
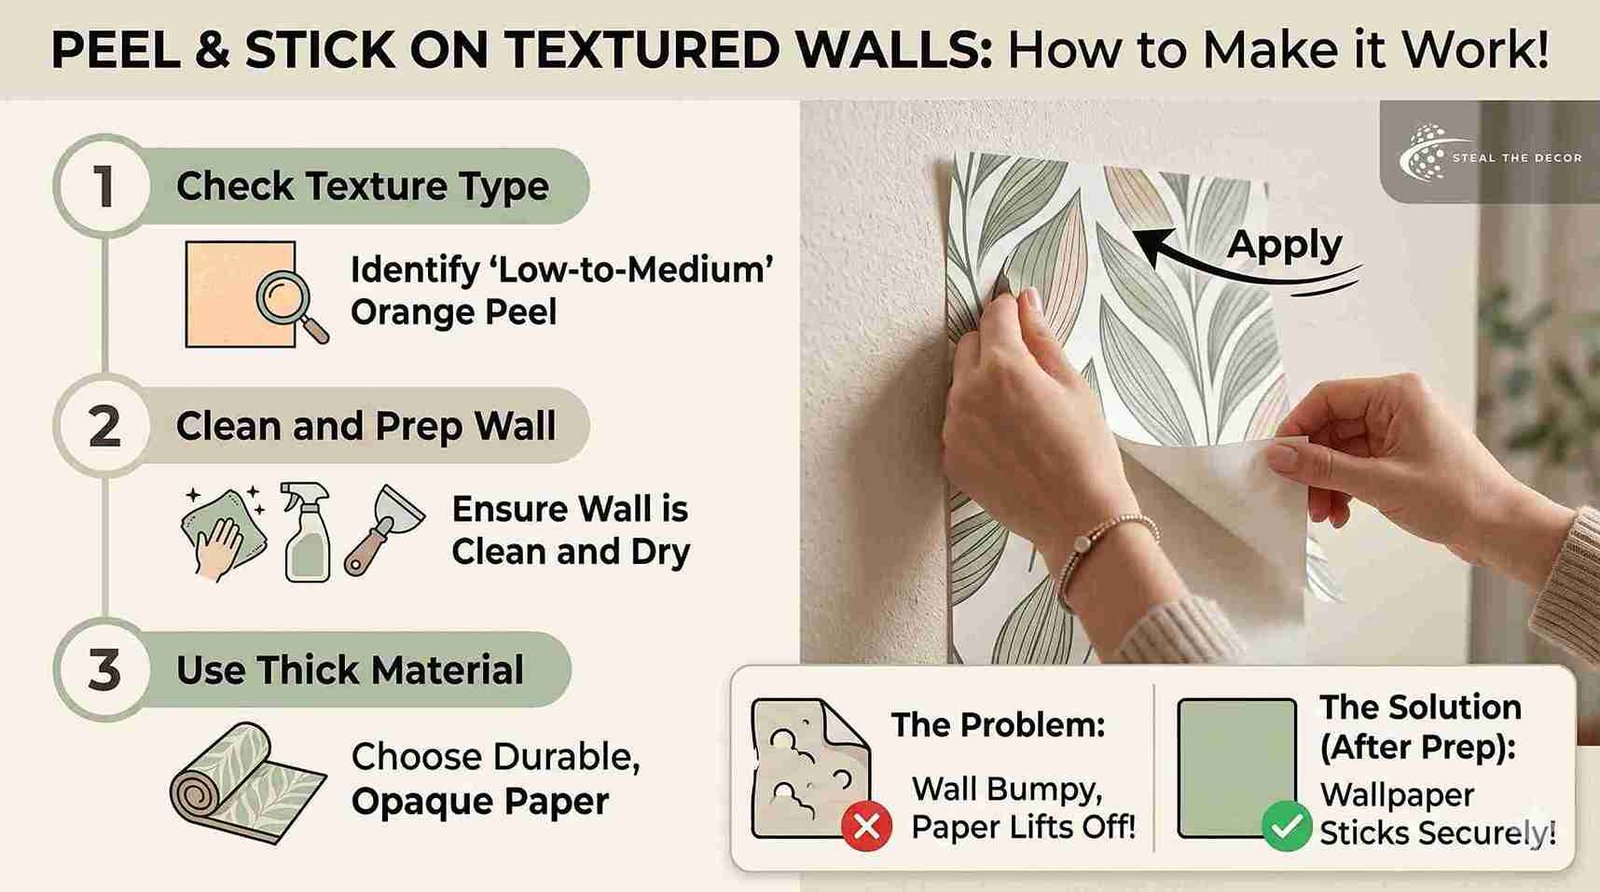
The wall in my Phoenix apartment had that bumpy orange peel texture every rental seems to come with, and I was holding a $34 roll of wallpaper that explicitly said: “for smooth surfaces only.” I put it up anyway. That roll bubbled, lifted, and eventually peeled right off within three days. But I didn’t give up. What I learned after five months of testing is that peel-and-stick wallpaper on textured walls can actually work—you just need the right texture type, proper prep, and thick enough material. Here’s everything I discovered through trial, error, and a few frustrating Sundays.
Can You Actually Use Peel-and-Stick Wallpaper on Textured Walls? The Honest Answer
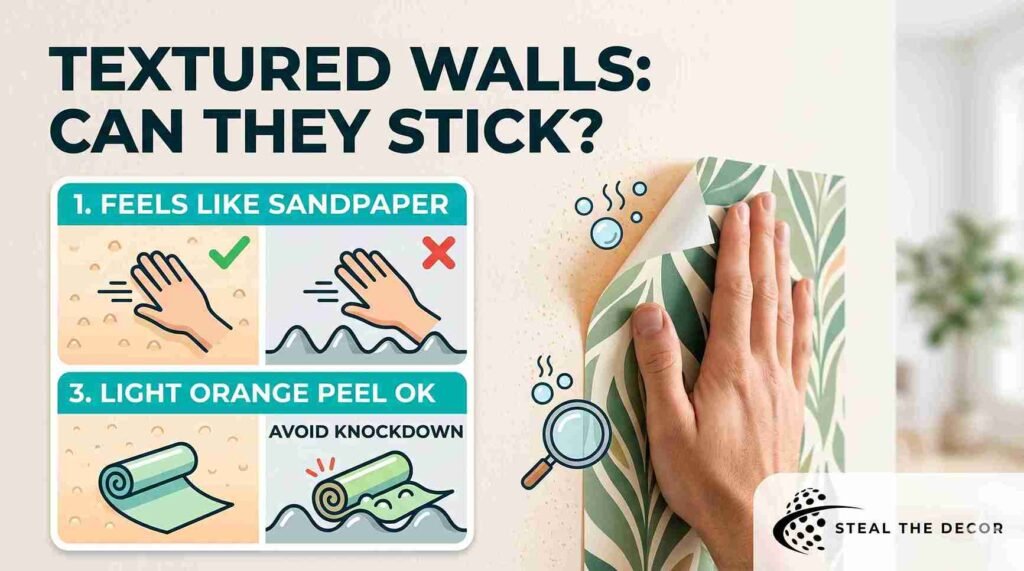
Peel-and-stick wallpaper on textured walls is possible, but only under specific conditions. The 5-second rule I developed after testing: run your palm across the wall. If it feels like fine sandpaper (light orange peel), you’re probably fine. If it feels like actual bumps catching your hand, the wallpaper will fail. I learned this after wasting that first roll on my bedroom’s knockdown texture.
The truth is that manufacturers don’t recommend it. But real life in American apartments rarely matches manufacturer ideals. I’ve had two accent walls hold up beautifully for over five months now, while one hallway attempt peeled off in under a week. The difference came down to texture type, prep work, and wallpaper quality—things I’ll break down completely below. Just don’t expect perfection on anything beyond light orange peel.
Understanding Wall Texture Types: Know Your Wall Before You Shop
Most American homes built after 1970 have textured walls. Builders love it because it hides drywall imperfections. Renters like me just see bumpy obstacles between us and a good accent wall. Here’s what you’re probably dealing with.
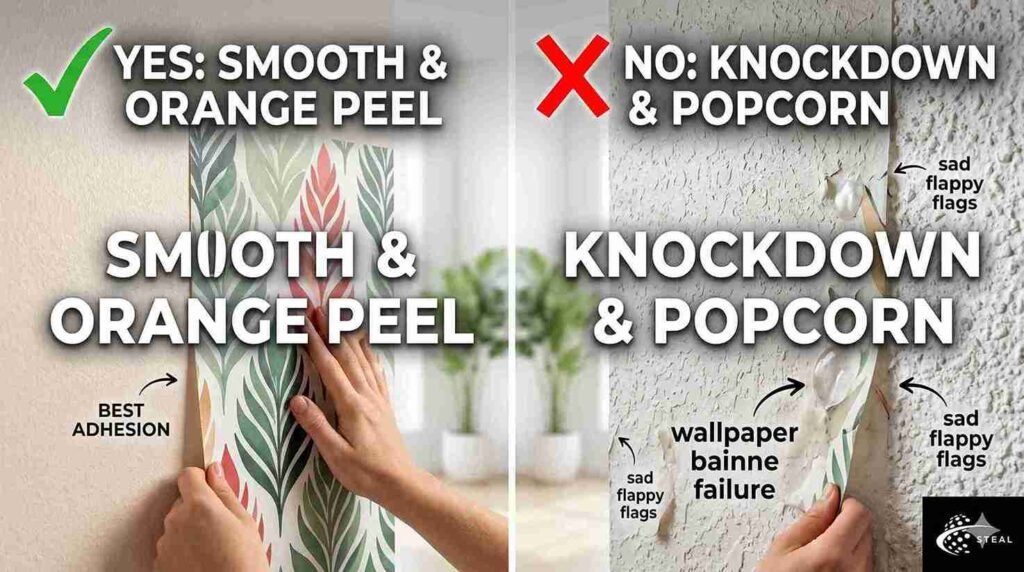
Orange peel texture is the most common in apartments and suburban homes. It looks like, well, orange skin—tiny dimples sprayed on with a hopper gun. This is your best-case scenario for adhesive wallpaper on bumpy walls. Light orange peel gives the adhesive enough flat surface to grip, while the slight texture actually helps hide tiny bubbles. My living room accent wall has this texture, and after five months, only one corner shows minor lifting.
Knockdown Texture sits right on the borderline. It’s created by spraying joint compound, then “knocking down” the peaks with a trowel. The result is a stucco-like pattern with flat areas mixed with raised ridges. I tried wallpaper on my hallway’s knockdown texture, and it failed within days. The ridges created air pockets that the adhesive couldn’t bridge. If you have this, you’ll need a wall liner for wallpaper first — I’ll cover that later.
Skip trowel texture is the risky cousin of knockdown. It’s hand-applied with a trowel in random sweeping motions, creating irregular peaks and valleys. Wallpaper adhesive bonds to the peaks but floats over the valleys, leaving visible gaps. I wouldn’t recommend attempting peel-and-stick on a skip trowel without significant surface preparation. A friend tried it in her Tucson condo and ended up with what she called “sad, flappy wallpaper flags.”
Popcorn texture is the ceiling stuff, though some older homes have it on walls too. Those chunky, cottage-cheese-like bumps are your worst enemy. Adhesive wallpaper simply cannot conform to that much irregular surface area. You’ll get maybe 10% contact at best. Don’t waste your money. I grabbed a smoothing tool kit from Amazon for $12.99 to test on a popcorn-textured closet wall — total failure, and I knew it would be. But I had to try.
Smooth Finish is self-explanatory and ideal. Level 5 drywall finish, skim-coated walls, or sanded-smooth surfaces give the adhesive full contact. If you have smooth walls, literally any peel-and-stick wallpaper will work for you. Enjoy your privilege. For the rest of us with textured walls, understanding exactly what type you’re dealing with is the first step toward hiding textured walls successfully.
Will Peel-and-Stick Wallpaper Stick to My Textured Walls? Critical Factors
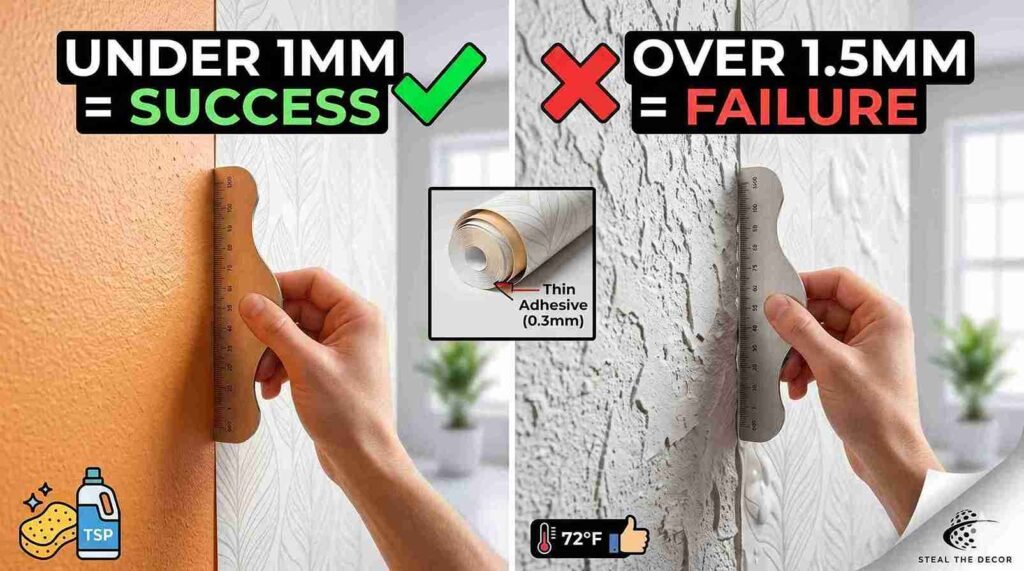
Texture depth matters more than anything else on this list. I measured my walls with a $7 contour gauge from Walmart—the kind woodworkers use. The orange peel measured about 0.5 mm in depth. Knockdown hit 1.5mm. That single millimeter difference determined success or failure. Anything under 1mm depth has a fighting chance. Above that, you’re gambling. The adhesive layer on most peel-and-stick wallpaper is only about 0.3mm thick. It simply can’t fill deep valleys.
Wallpaper material quality is where I initially tried to save money and paid for it. My first roll was some $14 no-name brand from Amazon—thin, PVC-based, with weak adhesive backing. It peeled within 48 hours, with an orange peel texture. The second attempt used RoomMates Decor’s thicker vinyl line ($29.99 per roll at Target), and the difference was night and day. Thicker material has more body, resists curling, and has a substantially stronger adhesive layer. Fabric-backed options performed even better, though they cost more. If you’re serious about making this work, don’t cheap out on material thickness.
Surface preparation sounds boring, but it’s the silent killer of wallpaper dreams. Dust, cooking grease, and even invisible residue from previous cleaners create a barrier between the adhesive and the wall. I cleaned my test wall three times: once with a dry microfiber cloth, once with a TSP substitute (bought at Home Depot for $5.48), and once with plain water. The difference in adhesion compared to my “quick wipe” attempt was dramatic. Also, temperature matters. I applied one panel on a 55°F December morning, and it bubbled by evening. The same wallpaper, applied on a 72°F afternoon, is still up months later. Cold walls reject adhesive. Proper wallpaper adhesion tips like these made all the difference between my failures and successes.
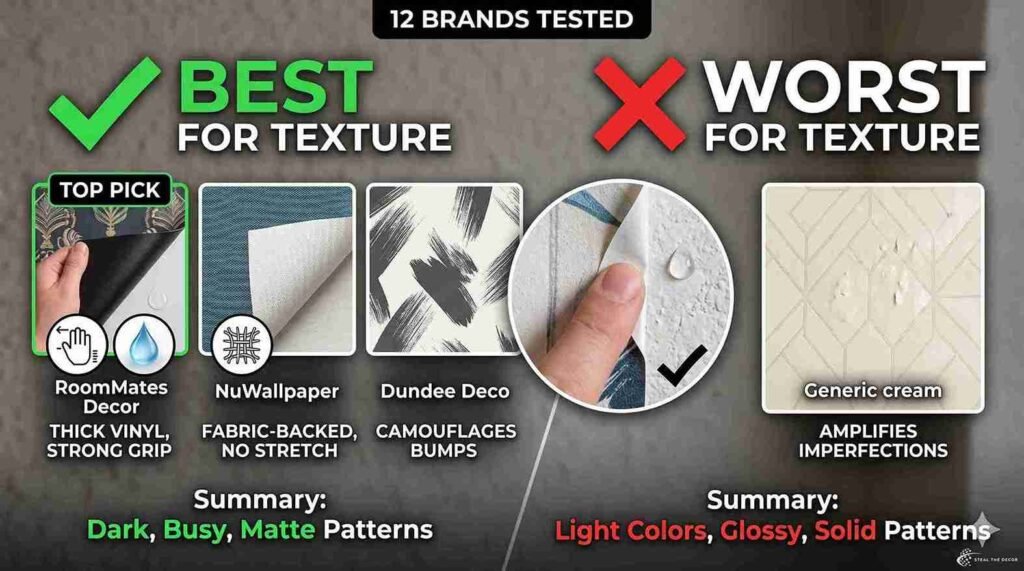
The Best Peel and Stick Wallpapers for Textured Walls (After Testing 12 Brands)
I went a little obsessed with this experiment. Over two months, I ordered twelve different peel-and-stick wallpaper samples from Amazon, Target, and Home Depot. Some were cheap disasters. A few surprised me. Here’s what actually worked on my orange-peel-textured walls.
Roommates Decor Peel-and-Stick Wallpaper was the overall winner. Picked up a roll at Target for $29.99. The vinyl is noticeably thicker than budget options, and the adhesive has this almost grippy, gel-like quality. It’s not fabric-backed, but the thickness compensates well. My accent wall behind the couch has held up through summer heat and AC cycles with zero edge lifting. Minor downside: the pattern selection skews more traditional. If you want modern or moody designs, options are limited.
NuWallpaper by WallPops worked surprisingly well for a brand I expected to be overhyped. Bought a roll on Amazon for $34.99. It’s fabric-backed, which gives it excellent dimensional stability—it doesn’t stretch or warp during application. The adhesive is aggressive enough for a light texture, but it didn’t damage my wall during a test removal. One “meh” note: the seams are slightly more visible than I’d like on textured surfaces, especially with lighter patterns. I kept the roll but probably wouldn’t rave about it to friends.
Dundee Deco Falkirk Brushed was my dark horse favorite. Found it on Amazon for $27.95. The pattern has this intentionally brushed, slightly weathered look that naturally camouflages any texture showing through. Darker colors with visual “noise” in the pattern hide imperfections brilliantly. A smooth, solid-colored wallpaper will show every bump underneath. This one’s textured design masks those issues completely. The actual material is mid-weight vinyl — not the thickest, but the pattern strategy compensates.
The pattern and color strategy deserves its own mention. Dark, busy patterns with matte finishes hide texture show-through remarkably well. Light colors, high-contrast patterns, and anything glossy will amplify every imperfection underneath. I made this mistake with a cream-colored geometric print that looked like it had chickenpox after application. Lesson learned. For budget-friendly wallpaper that actually works on texture, choosing thick vinyl wallpaper with forgiving patterns is your safest bet.
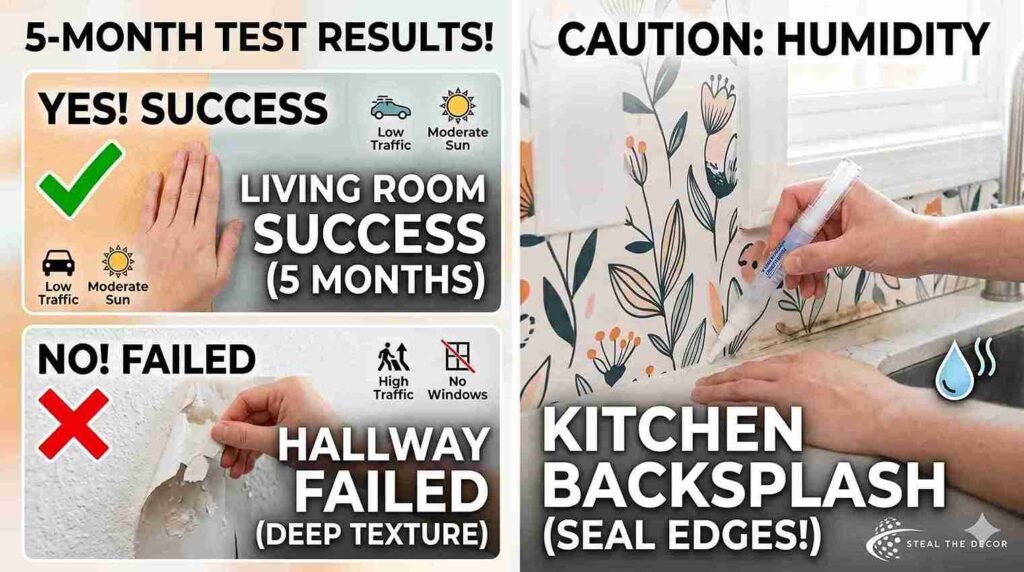
My 5-Month Real-Life Test: Does It Actually Hold Up?
I installed three test panels in different areas of my apartment on March 15th. Living room (orange peel, moderate traffic, indirect sunlight). Hallway (knockdown texture, high traffic, no windows). Kitchen backsplash area (orange peel, high humidity, direct morning sun). Same Roommates’ wallpaper, same prep routine. I was testing wallpaper samples in real conditions, not just slapping them up and hoping.
The living room panel is still up and looks 90% as good as day one. There’s a tiny 1/4-inch lift on the bottom right edge where my vacuum bumpers hit occasionally. That’s it. Five months of Phoenix summer heat and AC cycling, and it’s fine. I’m genuinely surprised.
The hallway panel failed dramatically. Knockdown texture was simply too much. Edges lifted within four days, center bubbles formed by week two, and by week three, I pulled it down in frustration. This is where I learned the hard texture lesson: wallpaper adhesive needs surface contact, not air gaps. When peel-and-stick wallpaper fell off in that hallway, it was a clean removal at least; the texture underneath stayed intact.
The kitchen backsplash area taught me about humidity. The wallpaper held up structurally — no peeling or bubbling — but the edges near the sink developed slight discoloration from water splashes. I resealed them with a clear acrylic edge sealer (Gardner-Gibson, $8.97 at Home Depot), and that solved the problem. Direct morning sun also slightly faded the color near the window by month four. If you’re applying near windows, UV-resistant patterns or window film might help. These long-term wallpaper results taught me more than any tutorial ever could.
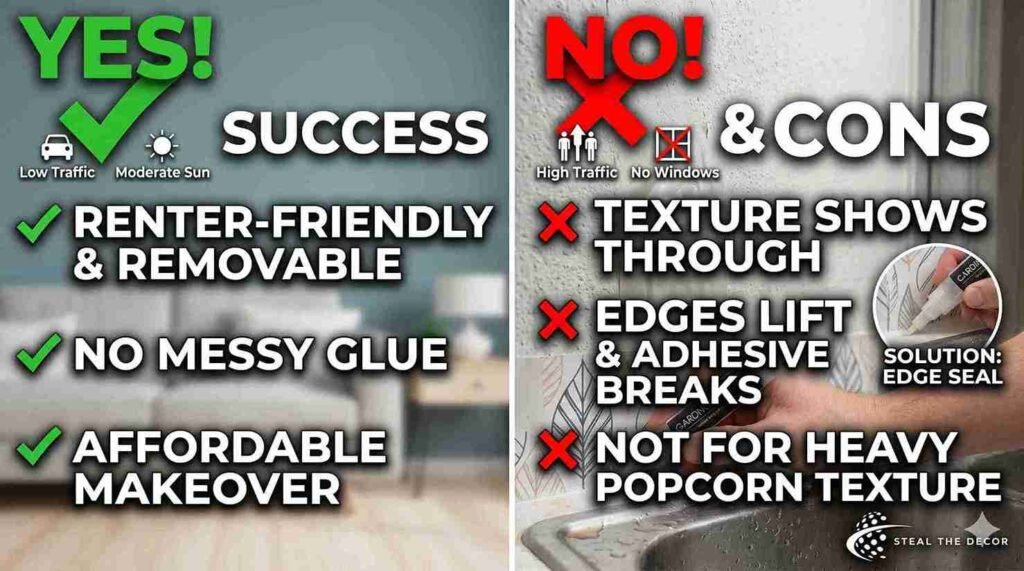
Pros and Cons of Using Peel and Stick Wallpaper on Textured Walls
| Pros | Cons |
| Renter-friendly and fully removable without damage | Texture may show through lighter or solid-color patterns |
| No messy glue, paste, or professional tools needed | Edges can lift over time, especially in high-traffic zones |
| Affordable room makeover — $30-40 per roll covers a significant area | Direct sunlight and high heat cause adhesive breakdown |
| Instant gratification — one afternoon transforms a room | Not suitable for heavy textures like popcorn or deep knockdown |
| Easy to change when you’re bored with the look | Seams are more visible on bumpy surfaces |
| Dark, busy patterns effectively hide wall imperfections | Humidity exposure requires edge sealing maintenance |
The wallpaper’s pros and cons genuinely lean positive if your texture is light enough. That said, don’t expect a magazine-perfect finish. There will be small imperfections. The texture will subtly show through certain lighting conditions. For me, the tradeoff is worth it—I’d rather have a 90% perfect accent wall than stare at beige rental walls for another year. The negatives of peel-and-stick wallpaper are real but manageable if you know what you’re getting into.
Step-by-Step Guide to Apply Peel and Stick Wallpaper on Textured Walls
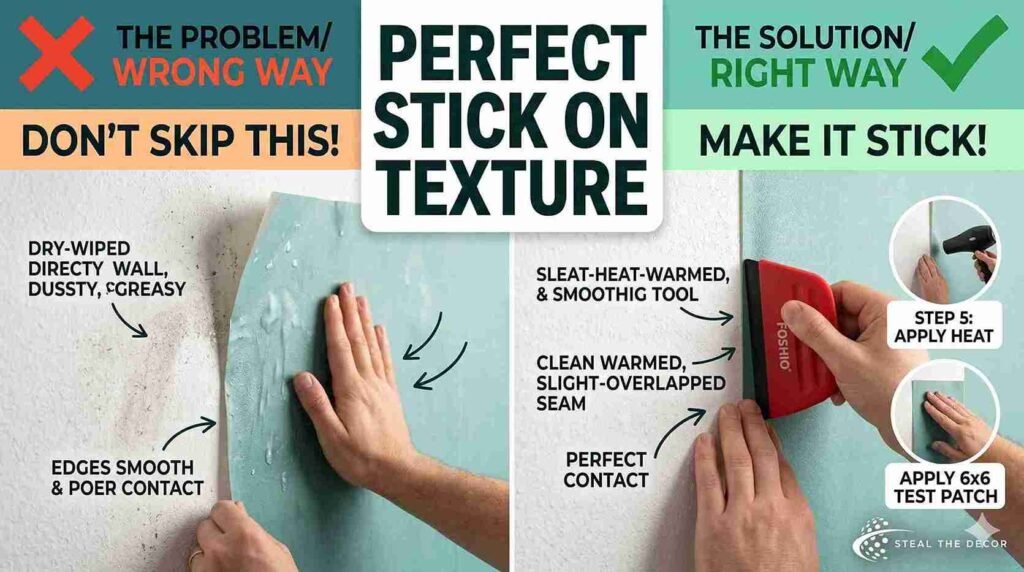
Step 1: Clean the wall thoroughly. I used the TSP substitute from Home Depot ($5.48) mixed with warm water. Wipe down every inch, then rinse with clean water. Let it dry completely—at least 4 hours in dry climates and overnight in humid areas. Any dust or grease residue creates a weak bond point. I skipped this step on my first attempt and paid for it.
Step 2: Test a small patch for 48 hours. Cut a 6×6-inch sample piece and stick it to the most textured part of your wall. Press it down firmly with a smoothing tool. Check it after two full days — look for lifting edges, bubbles, or adhesion failure. This small step saved me from committing to a full wall that would have failed. Don’t skip it. Testing wallpaper samples before full installation is the smartest DIY move you can make.
Step 3: Use a smoothing tool, not your hands. Your fingers create uneven pressure. I bought the FOSHIO Smoothing Tool Kit for $9.99 on Amazon, and it made the application dramatically smoother. Work from the center outward, pushing air toward the edges. On textured walls, go slower than you think necessary — the adhesive needs extra pressure to conform to bumps.
Step 4: Overlap seams slightly in textured areas. Smooth walls can handle butt-joint seams. Textured walls can’t. I overlap seams by about 1/16 inch—just enough that the texture underneath doesn’t create visible gaps between panels. The overlap is invisible with dark or busy patterns. With light, solid colors, it might show slightly.
Step 5: Apply heat to edges for better adhesion. After the panel is up, run a hairdryer on medium heat along all edges for about 30 seconds per foot. Then press firmly with the smoothing tool again. The heat reactivates the adhesive and helps it conform to the texture. I discovered this trick on a random DIY forum, and it genuinely works—my heat-treated edges have zero lifting after five months. This is how to make wallpaper stick when nothing else seems to work.
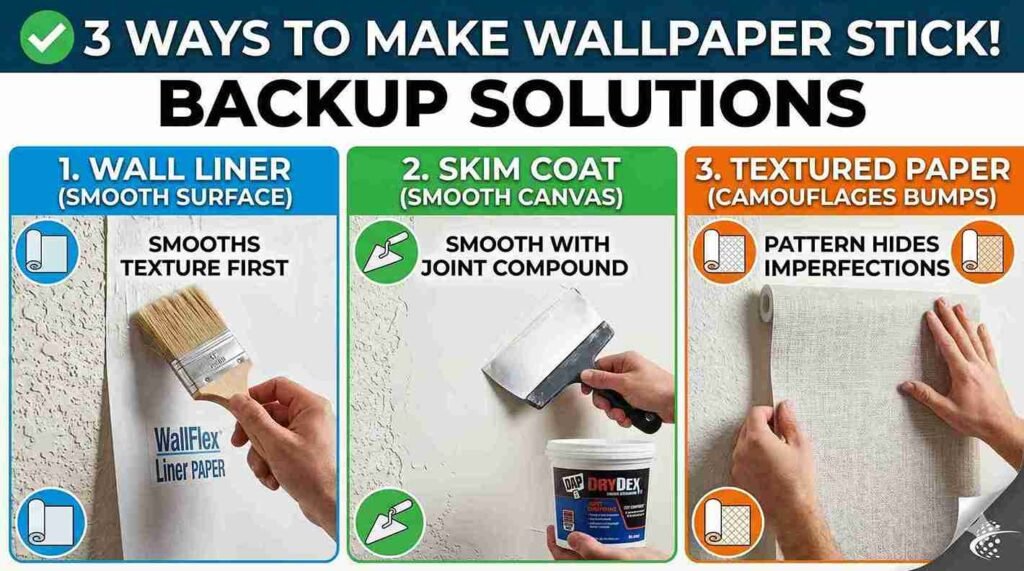
What If It Doesn’t Stick? 3 Reliable Backup Solutions
Sometimes the wallpaper just won’t cooperate. Maybe your texture is borderline. Maybe the adhesive isn’t strong enough. Before you give up entirely, try these backup options that I tested after my hallway failure. There are wall covering alternatives that can rescue your project.
Option 1: Install a thin wall liner first. Wall liner is a bridging material — essentially thick, paintable wallpaper that creates a smooth surface over texture. I used WallFlex Liner ($24.99 per roll at Home Depot) on my hallway after the initial failure. It’s not peel-and-stick—you apply it with paste—but once dry, it creates a smooth surface that peel-and-stick wallpaper adheres to beautifully. The tradeoff: it adds a step and isn’t as easily removable.
Option 2: Apply a light skim coat to smooth walls. For small areas like accent walls, skim coating with joint compound creates a smooth canvas. I did this on a bathroom wall using DAP DryDex Spackling ($8.47 at Walmart). Sand it smooth after drying, prime it, then apply your wallpaper. It’s labor-intensive but effective. The downside: it’s not reversible like peel-and-stick alone, so check with your landlord first. Learning how to smooth a textured wall for peel-and-stick wallpaper takes patience but delivers the best results.
Option 3: Choose textured or embossed peel-and-stick wallpaper. This is the clever workaround. Some peel-and-stick wallpapers come with their own dimensional texture—a linen look, grasscloth, or embossed patterns. These intentionally hide wall imperfections because the wallpaper itself isn’t flat. I tested the Arthouse Linen Texture Peel and Stick ($32.99 at Target), and it masked my knockdown texture surprisingly well. The wallpaper’s own texture camouflages what’s underneath.
Maintenance Tips: How to Keep Peel and Stick Wallpaper Looking Fresh on Texture
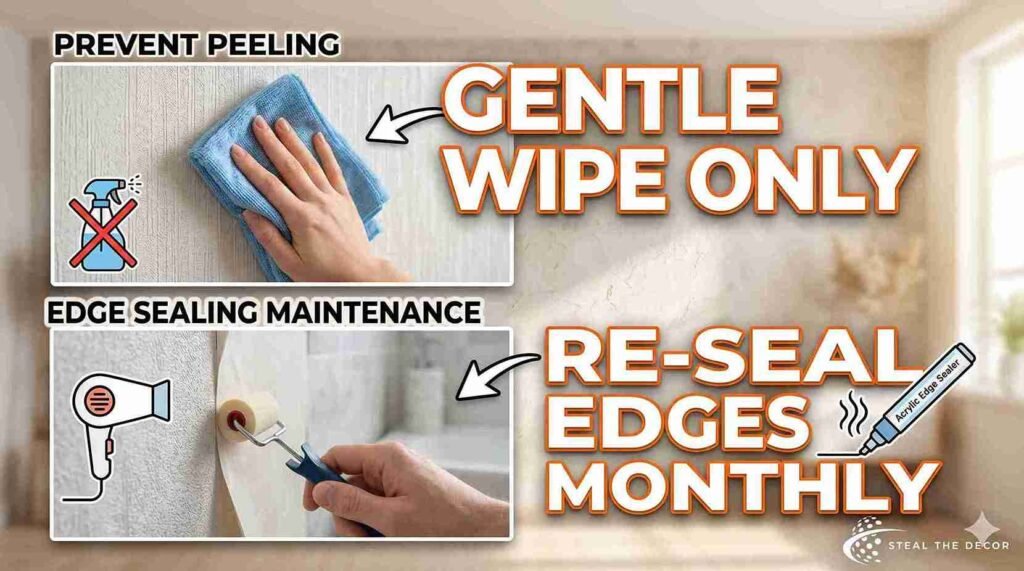
Cleaning textured-wall wallpaper requires a gentle touch. I use a barely damp microfiber cloth—emphasis on barely—and wipe gently in one direction. Scrubbing or circular motions can catch edges and start lifting. For stubborn marks, a tiny dot of mild dish soap on the cloth works, but rinse the area with plain water afterward. Never use spray cleaners directly on the wallpaper surface.
Edge maintenance is an ongoing thing, not a one-time fix. Every few weeks, I run my finger along the seams and edges. If I feel any lift starting, I use a small craft roller ($4.99 at Michaels) to press it back down. For edges that lift repeatedly, the hairdryer trick reactivates the adhesive temporarily. In high-humidity areas like bathrooms, I reapply a thin line of clear acrylic edge sealer every three months. It takes five minutes and prevents the slow peel that humidity causes. If you’re using wallpaper for bathroom walls, this maintenance routine is non-negotiable.
Frequently Asked Questions About Peel and Stick Wallpaper and Textured Walls
Can you apply peel-and-stick to textured walls?
Yes, you can apply peel-and-stick wallpaper to textured walls, but only if the texture is light—like orange peel. Heavy textures like popcorn or deep knockdown will cause the wallpaper to fail because the adhesive can’t make enough surface contact. I’ve successfully kept it on my orange peel walls for over five months with proper preparation. The key is testing a small patch first and using thick, high-quality wallpaper rather than budget options
How to get peel-and-stick to adhere to textured walls?
Getting peel-and-stick wallpaper to adhere to textured walls requires three critical steps: thorough cleaning to remove all dust and grease, using a thick vinyl or fabric-backed wallpaper with strong adhesive, and applying heat with a hairdryer along all edges after installation. I also found that overlapping seams by 1/16 inch prevents gaps that form when the wallpaper settles into texture valleys. Temperature matters too — apply it in a room that’s at least 68°F for best adhesion results.
How to smooth a textured wall for peel-and-stick wallpaper?
You can smooth a textured wall for peel-and-stick wallpaper using either a skim coat of joint compound or a wall liner. I tested both methods. The skim coat approach involves spreading thin layers of joint compound over the texture, sanding smooth, and priming before applying wallpaper. The wall liner method uses a thick, paste-applied liner paper that bridges over the texture to create a smooth surface. The wall liner is faster but less removable. Skim coating takes more work but gives you a perfectly smooth canvas that any wallpaper will stick to.
What wallpaper works best on textured walls?
The best wallpaper for textured walls is thick vinyl or fabric-backed peel-and-stick wallpaper with dark, busy patterns. I tested 12 brands and found RoomMates Decor ($29.99 at Target), NuWallpaper ($34.99 on Amazon), and Dundee Deco Falkirk Brushed ($27.95 on Amazon) performed best on orange peel texture. The common factor was material thickness—thicker wallpaper resists curling and has stronger adhesive. Dark, matte patterns also hide texture show-through much better than light or glossy designs.
Can I put peel-and-stick wallpaper on textured walls?
You can put peel-and-stick wallpaper on textured walls, but success depends entirely on your texture type. A light orange peel texture works well with proper preparation and quality wallpaper. Knockdown texture is borderline and usually needs a wall liner underneath. Popcorn and skip trowel textures will almost certainly cause failure. I wasted $34 learning this distinction in my knockdown hallway. Before buying multiple rolls, test a single sample piece on your specific wall for at least 48 hours.
What are the negatives of peel-and-stick wallpaper?
The main negatives of peel-and-stick wallpaper are edge lifting over time, visible seams on textured surfaces, texture show-through with light or solid-color patterns, adhesive breakdown from direct sunlight or humidity, and the fact that it simply won’t work on heavy textures like popcorn or deep knockdown. I’ve experienced all of these issues during my testing. The edge lifting is manageable with occasional maintenance. The texture show-through drove me crazy on one cream-colored pattern. But for renters wanting temporary, damage-free decor, the positives still outweigh these drawbacks.
Conclusion
The wallpaper is still up in my living room as I write this. Five months, one Phoenix summer, and countless vacuum bumper hits later. It’s not perfect — there’s that one corner I mentioned, and if you look closely in late afternoon light, you can faintly see the orange peel texture beneath. But it transformed a beige rental box into something that feels like my space. That tradeoff was worth every failed test panel. This DIY wall covering project taught me patience, and honestly, I’d do it again tomorrow.
Have you tried peel-and-stick wallpaper on your textured walls? I’d love to know what worked—or what failed spectacularly. Drop your experience in the comments. Especially if you found a brand I haven’t tested yet. I’m always looking for the next experiment.
About the Author: Marcus Chen is a rental apartment dweller in Phoenix, Arizona, who has painted, wallpapered, and accidentally damaged more walls than he’d like to admit. He keeps a $7 contour gauge in his toolkit at all times and once spent an entire Saturday measuring wall texture depths across his apartment complex. His cat, Toast, supervised none of the wallpaper experiments but knocked over three rolls anyway.