
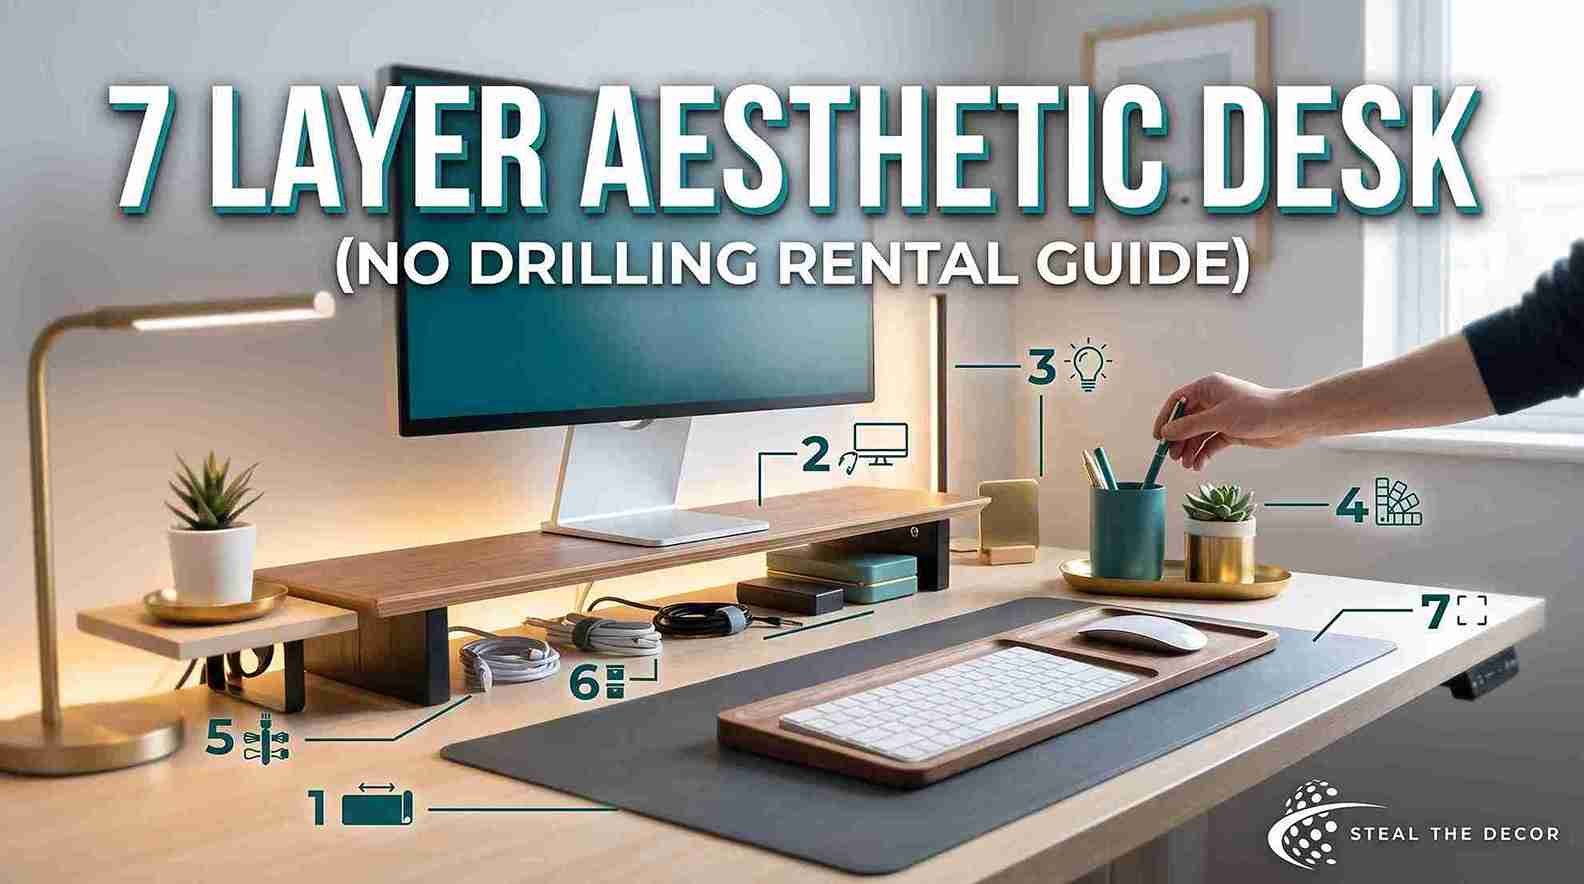
Table of Contents
Affiliate disclosure: some links below are affiliate links, which means I may earn a small commission at no extra cost to you. I only link products I have paid for and used in my own rental apartment.
Two hundred dollars of pretty desk accessories sat in a pile on my bedroom floor last spring, and my aesthetic desk setup still looked like a college dorm. The acrylic pen holder, the little wooden tray, the faux plant, all of it. The desk underneath was still gray particleboard, still lit by one yellow ceiling bulb, still trailing a charger cable down the wall like a vine.
My apartment is a 620 square foot one bedroom in Columbus with beige walls I am not allowed to paint and a lease clause that caps me at picture nails. The desk sits in the corner of the bedroom because there is no separate home office. I work from home four days a week, so that corner decides how my whole day feels.
Three weekends went into rebuilding it from scratch, and I tested every part of the process in a room where drilling is off the table. Six methods, two failures, one final layout that has not changed since March. What I found is that a good workspace is not a shopping problem. It is a layering problem, done in order, and the order matters far more than the budget. Here is the exact method, the real cost breakdown, and the two things that fell apart on me.
The Short Version: An aesthetic desk setup is built in seven layers: desk surface, screen height, lighting, color palette, cable management, contained storage, and negative space. Renters can finish all seven with no drilling by using a desk mat, a monitor riser, a task lamp, adhesive-backed LED light strips, and one wooden tray. A full damage-free build usually costs $120 to $250.
What an Aesthetic Desk Setup Actually Is, and Why Renters Get It Wrong
An aesthetic desk setup is a workspace where surface, lighting, storage and empty space are chosen together, not a desk with desk decor dropped on top. That one distinction is the whole article. Most desk setup ideas online sell you objects. Objects are the last layer, not the first.
Renters get stuck because the parts that make a room feel designer are the parts a lease usually blocks. You cannot paint the wall behind the desk. You cannot mount a shelf or hide cables inside the drywall. You cannot swap the ceiling fixture. So the fix has to happen on and around the desk itself, with removable and tension-mounted pieces that come off clean on move-out day.
Here is the part nobody mentions. Your desk top is roughly nine square feet your landlord has no opinion about. That is enough space to change how the whole corner reads, whether your taste runs minimalist, cozy, boho, pastel or kawaii. I rebuilt mine three separate times before the layering order clicked, and version three is the one friends ask about.
The 7 Types of Aesthetic Desk Setups, and How to Tell Which One You Are
There are seven desk styles renters ask about most, and each one changes the material and color choices in the layers below. Pick your style before you buy anything.
- Minimalist. One color family, bare surface, hidden cables, no more than three objects out. Best for small rooms and anyone who works better with a clear field of view.
- Cozy warm. Wood, linen, a lamp with a fabric shade, one plant. This is the style people mean when they say a room should feel warm, and it hides a cheap desk better than any other.
- Beige and neutral. Sand, cream and off-white with one black accent. The safest style for a rental because it reads calm against builder beige walls instead of fighting them.
- Boho. Terracotta, rattan, brass and a trailing plant. Texture does the work here, so the desk mat matters more than the accessories.
- Kawaii and pastel. Lilac, cream and soft pink with cute acrylic storage. The one rule is to keep the shapes matched so the cuteness does not read as clutter.
- Gaming. Mechanical keyboard, extended mouse pad, one accent color of RGB instead of a full rainbow. A gaming corner can still look calm when the light is held to one hue. An anime or landscape print mat is the usual swap here for a plain one.
- Creator. Camera, ring light and cable runs planned for a clean shot on screen. Layer five carries the most weight in this one.
Why Most Desks in Setup Photos Face a Wall
Desks in styled photos face a wall because a wall gives the camera a controlled backdrop and gives the person fewer distractions in their sight line. In a rental that choice has a practical upside. A desk against a wall keeps the cable run short and lets one adhesive light strip on the riser light the whole scene. A desk facing a window looks better in person and photographs worse, since the backlight blows out the shot.
Bottom line: fix the surface, the light and the empty space first, and the cute pieces will finally look like they belong.
Does This Method Hold Up in a Rental Where You Cannot Drill or Paint?
Yes, with two honest limits. Every layer below mounts to the desk, sits on the floor, plugs into an outlet, or sticks with removable adhesive. Nothing needs a wall anchor, which is the metal sleeve you normally hammer into drywall to hold weight.
Here is where it holds. On smooth painted drywall, Command Picture Hanging Strips by 3M and Command Cord Clips by 3M carry light items and pull off cleanly when removed slowly and straight down, which matches the official 3M Command removal instructions. On a flat desk top, a desk pad and a monitor riser need no fixing at all. Plug-in lighting sidesteps the ceiling fixture completely.
Here is where it does not. Adhesive fails on textured walls, the bumpy orange peel or knockdown finish common in older buildings, because the sticky pad only touches the high points. I lost an LED light strip that way in week one. It hung two days then peeled off in a slow curl at 1 a.m. Adhesive also fails on unsealed raw wood and on paint newer than about three weeks, since fresh paint has not cured and lifts in a sheet.
The workaround on textured walls is to keep every light and cable run on the desk and the furniture instead of the wall. That is what I did, and my deposit survived. If your walls are smooth and you want the wall behind the desk to carry some of the look too, the same adhesive logic powers renter-friendly accent wall ideas in the rest of the apartment.
Bottom line: run your lighting and cables along furniture, not textured walls, and the whole build stays deposit-safe.
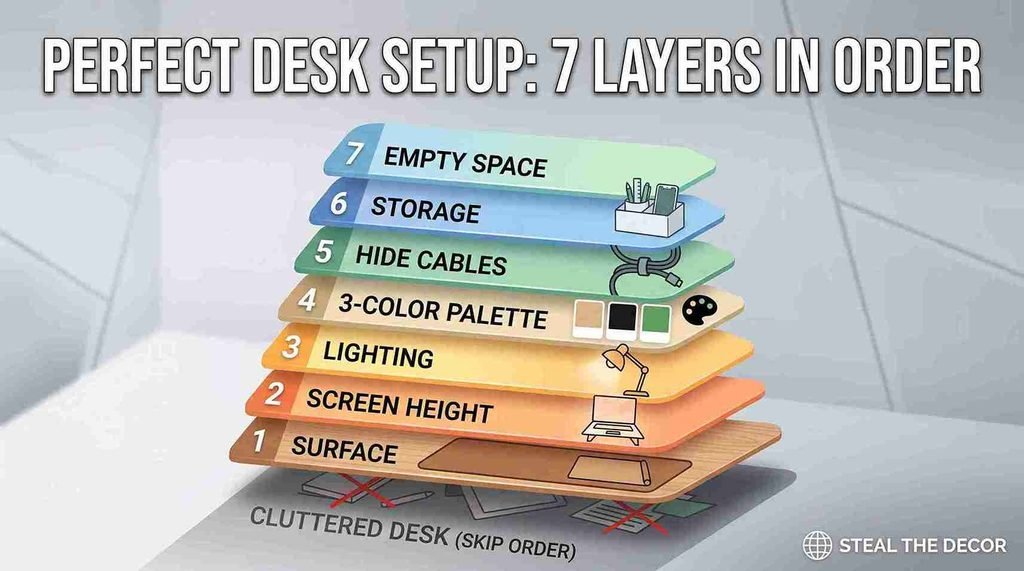
The 7 Layers of a Desk Setup, Built in Order
Build these layers in sequence. Skipping ahead is exactly why most desk setups look cluttered instead of calm.
- Desk surface. Cover the desk top first, because the surface sets color and texture for everything above it. A large office desk mat in felt, cork or vegan leather hides scratched particleboard instantly and gives the whole office setup a defined edge. I use a 31 by 15 inch mat in warm sand, and a wide blotter style pad does the same job for a study desk. Budget desk pads start near $18. Two sizes cover almost every rental desk: 31.5 by 15.7 inches for a standard desk and 35.4 by 15.7 inches when you run a monitor plus a laptop. Pattern is where your style shows. Plain faux leather and PU leather read minimalist, while scalloped edges, checkered gingham and small floral prints read cute and cottagecore. If your desk is already solid walnut or oak, skip the mat and let the wood grain carry the texture. A gel wrist rest or a keyboard wrist rest added at the front edge takes pressure off your wrists and costs about $10.
- Screen height. Raise the screen so the top of the display sits near eye level, which fixes your neck and the visual line of the desk at the same time. A monitor riser or laptop stand creates a second level, and that second level is what makes a laptop setup look planned instead of dumped. The Rain Design mStand in aluminum (typically $45 to $60) is what I bought after a $15 acrylic stand flexed under my MacBook. The riser also opens storage underneath, which layer six uses. Four riser formats exist and each suits a different desk. A plain wood or bamboo shelf with acrylic legs suits a small surface. A riser with a drawer and two pen holders doubles as layer six storage. A dual monitor riser spans a wide desk. A vertical laptop dock in solid walnut works when the laptop stays closed and feeds an external screen. A monitor arm is the non-renter version and usually needs a desk clamp, so measure your desk thickness first.
- Lighting. Add one task lamp plus one indirect light, because a single overhead bulb is what makes a rental desk look flat and yellow. A matte black or cream desk lamp with an adjustable arm covers working light, and a small table lamp with a fabric or glass shade does the same job with a softer read. Three lamp formats suit a rental. A clamp-mount gooseneck LED lamp frees surface space and needs no drilling. A weighted architect style task lamp sits on the desk and tilts where you need it. A cordless rechargeable mushroom lamp adds ambient light in a corner with no outlet nearby. An LED light strip along the back edge of the riser covers the glow. Govee LED Light Strips and Philips Hue Lightstrip run about $20 to $70 depending on length and smart features. Warm white near 2700K reads aesthetic cozy. Cool white reads like a dentist office. The American Optometric Association links glare and weak task lighting to most screen eye strain, so this layer buys comfort and productivity along with looks.
- Color palette. Pick three colors and stop, because a beige aesthetic desk or any neutral scheme works through repetition, not variety. Mine is sand, black and green: sand mat, black lamp and mechanical keyboard, green plant. A boho version might run terracotta, cream and brass. A kawaii or pastel version might run lilac, cream and soft pink. A gaming corner can still follow this rule by holding RGB to one accent color instead of a full rainbow. Whatever you pick, every new item joins the three or it goes back in the box.
- Cable management. Route every cable to one corner and out of sight, because visible cables cancel out every other layer. Adhesive clips along the back edge, a zip-up sleeve for the bundle, and a power strip mounted under the desk top with heavy duty strips will handle a full setup. Anker clips and ties run about $8 to $18 a set. Test one clip for 48 hours before you commit to a dozen.
- Contained storage. Give every small object a container, because loose pen and pencil piles read as mess no matter how nice the desk is. One wooden tray or desk organizer holds daily items. One pen holder in ceramic, concrete, resin, silicone or acrylic holds writing tools. Matched organizer sets of three, usually a pen holder plus a paperclip tray plus a sticky note holder, keep the shapes consistent so a full desk still reads calm. A clear acrylic or khaki phone stand keeps the phone from floating, and a small tray holds earbuds and their case. Grovemade sells walnut desktop storage at the high end (roughly $70 to $130) and IKEA and Target Threshold sell similar shapes under $25. Three containers is usually plenty for a desk set this size.
- Negative space. Leave at least one third of the surface completely empty, because negative space is the layer that separates a styled desk from a full one. This is the free layer and the one everyone skips. When I cleared my right third down to bare mat, the same aesthetic desk accessories suddenly looked intentional.
Want the wall to pull weight too? One oversized print hung with the method in my post on oversized prints for apartments does more for a corner than five small frames, and the same no-nail approach works for a grouped frame arrangement without nails if you prefer a grid of smaller pieces. A single panel of removable wallpaper behind the desk is the third option.
Desk Decor Trends Worth Copying in a Rental
Four current desk decor trends work without a single hole in the wall. Warm neutral palettes have replaced cool gray, which is why sand and cream mats outsell black ones now. Natural material mixing is the second, meaning one wood piece plus one stone or concrete piece on the same surface. Hidden tech is the third, with cables sleeved and chargers moved under the desk instead of sitting on it. Low light greenery is the fourth, since pothos and ZZ plant survive apartments with one north window.
Skip the trends that need permanent hardware. Floating shelves, clamped monitor arms on thin desks and hardwired sconces all cost renters money or deposit. Most renters find the neutral palette and hidden tech trends deliver the biggest visual change for the least risk.
Where to Shop for Aesthetic Desk Accessories
Shop by price tier rather than by store, because the same shapes repeat across all of them. IKEA and Target Threshold cover trays, lamps and storage under $25. Amazon covers desk mats, LED light strips, phone stands and cable kits in the $15 to $40 range, and it is where most of my own build came from. Lamicall and KINGFOM sit in that same band for phone stands and PU leather caddies. Grovemade and Orbitkey sit at the top for walnut and vegan leather, roughly $50 to $130. Etsy is worth a look for handmade ceramic pen holders, resin sculptures and concrete organizer sets when you want one piece nobody else has.
Search by the exact words that describe your style, not by the word aesthetic alone. Terms like scalloped desk mat, checkered gingham mouse pad, concrete organizer set, bamboo monitor riser and walnut laptop stand return far better matches than a generic search.
How to Keep a Desk Cute and Practical at the Same Time
A desk stays cute and practical when every decorative object also does a job. A wooden tray corrals daily items. A ceramic pen holder holds pens. A plant improves the air and adds the only curve on a rectangular surface. Objects with no job are the ones that turn into clutter within a week. My rule after three rebuilds is simple. Each item earns its spot by function first, then by looks.
How to Get a Clutter-Free and Productive Desk
A clutter-free desk comes from a daily two minute reset, not from buying more storage. At the end of each work session, return every item to its container and wipe the mat. Keep an off-desk landing box for anything without a home. The one third empty rule from layer seven is what keeps the reset fast. I write more at this desk now than I did before, and the only change was the reset habit plus the empty third.
Bottom line: surface, height and light do eighty percent of the work, and the cute stuff is the last twenty.
Pro Tips for Renters:
- Buy the desk mat one size larger than you think. A mat that nearly reaches both desk edges reads deliberate, and a small mousepad floating in the middle reads like an afterthought.
- Put your LED light strip behind an object, never facing the room. Light bouncing off a wall looks soft, and a visible strip of diodes looks like a server rack unless that is the vibe you want.
- Warm up cheap furniture with one natural material. A single tray in real wood on a laminate desk changes the read of the whole surface for about $18.
- Photograph the desk with your phone before you style it. The camera flattens the scene and shows clutter your eye stopped noticing months ago.
- Keep one drawer or box off the desk as a landing zone for anything outside your three colors. Negative space only survives when the overflow has somewhere to live.
Step by Step: How to Make My Desk Aesthetic Without Damaging the Rental
Follow these seven steps in order. Each takes ten minutes to an hour, and the full build fits in one weekend afternoon.
Step 1. Clear the desk completely and measure it. Take everything off, wipe the surface, and measure width and depth in inches. Save the numbers in your phone before you shop. Common mistake: ordering a desk pad without measuring, then living with a large mouse pad that overhangs the front edge and catches your wrists.
Step 2. Lay the mat and set your zones. Put the mat down and split the surface into three zones in your head: work zone in the center, tools on one side, empty on the other. Place nothing yet. Common mistake: putting objects back in their old spots out of habit, which rebuilds the mess you just cleared.
Step 3. Set the screen height. Place the riser or laptop stand, then sit down. The top of the screen should land at or slightly below eye level, and your forearms should rest parallel to the floor. Common mistake: stacking books under a laptop as a permanent fix, which wobbles and blocks the airflow vents underneath.
Step 4. Mount the LED light strip with removable adhesive. Wipe the mounting surface with rubbing alcohol, let it dry five minutes, then press the strip along the back edge of the riser or the underside of a shelf. Hold each section thirty seconds. Common mistake: sticking the strip to a textured wall, where it holds a day or two and then peels. I lost mine exactly this way.
Step 5. Route and bundle the cables. Gather every cable at the back, sleeve them together, and clip the bundle to the underside of the desk with adhesive cord clips. Mount the power strip underneath, not on the floor. Common mistake: pulling cables taut, which pops clips off within a week. Leave a small loop of slack at every clip.
Step 6. Add the tray, pen holder and desk plant. Place the wooden tray first, then the pen holder beside or inside it, then one desk plant in the far corner. Pothos, snake plant and ZZ plant all survive low apartment light. Common mistake: choosing a plant that wants direct sun for a desk sitting three feet from a north window.
Step 7. Do the negative space edit. Remove one third of what is on the desk and live with it for two days before anything comes back. Most of it does not come back. Common mistake: treating this step as optional, which is the single biggest reason a desk full of nice pieces still looks busy.
Greenery can go up instead of out. The ceiling method in my post on trailing greenery with no drilling keeps a pothos above the desk and off the surface entirely.
Bottom line: the order is the method, and step seven is what makes the other six visible.
Common Mistakes Renters Make When They Decorate a Desk
Here is what trips most people up when they decorate this corner at home.
Buying accessories before fixing the surface. A ceramic pen holder on scratched gray laminate still reads as scratched gray laminate. Cover the desk with a mat or a wood top first, then shop. This was my $200 mistake and I still have the receipts.
Using one overhead light. A single ceiling bulb throws hard shadows and flattens every texture you paid for. Add a task lamp at desk level plus one indirect source and the same pieces look completely different.
Sticking adhesive to textured or freshly painted walls. Adhesive needs a smooth, cured surface to bond. On orange peel texture or paint newer than about three weeks, the pad either fails or takes paint with it. Test one strip in a hidden spot and wait 48 hours.
Mixing more than three colors. Every extra color splits the eye. Pick three, repeat them across the mat, the hardware and one accent, and let repetition do the styling.
Filling every inch. A full desk reads busy no matter how nice the objects are. Keep a third of the surface bare and defend it.
Mounting a power strip where you can see it. A visible power strip undoes the cable work you just did. Move it under the desk top with heavy duty adhesive strips rated well above its weight.
[Image: close up of cable clips and a sleeve under a desk edge · alt text: “cable management for an aesthetic desk setup without drilling”]
Quick question before you keep reading. Go stand at your bedroom door and look at the desk from ten feet back. What jumps out first, the screen or the cables? Whichever it is, that is your layer to fix this week.
Renter-Safe Desk Accessories I Actually Use
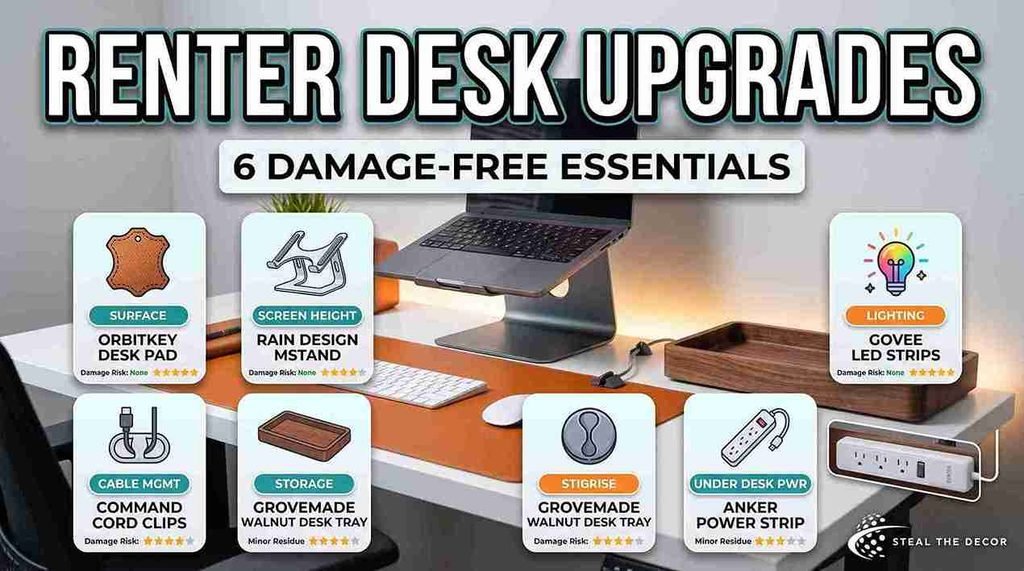
These are the six pieces in my own corner, listed by the layer each one serves rather than by price. I have paid for and used every one.
- Vegan Leather Desk Pad by Orbitkey serves layer one, the surface. Warm, wipeable, and it covers scratched laminate fully. Pros: heavy enough to lie flat out of the box. Cons: shows dust in darker colors. Damage risk: None. (typically $50 to $70)
- Rain Design mStand by Rain Design serves layer two, screen height. Solid aluminum with zero flex under a MacBook. Pros: no wobble. Cons: suits one laptop size well and not others. Damage risk: None. (typically $45 to $60)
- Govee LED Light Strips by Govee serve layer three, lighting. Dimmable warm white for the glow behind the riser. Pros: cheap and app controlled. Cons: factory adhesive fails on texture, so mount to furniture. Damage risk: Minor residue. (typically $20 to $40)
- Command Cord Clips by 3M serve layer five, cable management. Pros: remove cleanly from cured painted drywall when pulled slowly downward. Cons: they pop off when the cable is pulled tight. Damage risk: None on cured paint, Risk of paint damage on fresh paint. (typically $8 to $14)
- Walnut Desk Tray by Grovemade serves layer six, storage. Pros: real wood grain warms a cold desk instantly. Cons: highest price on this list. Damage risk: None. (typically $70 to $130)
- Anker Power Strip by Anker also serves layer five, under the desk. Pros: flat profile mounts easily underneath. Cons: needs heavy duty strips, not standard ones. Damage risk: Minor residue. (typically $20 to $35)
Table is mobile responsive, scroll sideways on a phone.
| Product / Method | Price Range | Ease of Use (1-5) | Damage Risk | Best For | Our Rating |
|---|---|---|---|---|---|
| Vegan Leather Desk Pad by Orbitkey | $50 to $70 | 5/5 | None | Covering scratched laminate | 5/5 |
| Rain Design mStand by Rain Design | $45 to $60 | 5/5 | None | Laptop setup at eye level | 5/5 |
| Govee LED Light Strips by Govee | $20 to $40 | 4/5 | Minor residue | Warm indirect glow | 4/5 |
| Command Cord Clips by 3M | $8 to $14 | 4/5 | None on cured paint | Routing cables off the floor | 4/5 |
| Walnut Desk Tray by Grovemade | $70 to $130 | 5/5 | None | Contained desktop storage | 4/5 |
| Anker Power Strip by Anker | $20 to $35 | 3/5 | Minor residue | Hiding the power block | 4/5 |
Bottom line: six pieces cover all seven layers, and only two of them touch a wall at all.
What to Check With Your Landlord Before You Start
Check these seven items before sticking anything to a wall or plugging in new lighting. Most take one email.
- Ask whether removable adhesive strips are allowed on painted walls, and get the answer in writing.
- Ask when the unit was last painted, since paint under about three weeks old has not cured and lifts with adhesive.
- Ask whether the walls are textured, or check yourself by running a hand across them.
- Ask if anything may be mounted to a wall at all, including small shelves.
- Ask about the outlet load in that room, especially in older buildings on shared circuits.
- Ask whether the existing light fixture may be swapped, and plan on plug-in lighting when the answer is no.
- Read the fixtures and alterations clause in your lease, then check your state rules through the HUD tenant rights resource.
Bottom line: one email now is cheaper than one deduction later.
Real Results: What My Desk Makeover Cost Me
My full makeover came to $214.68 across three weekends. Breakdown: desk pad $58.00, laptop stand $49.99, task lamp $32.00, LED light strip $24.99, cable clips and sleeve $16.48, wooden tray $18.99, pothos and pot $14.23.
Two things failed. The first LED light strip peeled off my textured bedroom wall after two days and left a faint gummy line I cleaned off with rubbing alcohol. The second was a $15 acrylic laptop stand that flexed under a 14 inch MacBook Pro and made me nervous every time I typed. I replaced it with the aluminum Rain Design mStand and that one has not moved since.
What worked better than expected was the cheapest layer. The negative space edit cost nothing, took twenty minutes, and did more for the corner than the $58 desk pad. In my experience most renters are one edit away from a stylish and functional desk they already own. I also write at that desk more now, which is the productive part I did not plan for.
According to the 2024 U.S. Census Bureau American Community Survey, roughly 35 percent of American households rent rather than own, which is a lot of people working from desks they are not allowed to drill into. That is the whole reason this method exists. If the rest of your rental needs the same treatment, my budget rental kitchen refresh follows the same damage-free logic room by room.
Bottom line: the layer that costs zero dollars is the one that changed the most.
FAQ: Aesthetic Desk Setup Questions Renters Ask
What should I put on my desk for an aesthetic look?
An aesthetic desk setup needs five things on the surface: a large desk mat, a raised screen on a monitor riser, one task lamp, one wooden tray holding a pen holder, and one small desk plant. Keep the count low. Anything past those five competes for attention and reads as clutter.
How do I make my desk aesthetic with just a laptop?
An aesthetic desk setup with a laptop starts with a laptop stand, because raising the screen creates the second level that makes a surface look planned. Add a desk mat under the stand, a task lamp to one side, and one wooden tray for small items. Three pieces and a laptop are enough.
Is this setup safe for rental walls?
An aesthetic desk setup is safe for rental walls when every component mounts to the desk or furniture instead of the wall. Desk mats, monitor risers, task lamps and trays touch no wall at all. Only LED light strips and cable clips use adhesive, and both belong on furniture in textured rooms.
Does an LED light strip leave damage or residue?
LED light strips can leave a thin adhesive residue on painted drywall, which usually wipes off with rubbing alcohol and a soft cloth. Removal is safest when the strip is warmed with a hair dryer on low for about thirty seconds, then peeled slowly at a shallow angle instead of pulled straight out.
How much does an aesthetic desk setup cost?
A damage-free aesthetic desk setup usually costs $120 to $250 for all seven layers. The StealTheDecor test build came to $214.68, with the desk pad at $58.00 and the laptop stand at $49.99 as the two largest line items. An affordable version built from IKEA and Amazon Basics pieces lands closer to $90.
Which brands are best for renter-safe desk accessories?
Rain Design, Orbitkey, Grovemade, Govee, Anker and 3M cover the six functions in a renter-safe desk. Rain Design and Orbitkey handle height and surface, Grovemade handles storage, Govee handles lighting, and Anker plus 3M handle cable management. IKEA and Target Threshold cover the same shapes for less.
How do I pick a mechanical keyboard that fits an aesthetic desk setup?
Pick a mechanical keyboard by size first, then switch sound, then color. A 65 percent or 75 percent layout leaves room for a large mouse pad on a small rental desk. Quiet linear or silent tactile switches suit shared walls. Match the keycaps to one of your three palette colors.
Key Takeaways
- An aesthetic desk setup is built in seven layers: desk surface, screen height, lighting, color palette, cable management, contained storage, and negative space.
- A full damage-free aesthetic desk setup for renters usually costs $120 to $250, and the StealTheDecor test build came to $214.68 across three weekends.
- Adhesive-backed LED light strips fail on textured walls because the adhesive pad contacts only the high points, so mounting them to a monitor riser or shelf edge holds far better.
- Command Cord Clips by 3M remove cleanly from cured painted drywall when pulled slowly downward, which makes them a deposit-safe pick for desk cable management in rental apartments.
- The Rain Design mStand in aluminum holds a 14 inch MacBook Pro without flex, while low-cost acrylic laptop stands near $15 often bend under the same weight.
- Leaving one third of the desk surface completely empty costs nothing and does more for how a workspace reads than any single purchase.
- Pothos, snake plant and ZZ plant all survive low apartment light, which makes them reliable desk plants for rental bedrooms with no direct sun.
Wrapping Up
Three weekends and one peeled light strip later, the thing I keep coming back to is that order mattered more than budget. Cover the surface, raise the screen, fix the light, leave space. The cute accessories land on their own after that, whether your aesthetics run creator neutral or full gamer color.
Have you rebuilt your desk corner in a rental? What worked and what fell off the wall at 2 a.m.? Tell me, because I collect these stories. If you want more aesthetic desk setup ideas and inspiration for the rest of the room, the same creative and damage-free rules carry straight over.
If the floor under the desk is the next thing bothering you, the method in my post on softening rental carpet with a rug warms the corner without touching the landlord’s flooring.
All the products I tested are linked above and I have paid for every one myself. Your lease limits what you can drill. It does not limit what you can build.