

I stared at the blank wall in my rental apartment for three months before doing anything about it. Not because I didn’t have the frames. I had seven of them, stacked against the baseboard, collecting dust. The problem was fear. Fear of my security deposit vanishing. Fear of crooked frames I’d have to stare at every morning. Fear of committing to a layout and hating it three days later. If you’re reading this, you probably know exactly what I mean. Learning how to hang a gallery wall without nails sounds simple until you’re standing there with a Command Strip in one hand and your landlord’s voice echoing in your head.
What eventually pushed me to try was a Black Friday sale at Target. I picked up the Command Picture Hanging Strips Variety Pack for $14.99—the one with the Velcro-style strips that snap together. I’d seen them recommended everywhere, including by my coworker Jenna, who has somehow kept her security deposit intact across four different apartments. “They work,” she said. “But you actually have to read the instructions.” I nodded like someone who definitely reads instructions. I am not that person. That overconfidence cost me a frame and a small chunk of paint, but we’ll get to that.

The Day I Learned That Winging It Doesn’t Work
I wish I could tell you I planned everything carefully. I didn’t. My first attempt involved holding frames up to the wall, eyeballing the placement, and slapping strips on wherever they felt right. The result looked like someone had thrown picture frames at the wall from across the room. Nothing aligned. One frame was so close to the ceiling that it looked like it was trying to escape. My girlfriend walked in, tilted her head, and said, “That’s… a choice.” She wasn’t wrong.
That failure taught me something no YouTube tutorial mentioned: the wall layout matters more than the hanging mechanism. A gallery wall layout isn’t just about what looks good on Pinterest. It’s about how the arrangement interacts with your actual room—furniture placement, light sources, door swing radius, and walking paths. My mistake? I centered everything on the wall itself instead of centering it relative to the couch. The whole arrangement felt off until I shifted it three inches to the left. Three inches. That’s how precise this needs to be.

What Actually Works: Damage-Free Picture Hanging That Survives Real Life
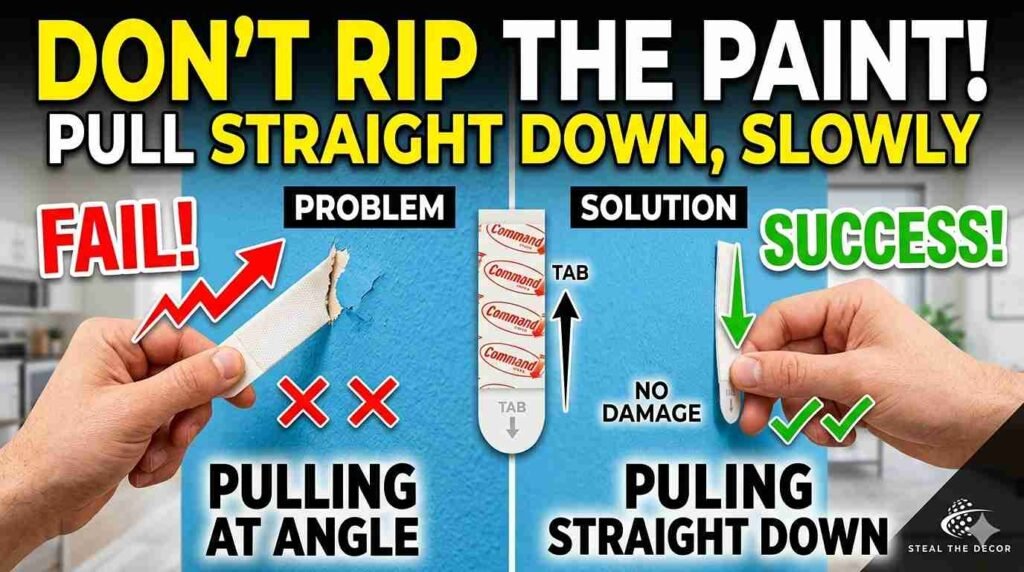
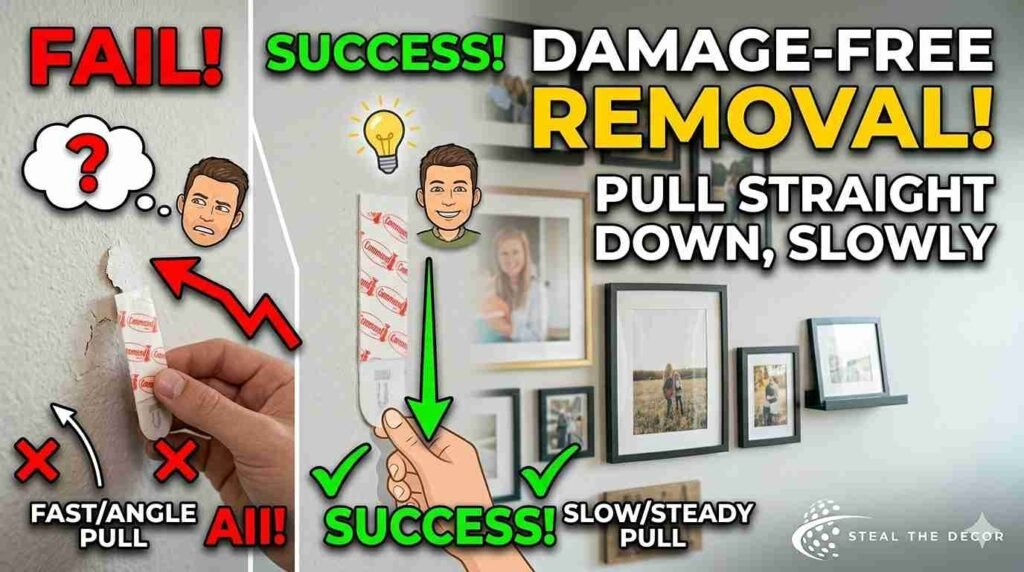
Damage-free picture hanging isn’t magic. It’s chemistry and patience, and I had neither on my first try. Command Strips use a stretch-release adhesive technology—basically, the bond gets stronger over time, and when you’re ready to remove it, you pull the tab straight down (not out, not up, straight down), and the adhesive stretches until it releases. The keyword here is “straight down.” I pulled at a 45-degree angle because I was in a hurry, and the strip snapped halfway. The remaining adhesive was now permanently fused to my wall, and removing it required a putty knife, spackle, and a lot of quiet swearing.
Here’s what nobody tells you about removable adhesive strips: they have a cure time. Command Strips’ curing time is roughly one hour before you should hang anything on them. That means you stick the strips to the wall, press firmly for 30 seconds, and then walk away. Do not hang your frame. Do not test it. Do not poke it as I did. Let the adhesive bond properly. I skipped this step on frame number three, and twenty minutes later, I heard a crash from the living room. The frame survived. My confidence did not.
What You’ll Need Before You Start (And What I Wish I’d Bought First)
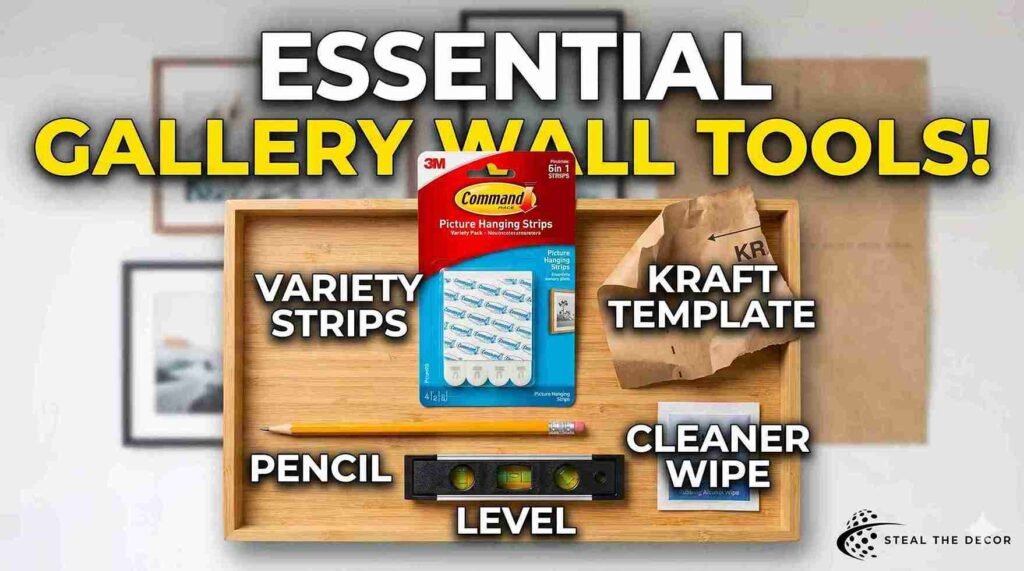
| Item | Approximate Price | Where I Got It | Why It Matters |
| Command Picture Hanging Strips Variety Pack | $14.99 | Target | Different sizes for different frame weights |
| Kraft paper roll | $6.99 | Michaels | For the template method—skip this and suffer |
| Painter’s tape | $4.49 | Home Depot | Holds templates without damaging walls |
| 24-inch level | $9.99 | Amazon | The tiny level in your toolbox won’t cut it |
| Rubbing alcohol wipes | $3.29 | CVS | Clean walls = strips that actually stick |
| Pencil | Already owned | — | Marking placement points |
I bought the Command Picture Hanging Strips Large for my bigger frames, which claim to hold up to 16 pounds. My heaviest frame is maybe 4 pounds. I over-engineered this because I didn’t trust the weight claims, and honestly, I don’t regret it. The small strips work fine for 8×10 frames and under, but once you get into 11×14 territory with glass, the medium or large strips feel more secure. For canvas art, I used the Command Canvas Hangers—they have a different grip mechanism designed specifically for the wooden stretcher bars on the back of canvases. I found these at Walmart for $11.97 for a pack of four.
The Picture Frame Template Method That Saved My Sanity
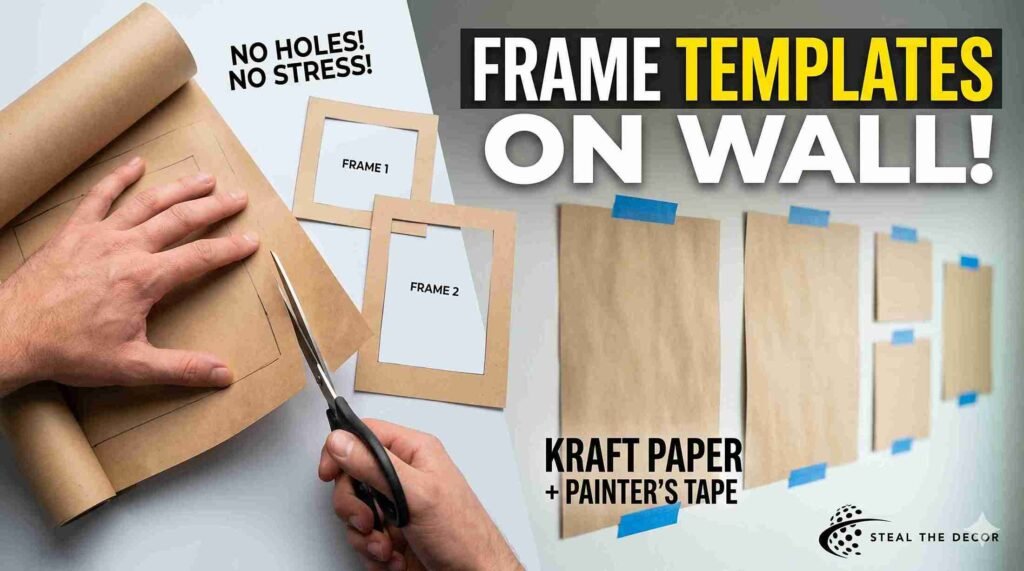
I didn’t invent this, but I wish I’d known about it before my first disaster. The picture frame template method is exactly what it sounds like: you trace each frame onto kraft paper, cut out the paper templates, and tape them to the wall with painter’s tape. Then you stare at them. For a day. Maybe two. You move them around. You realize the arrangement you loved on Pinterest looks weird in your actual room. You adjust. No holes in the wall. No wasted Command Strips. No existential dread.
Here’s how I did it the second time: I laid all seven frames on the floor, arranged them until the spacing felt right, then traced each one onto kraft paper from the roll I bought at Michaels. I cut them out, labeled the back of each template with the frame it belonged to, and started taping them to the wall using painter’s tape. I lived with those paper rectangles for two days.
On day two, I moved three of them. The measuring frame placement step is tedious but non-negotiable. My spacing between frames is 2.5 inches, which feels tight enough to look intentional and loose enough to breathe. I used a 24-inch level from Amazon to make sure each template was straight before committing to the real thing.
Hanging Pictures on Textured Walls Without Nails
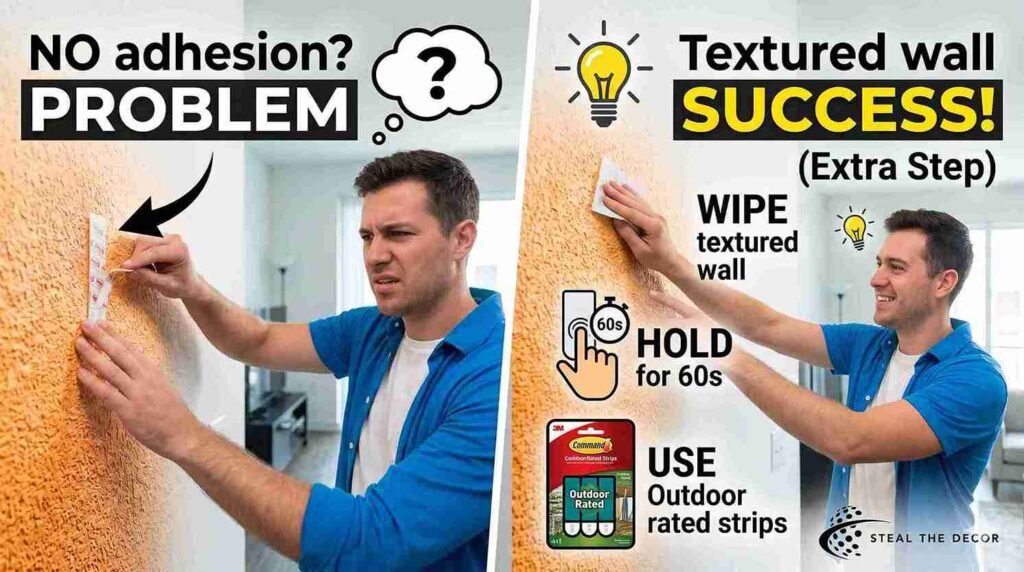
My apartment has those slightly bumpy walls—not full-on popcorn texture, but definitely not smooth drywall. Every Command Strip package warns that textured surfaces reduce adhesion. I ignored this because I wanted to believe the marketing. Frame number two fell after four hours. Hanging frames on textured walls requires an extra step that I learned from a maintenance guy named Rick, who saw me struggling in the hallway.
Rick told me to wipe the wall with rubbing alcohol first—not just a dry cloth, not Windex, but actual isopropyl alcohol on a cotton pad. Let it dry completely. Then press the strip onto the wall and hold it there for a full 60 seconds, not the 30 that the package says.
The alcohol removes any residue or dust that fills the tiny grooves in the texture, giving the adhesive more surface area to grip. For my worst wall—the one that faces the hallway and gets vibration from people slamming doors—I used the Command Strips designed for outdoor use. They’re rated for higher humidity and temperature swings, and honestly, they’ve outperformed the indoor ones on that particular wall. I bought those at Home Depot for $7.98.
How I Planned My Layout Without Losing My Mind
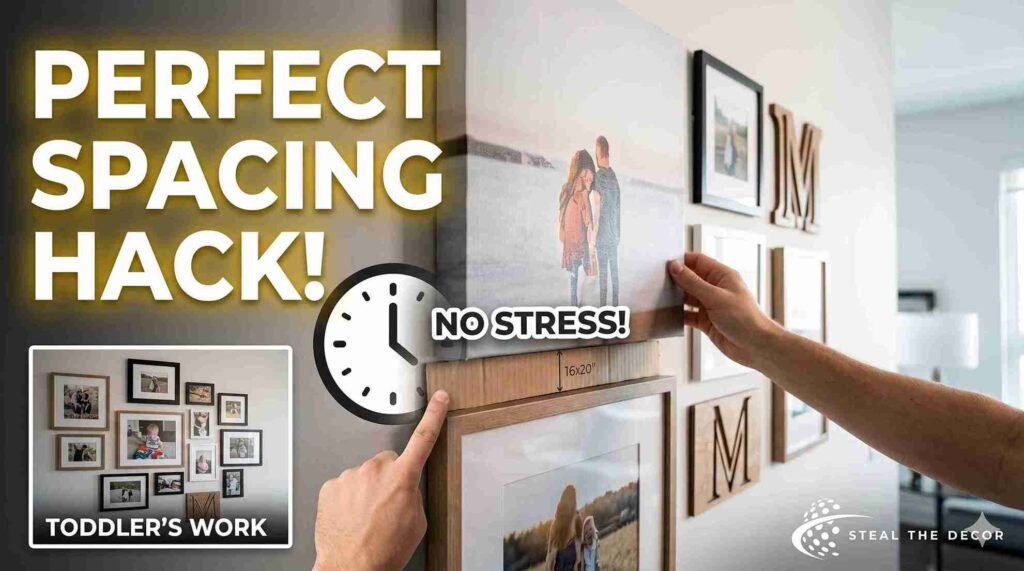
The wall décor arrangement is where most people freeze up, myself included. I had seven frames of varying sizes, one canvas, and a wooden monogram letter “M” I bought on Etsy for $22. A mixed media gallery wall looks fantastic when done right and chaotic when done wrong. My rule of thumb now: anchor the arrangement with one large piece slightly off-center, then build outward. I used my 16×20 canvas as the anchor and arranged the smaller frames around it in a loose grid.
For precise spacing, I used a trick my mom taught me. Cut a piece of cardboard exactly 2.5 inches wide and 8 inches long. Use it as a spacer between frames as you place them. It’s faster than measuring every single gap with a tape measure, and it keeps everything consistent. My first attempt had gaps ranging from 1 inch to nearly 4 inches, and it looked like a toddler arranged them. The cardboard spacer fixed that instantly.

Step-by-Step: How to Hang a Gallery Wall Without Nails
Step 1: Choose and arrange frames on the floor. I spent forty minutes on this. My girlfriend spent ten, and her arrangement was better. I used hers.
Step 2: Trace and cut templates. Kraft paper, scissors, and patience. Label everything. I used sticky notes on the back of each template with the frame name and orientation.
Step 3: Tape templates to the wall. Painter’s tape is your friend here. Don’t use Scotch tape—it’ll pull paint when you move the templates. I learned this the annoying way.
Step 4: Live with the templates for 24 hours. This sounds excessive. It’s not. The first arrangement I loved at 2 PM looked terrible at 7 PM when the sun hit it differently.
Step 5: Clean the wall surface. Rubbing alcohol and cotton pads; let them dry completely. Do not skip this. I skipped this on frame four, and it fell.
Step 6: Apply Command Strips to frames. Follow the weight guidelines on the package. For my 11×14 frames with glass, I used four medium strips per frame—two at the top corners and two at the bottom. Overkill? Maybe. But nothing has fallen since.
Step 7: Remove the template paper and stick the frames to the wall. Line up the frame edges with where the template was. Press firmly for 60 seconds on textured walls and 30 seconds on smooth. Then leave them alone.
Step 8: Wait one hour before hanging anything on the strips. The cure time is real. I set a timer on my phone and went to get coffee. When I came back, I gently tested one corner. It held.
Step 9: Level check. Use an actual level, not your phone’s level app. I tried the app. It told me three different things in thirty seconds.

Rental-Friendly Wall Decor That Won’t Cost You Your Deposit
I’ve moved four times in six years. Each time, the security deposit conversation haunts me. Rental-friendly wall decor isn’t just about hanging pictures—it’s about the entire approach to personalizing a space you don’t own. Command Strips are the obvious answer for frames, but I’ve also used them for lightweight shelves, small plants in wall-mounted pots, and even a Command Slate Picture Ledge that holds three small frames without any wall penetration. That ledge cost me $19.99 at Target, and it’s followed me through two apartments now.
The ledge is interesting because it uses a different mechanism than the strips—it’s more of a bracket system with adhesive backing. It’s rated for 5 pounds, which means you can put a few small frames, a tiny plant, and maybe a candle on it. I wouldn’t push it past that. My wooden monogram letter hangs above the gallery wall using two large Command Strips, and it’s been up for eight months without budging. But here’s my honest take: Command Strips work brilliantly until they don’t. And they don’t work when you rush the process. Every single failure I’ve had—three total—happened because I cut a corner somewhere.

How to Use Command Canvas Hangers Without the Confusion
Canvas art is tricky because the back isn’t flat like a picture frame. Traditional Command Strips don’t grip the wooden stretcher bars well, and I found that out the hard way when my canvas slid off the wall at 3 AM and scared me half to death. How to use Command Canvas Hangers properly: These have a small metal clip that grips the wooden frame on the back of the canvas, plus an adhesive backing that sticks to the wall. You attach the clip to the canvas stretcher bar first, then press the canvas against the wall where you want it.
The mistake I made: I didn’t secure the clip tightly enough to the canvas bar, so the canvas hung slightly crooked and eventually slipped. When I redid it, I made sure the metal teeth actually bit into the wood. It felt aggressive, but it’s designed to work that way. The canvas hasn’t moved since. I bought the Command Canvas Hangers pack at Walmart for $11.97—it comes with enough hardware for two medium canvases.
What I’d Tell Anyone Trying This for the First Time
Secure artwork properly by matching the strip size to the frame weight. Don’t guess. My 5×7 frames use small strips. My 11×14 frames with glass use large strips. My canvas uses the dedicated canvas hangers. Mixing and matching based on what’s left in the package leads to problems. I had two large strips leftover and used them on a tiny frame because I was too lazy to buy more small ones. That frame is now permanently stuck to the wall because the large strip covers so much surface area that removing it will definitely take paint with it. I haven’t tried yet. It’s been there for a year. It’s fine. I’m fine.
The peel-and-stick technology that Command uses is genuinely impressive, but it’s not forgiving. Once that adhesive bonds, you have one chance to remove it correctly. If you mess up the removal—pull at the wrong angle, rush it, try to pry it off with a tool—you will damage the wall. I’ve seen Reddit threads where people claim Command Strips ruined their walls, and after my own failures, I suspect most of those cases involved incorrect removal. The tab must be pulled straight down, very slowly, stretching the adhesive as it releases. It takes about 30 seconds per strip if you do it right. Rushing takes paint off in three seconds flat.

What I Own, What Fell, and What’s Just Meh
My gallery wall currently has nine pieces. The unique frames came from thrift stores (Goodwill in Austin had amazing ornate frames for $3-$7 each), Target, and one was a gift. The most expensive frame was $24 at HomeGoods. The cheapest was $1.99 at a garage sale in Portland. Mixing frame styles—some gold, some black, one natural wood—gives the wall character, but the gold frames are significantly heavier than they look. I didn’t account for that, which is why one of them needed four large strips instead of the two I initially used.
The “meh” product: I bought a set of off-brand adhesive strips from Amazon for $8.99 because the reviews said they were “just as good as Command.” They’re not. Two of my frames fell within a week, and the adhesive left a sticky residue that took rubbing alcohol and twenty minutes of scrubbing to remove. I didn’t return them because I’d already opened the package and used half. They’re now sitting in my junk drawer, which is where bad impulse purchases go to be forgotten.
The standout product, unexpectedly, was the Command Slate Picture Ledge I mentioned earlier. It holds three 4×6 frames in simple black frames, and it’s the one part of the wall that gets compliments from everyone who visits. For $19.99 at Target, it added dimension to a flat arrangement and gave me a place to put smaller frames that didn’t fit the main grid. If I were doing this all over again, I’d build the entire gallery wall around that ledge instead of treating it as an afterthought.

What Changes With Seasons, Humidity, and High-Traffic Areas
My apartment’s front door is ten feet from the gallery wall. Every time someone comes in or out, the wall gets a subtle vibration. In a high-traffic area, those micro-vibrations add up. One of my frames shifted slightly after three months—not enough to fall, but enough to look crooked. I check the frames every two weeks now, pressing gently on each corner to make sure nothing has loosened. So far, the Command Strips have held, but I’m aware that humidity changes things.
Last summer, my AC broke for four days, and the indoor humidity hit levels I didn’t know were possible in a non-tropical climate. One strip on the canvas started peeling at the corner. I pressed it back down, and it’s held since, but it was a reminder that these strips have limits. The packaging doesn’t mention humidity thresholds, but my experience says if you’re sweating indoors, your Command Strips are sweating too, and they might let go.
The Removal Process I Wish Someone Had Explained Clearly
When I eventually move out, I’ll need to remove nine frames plus a ledge plus a monogram letter from this wall. Based on my test removals (I had to redo two frames after the initial placement), here’s what works: grab the exposed tab at the bottom of the strip. Pull straight down—not toward you, not at an angle, straight down along the wall. Do it slowly. Like, painfully slowly. The strip will stretch and eventually release. If it snaps, you’re in trouble, and you’ll need a hairdryer to warm the remaining adhesive before gently scraping.
I practiced on a strip behind the couch where any damage would be hidden, and the removal left zero residue and zero paint damage. The key was the slow, steady pull. My first “fast” removal on a different strip took a tiny chip of paint with it. That chip is now hidden behind the couch, and I’ve made peace with the fact that my security deposit might take a $50 hit for touch-up paint. Real life, right?
Frequently Asked Questions About Hanging a Gallery Wall Without Nails
How to hang a gallery wall with command strips?
You apply the Command Strips to the back of each frame, press the frame firmly against the wall for 30-60 seconds, then remove the frame from the wall, leaving the strips attached to the wall. Wait one hour for the adhesive to cure, then snap the frame back onto the strips. The layout should be planned first using paper templates, so you know exactly where each frame goes before committing.
Are Command Strips really damage-free?
Yes, when used and removed correctly. The strips use a stretch-release adhesive that detaches cleanly if you pull the tab straight down very slowly. I’ve removed six strips successfully with zero damage. I’ve also removed one too quickly and lost a small paint chip. The difference was entirely in the removal technique, not the product.
How to stick photos on a wall without damaging them?
For lightweight photos or prints without frames, use Command Poster Strips or the smaller Photo Strips. These are designed for lighter items and have a gentler adhesive. I used these for a few unframed 4×6 prints above my desk, and they’ve held up for six months. Don’t use regular tape—the adhesive yellows over time and will damage both the photo and the wall.
How to not damage walls with command strips?
Clean the wall with rubbing alcohol before application; let it dry completely; press the strip firmly for 60 seconds; wait the full cure time before hanging anything; and when removing, pull the tab straight down very slowly along the wall surface. Never pull the tab toward you or at an angle. Never try to peel the strip off from the top. Never rush the removal.
Do 3M command strips damage paint?
They can if the paint is old or improperly applied or if the strip is removed incorrectly. In my experience across four apartments, properly removed strips caused zero damage to the walls with quality paint. The one chip I caused was on a wall with cheap landlord-grade flat paint, and I pulled the strip at an angle instead of straight down. The product isn’t the variable here—the paint quality and your removal patience are.
How to remove 3M without damaging a wall?
Grip the exposed tab firmly, pull straight down along the wall surface very slowly—the strip will stretch as the adhesive releases. Never pull toward yourself. If the strip snaps, use a hairdryer on low heat to warm the remaining adhesive for 30 seconds, then gently scrape with a plastic putty knife. I had to do this once, and while tedious, it didn’t damage the wall.
About the Author: Marcus Chen has moved seven times in nine years and still checks behind the couch for damage he might have missed. He owns a level but doesn’t entirely trust it, and his junk drawer contains no fewer than fourteen unused Command Strips of various sizes because “you never know when you’ll need them.” His current gallery wall includes one slightly crooked frame, and he’s made peace with it.
What about you? Have you tried hanging a gallery wall with Command Strips and had a completely different experience? Or maybe you’ve found a different damage-free method that worked better for your walls? I’d genuinely love to hear what worked—and what absolutely didn’t—because every wall seems to have its own personality, and I’m always collecting data for my next apartment.