

Table of Contents
Last March, I stood in my kitchen at 7 a.m. and realized I hated being there. The counters were that beige laminate with brown flecks that look dirty even when they’re clean. The cabinets had this dark oak veneer from decades ago. The wall behind the stove wasn’t a backsplash at all—just paint that had started peeling from steam and grease. My landlord’s response when I’d asked about updates during the walkthrough? A shrug and “Everything’s functional.” Which meant nothing was changing.
So I decided to try a rental kitchen makeover on a budget. I gave myself roughly a hundred bucks. I ended up at $122 all in—not because I went wild but because I made a dumb mistake on my first attempt at covering the counters and had to rebuy material. I’m telling you this upfront so you know the real number, not some rounded-down version that sounds better in a headline. Here’s exactly what I did, what held up, and what I’d skip if I started over.
What a Rental Kitchen Makeover on a Budget Actually Means
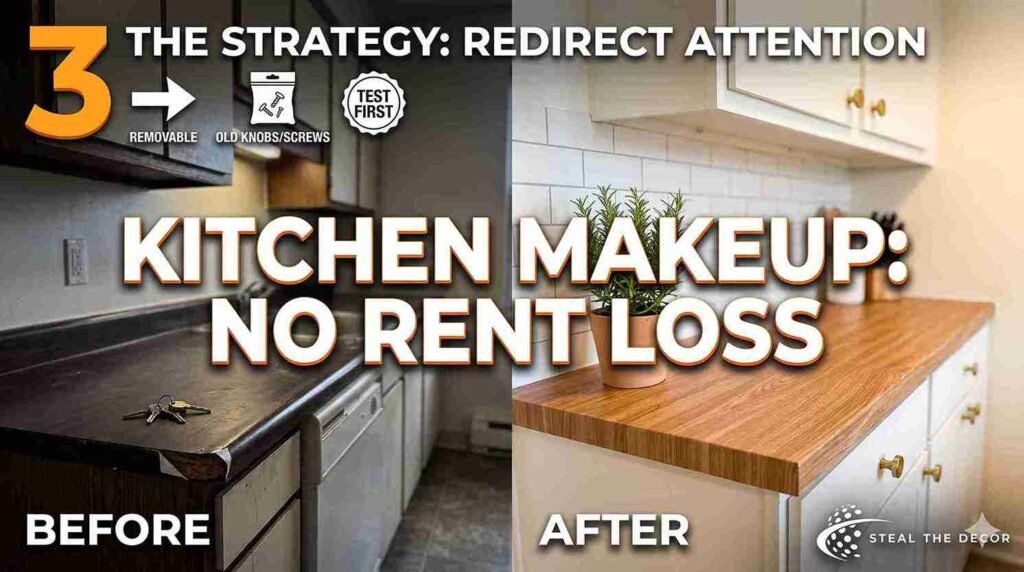
Some posts will tell you a cheap refresh is about lighting a candle and calling it done. That wasn’t my goal. For me, it meant this: I couldn’t change the sink, the appliances, the floor, or the layout. But I could change what my eyes landed on first when I walked in. That’s the whole strategy — redirect attention, not fix every flaw.
I set three rules before I touched anything for this rental kitchen makeover on a budget. First, nothing permanent. If adhesive touched a surface the landlord owned, I tested it somewhere hidden for two days first, then removed it to check for marks. Second, every original piece—screws, knobs, and hinges—went into labeled bags stored in the cabinet above the fridge. Third, if something looked worse after my attempt, I’d stop. These rules saved me more than once.
My kitchen is a galley-style in a Dallas apartment building from the 1970s. Maybe 50 square feet. The counters were that classic speckled laminate—the kind builders picked because it hides stains, but the trade-off is that it never actually looks fresh. Cabinets had a dark oak veneer finish with brass hinges that had oxidized green at the joints. The floor was beige vinyl sheeting, the same age as the building, with a rip near the dishwasher. One ceiling fixture that casts harsh shadows. One window facing a brick wall. Not a single surface felt chosen.
I didn’t take photos on the first two days. I was embarrassed to document something that felt so far from what I wanted. But looking back, that’s exactly why this whole thing mattered. You don’t need a pretty starting point. You just need to start. The bland decor was my reality, and the before-and-after difference came from layering personality on top of it.

Contact Paper Countertop Before and After: $14 and a Lesson in Slowing Down
The counters were the biggest visual problem. In a galley layout, they’re all you see—two long stretches at eye level. If I didn’t address them, nothing else would register. Painting wasn’t an option in my lease, and epoxy was too costly. While planning this rental kitchen makeover on a budget, I kept seeing people use contact paper countertops, which sounded flimsy until I watched a few videos of results that genuinely surprised me.
I ordered D-C-Fix Grey Marble vinyl contact paper from Amazon—26 feet by 17 inches for $13.99. One roll covered both counter sections. The marble pattern is grey veining on white, simple enough that it doesn’t try too hard.
The Mistake That Cost Me an Extra $14
I peeled the entire backing off in one go and tried to lay it down like a tablecloth. Within seconds, it had folded onto itself, bubbled in four places, and creased badly enough that the section was unusable. I wasted roughly four feet of the roll and had to order a second one. That’s where the extra money in my budget came from.
The second time, I worked differently. Cleaned the counters with rubbing alcohol and let them dry fully. Measured each section twice. Cut with an X-Acto knife. Peeled only three inches of backing at a time, smoothing with an old credit card wrapped in a microfiber cloth, working left to right. Both counters took about 90 minutes. The result holds up eight months later through coffee, sauce splatters, and a dropped jar of salsa. No peeling at the edges. No staining. When I tested a corner removal last month, it lifted off clean without leaving residue. That matters when someone else owns the place.
Removable Backsplash Rental: $22 at Home Depot
After the counters worked, the bare wall behind my stove started bothering me more, not less. The contrast between the new counter surface and the old peeling paint made the wall look worse than it had before. I realized a true rental kitchen makeover on a budget needed something temporary that wouldn’t damage the wall — a faux backsplash that could pass for real.
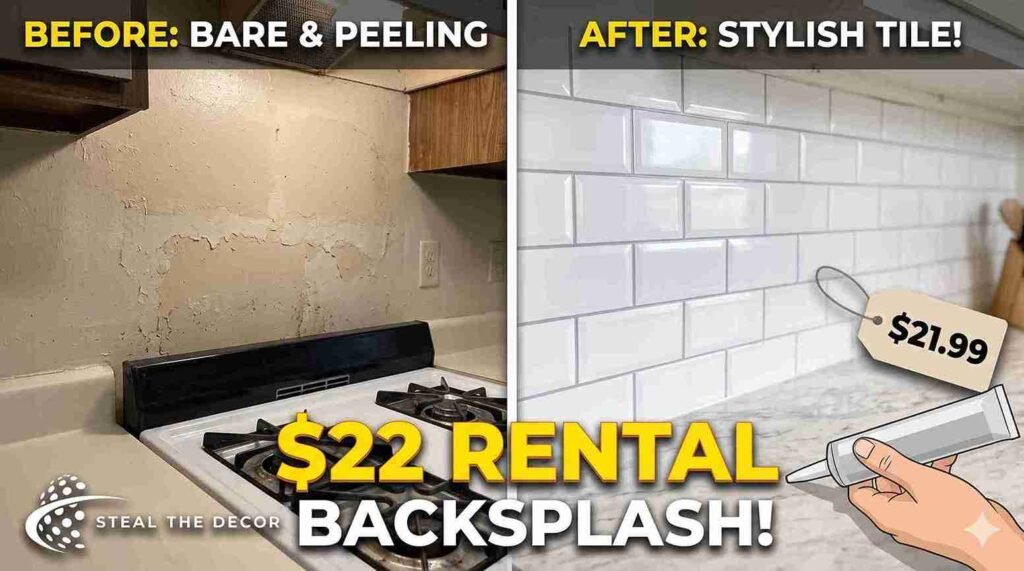
I found Art3d peel-and-stick backsplash panels in a subway tile pattern at Home Depot — 10 sheets for $21.99. These aren’t flat stickers. They’re made of a gel-type material with beveled edges that catch light in a way that reads as ceramic from a few feet away. I chose plain white because my kitchen gets almost no natural light, and anything darker would have shrunk the space further.
Installation was straightforward but tedious. Cutting around outlets took patience and an X-Acto knife. The whole job ran about three hours. One thing I didn’t anticipate: the bottom edge where the panels meet the countertop can lift slightly over time from cooking moisture. I ran a thin line of removable caulk along that seam—$3 at Home Depot—, and the problem stopped.
Do they look like real tile? From across the room, yes. My neighbor touched them and asked where I’d learned to grout. From six inches away under bright light, you can spot the seams if you’re looking. For $25 total, including the caulk, I’m fine with that trade-off.
Rental Cabinet Makeover Without Painting: $9 and 12 Minutes
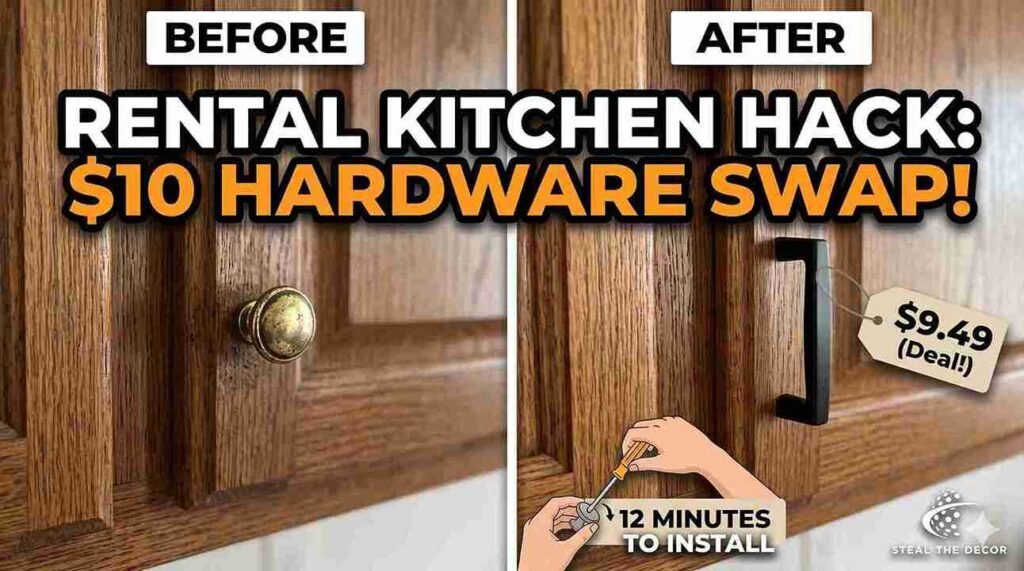
I couldn’t paint the cabinets—lease didn’t allow it—and honestly, doing it wrong creates a sticky, peeling mess that’s worse than what you started with. But the brass knobs and green-tarnished hinges were dating the whole kitchen by two decades. I needed a rental cabinet makeover without painting that still made a visible difference.
I ordered Ravinte matte black cabinet pulls from Amazon—a 30-pack for $9.49 on a lightning deal, normally $14.00. For the hinges, instead of replacing them, I cleaned them with vinegar and applied two thin coats of Rust-Oleum Cabinet Transformations glaze in charcoal from Walmart for $8.97. Let them dry overnight. Reinstalled everything with the new pulls the next morning.
It took 12 minutes to swap the hardware. The difference was immediate—dark oak with matte black reads as intentional in a way that dark oak with brass does not. It’s not a renovation. But it’s enough that you notice the shape of the cabinets instead of the color of the hinges. I stored every original screw and knob in a labeled bag above the fridge. When I move out, they go back on.
How to Brighten a Dark Rental Kitchen: $16 That Changed Everything
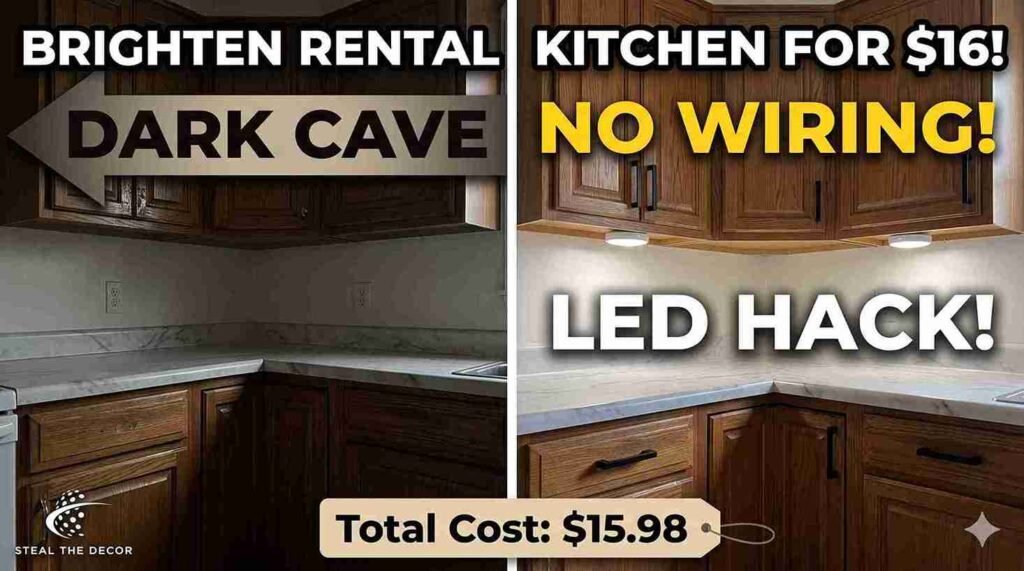
The single ceiling fixture in my kitchen is the kind of flush-mount dome that every apartment built before 2010 seems to have. It threw harsh shadows across the counters and made the whole room feel like a hallway. Replacing it wasn’t allowed, and I didn’t want to mess with electricity anyway. Figuring out how to brighten a dark rental kitchen without touching the wiring became a priority.
I picked up GE wireless LED under-cabinet lighting—a two-pack for $15.98 at Target. They’re battery-operated, attach with adhesive strips, and have motion sensors. I stuck one under each upper cabinet run, angled toward the new countertops. The difference was disproportionate to the cost. Suddenly, the dark corners near the stove were visible. The marble contact paper actually looked like marble instead of shadowy beige. I change the batteries roughly every three months, which is a minor annoyance but worth it for a kitchen that no longer feels like a cave.
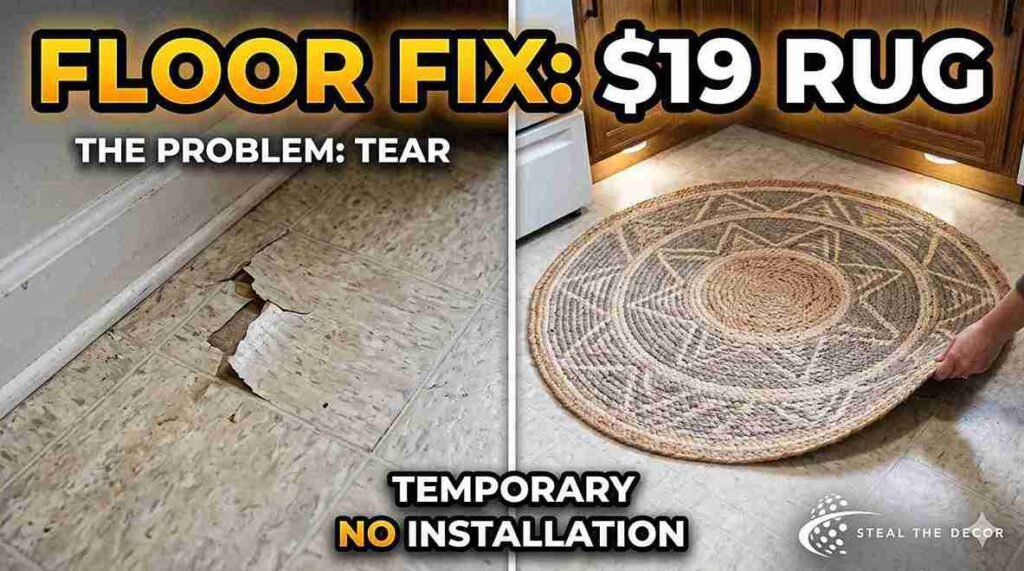
Temporary Kitchen Floor Mat: $19 That Hid the Damage
The tear in the vinyl near the dishwasher bothered me. I tried a set of peel-and-stick floor tiles from Lowe’s—$6 for a small pack—hoping they’d cover the damaged section. They lifted within a week. The floor surface was too textured and too old for the adhesive to grip properly. I didn’t return them. I didn’t hate them. They just didn’t work.
What did work was simpler. I bought a nuLOOM Marisol braided indoor/outdoor rug in a geometric beige-gray pattern, 2 by 3 feet, for $18.99 at Walmart. It covers the tear completely. It’s washable. This vintage-style rug adds a layer of texture where there had been flat, damaged vinyl. It’s not a floor makeover. It’s a rug. For $19, that was enough.
Small Space Organization: Storage That Doesn’t Need Drilling
My kitchen had two drawers and four cabinets total. Two cabinets sat above the fridge—unusable without a step stool. One lower cabinet was half-blocked by plumbing. That left me with one functional cabinet and two drawers for everything: pots, pans, utensils, spices, trash bags, and cleaning supplies. The lack of storage was making the kitchen frustrating to use, not just frustrating to look at. Small space organization became essential.
I found an mDesign bamboo utensil organizer at Target for $10.49 and a three-tier wire shelving unit from Amazon Basics for $12.99 that fit perfectly in the dead corner next to the fridge. No drilling. No wall anchors. The shelf holds spices, cookbooks, and a woven basket storage container full of snack bars. The organizer turned my chaos drawer into something I don’t dread opening.
The Cabinet Door I Removed
During my research, I kept seeing open shelving storage as a suggestion for rentals, but I didn’t want to install new shelves or drill brackets. Then I noticed my upper cabinet doors were attached with simple screws that were fully accessible. I unscrewed one door — the one with the most worn veneer — and stored it under my bed, wrapped in a blanket.
Inside, I arranged three white plates, a small low-light plant, and a cookbook. The cabinet interior was the same beige as the walls, so it looked like a recessed shelf rather than a cabinet missing its door. The decision to remove cabinet doors — even just one — cost nothing and took under ten minutes. When I leave, the door goes back on with four screws. Nobody will know it was ever different.

Luxury Rental Kitchen Makeover on a Budget: How to Make It Look Expensive
I walked through three model homes in my neighborhood a few months ago—not to buy, just to look at kitchens. I wanted to understand how to make a rental kitchen look expensive without actually spending much. Two things stood out everywhere: surfaces weren’t bare, but they also weren’t cluttered. Items sat in groups of three.
I tried the same approach using things I already owned, plus a couple of cheap additions. A wooden cutting board I’d thrifted years ago was leaning against the backsplash. A snake plant in a matte white pot from IKEA for $6.99. A glass olive oil bottle from Ross for $5.99. Grouped near the stove, they look arranged rather than scattered. A small tray from Dollar Tree — $1.25 — holds salt, pepper, and a pothos cutting in water next to the stove. The tray keeps the spices from looking messy, and the plant adds a spot of green in a room that otherwise has none.
The idea that a kitchen can look like a million bucks without a renovation is exaggerated—let’s be real. But pulling off a rental kitchen makeover on a budget got me close enough that my space feels intentional. The rule I follow now: anything that lives on my counters either gets used daily or earns its spot by looking good. If it’s neither, it goes somewhere hidden. That rule alone cleared about 40 percent of the visual clutter.
Where the Money Actually Went
| What I Bought | Product | Where | Cost |
| Countertop covering | D-c-fix Grey Marble contact paper (two rolls—messed up the first) | Amazon | $27.98 |
| Backsplash panels | Art3d peel-and-stick subway tile, 10 sheets | Home Depot | $21.99 |
| Cabinet pulls | Ravinte matte black, 30-pack | Amazon | $9.49 |
| Hinge finish | Rust-Oleum Cabinet Transformations glaze | Walmart | $8.97 |
| Under-cabinet lights | GE Wireless LED two-pack | Target | $15.98 |
| Kitchen rug | nuLOOM Marisol braided, 2×3 | Walmart | $18.99 |
| Utensil organizer | mDesign bamboo | Target | $10.49 |
| Wire shelf | Amazon Basics three-tier | Amazon | $12.99 |
| Edge caulk | Small tube, removable | Home Depot | $2.97 |
| Counter tray | Small tray | Dollar Tree | $1.25 |
| Total | $131.10 |
The total kept creeping upward as I went along. I forgot the second roll of contact paper in my initial mental math. Then the caulk. Then the tray. That’s just how these projects work — the small stuff adds up quietly. If someone asks me whether you can refresh a kitchen for under $100, the honest answer is yes, if you nail everything the first time and skip the extras. I didn’t. I ended up at $131. For what I got, that still feels like a deal.
What I’d Change If I Were Starting Fresh
First, I’d buy two rolls of contact paper from the beginning and accept that I’d probably waste some while learning. Would’ve saved me a week of half-finished counters. Second, I’d deal with mail clutter earlier—I waited six weeks, and during that time my nice counters were buried under bills and junk flyers, completely undermining the work I’d done.
Third, I’d skip the floor tiles entirely. That was a waste of $6 and an hour of my time. Old vinyl with texture isn’t a good surface for adhesive tiles, and I should’ve known that going in. Some things just aren’t fixable within the limits of a rental, and that particular floor was one of them.
Fourth, I’d spread the work over two weekends instead of cramming everything into two days. By Sunday night of my first attempt, my back hurt, I was frustrated, and I’d stopped enjoying the process. That’s not the point. Executing a rental kitchen makeover on a budget is supposed to be satisfying, not a stressful deadline. This whole renter-friendly makeover worked because I finally permitted myself to go slow.
Frequently Asked Questions
How can I make my rental kitchen look better?
Start with the surfaces that take up the most visual space — your counters and the wall behind the stove. I covered my ugly laminate with marble-pattern contact paper and added peel-and-stick backsplash panels. Those two changes did more than everything else combined because they’re what the eye hits first. After that, swap dated cabinet hardware for something modern, stick battery-powered lights under the cabinets, and lay down a rug that distracts from whatever’s wrong with the floor. Don’t aim for perfection. Aim for intention.
What is the cheapest way to cover kitchen countertops?
Contact paper, hands down. I paid $14 for a roll of D-C-Fix marble-look vinyl on Amazon, and one roll covered both sides of my galley kitchen. The catch is patience—peel the backing just a few inches at a time and smooth as you go, or you’ll end up with bubbles and creases as I did on my first attempt. If your counters get heavy use near the stove, a thicker vinyl sheet made for countertops runs about $25 to $30, but the $14 option has held up fine for me through daily cooking.
Can you put a peel-and-stick backsplash in a rental?
In most cases, yes. My Art3d panels from Home Depot have stayed up for eight months with no wall damage. But I tested a scrap piece behind the fridge first—stuck it on, waited two days, and peeled it off slowly. No paint came with it. If your walls have flat or matte paint, be more careful because those finishes don’t release as cleanly as semi-gloss. The bottom edge near the counter can lift over time from steam and wiping, so I ran a thin bead of removable caulk along that seam. Took five minutes and solved it.
Do peel-and-stick backsplash tiles look cheap?
From a normal standing distance in warm kitchen light, not at all. The ones with a gel texture and beveled edges catch light in a way that reads like real ceramic. Up close under bright white light, you’ll notice the seams if you’re inspecting carefully. For daily life—guests, neighbors, your landlord checking the sink—they pass without question. If someone gets six inches from the wall and studies it, they’ll figure it out. For $22, I’m comfortable with that.
How to make an ugly kitchen look good without remodeling?
Go in order of what people actually see. Surfaces first — counters and backsplash. Then use lighting to change how the whole room feels. Then, the hardware to update the cabinets. Then, styling and organization. I made the mistake of organizing my drawers before touching my counters, and guess what? Nobody noticed the organized drawers because the beige laminate was still screaming for attention. Start big. Finish small.
What to do with an outdated kitchen in a rental?
Stop obsessing over what you can’t change and attack what you can. I can’t replace my outdated appliances or the beige floor, so I stopped letting them bother me. Instead, I covered the counters, added a backsplash, swapped the hardware, improved the lighting, and threw down a rug. One trick that helped more than I expected: I removed one upper cabinet door and used the open shelf for display. It cost nothing and made the kitchen feel custom. The door goes back on when I move out. If your cabinets are the main thing making the space feel dated, this one move helps a lot.
Final Thoughts
My kitchen is still a rental kitchen. The floor still has a tear under the rug. The appliances are still from another decade. The cabinets are still dark oak veneer, just with nicer pulls. But I don’t dread walking in anymore. That’s what the money actually bought — not a renovation, not a magazine photo, just the ability to make coffee in the morning without resenting my surroundings. The rental-friendly upgrades I made were never about fooling anyone. They were about making the space feel like someone lives here on purpose.
If you’re staring at your own rental kitchen right now and feeling stuck, pick one surface. Just one. Start there. Don’t try to do everything at once, and don’t expect it to look like someone else’s after photo. Expect it to look like yours. A budget kitchen makeover isn’t about spending the least money possible. It’s about spending the right money on the things you’ll actually notice every single day.
What’s the one part of your rental kitchen that bugs you most? And have you found anything that actually helped? I’d genuinely like to know—drop a comment. I’m always collecting ideas, especially the cheap ones.
About the Author
Ali Ahmad has rented seven apartments across four states and has never once gotten his full security deposit back—though this time he’s feeling pretty good about it. He keeps what he calls a “move-out box” in every apartment: original hardware in labeled bags, a printed copy of the lease, and a tiny screwdriver he uses exactly once per lease term. He’s currently trying to propagate a pothos cutting that’s been sitting in the same glass of water for three months (roots are growing, slowly).
More Rental-Friendly Makeover Guides: click here.