
Table of Contents
Groceries in both hands keys in my teeth and my left foot landed square on a wet running shoe. The bag split. A can of chickpeas rolled under the radiator and stayed there for two days.
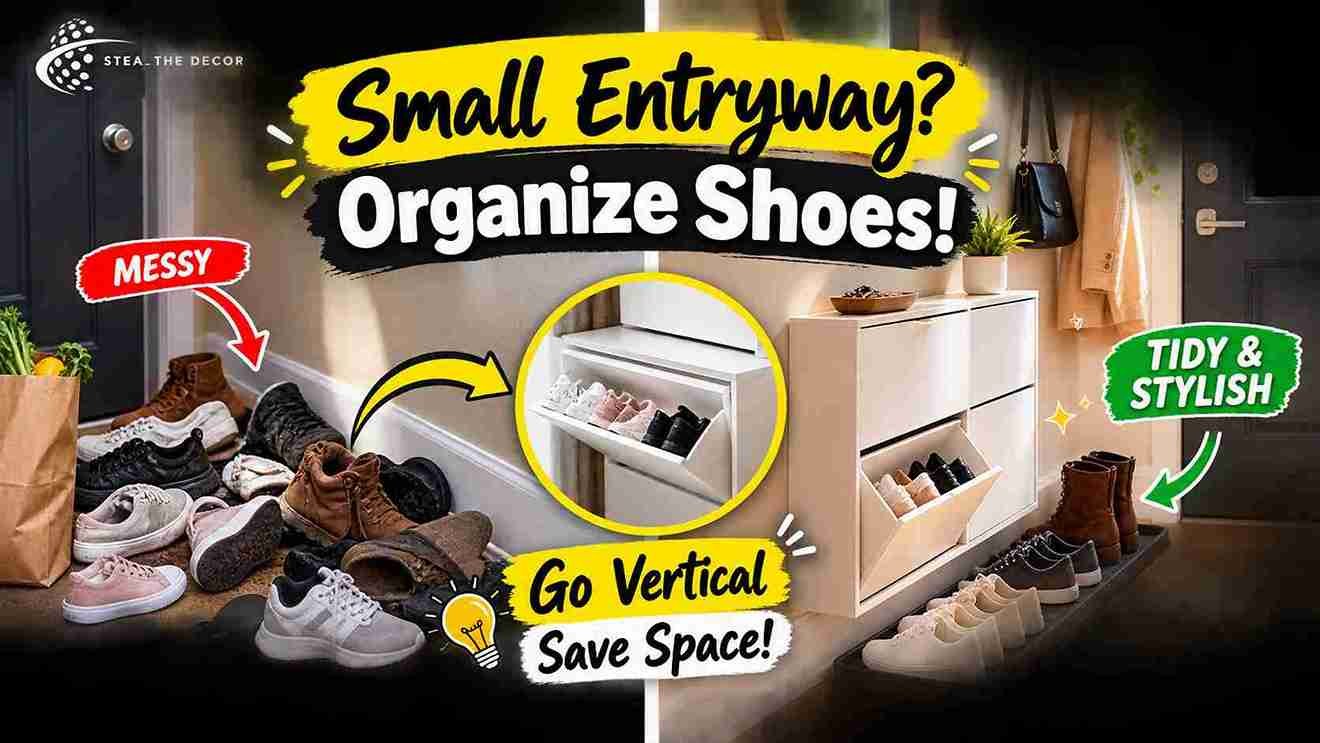
That was my entryway in a one-bedroom rental in Columbus. Thirty-two inches wide no closet no coat hooks and a door that swings inward and eats half the floor. Eleven pairs lived in a pile against the baseboard because there was nowhere else to put them. My lease also bans wall anchors so the obvious fix was off the table before I started.
So I spent three weekends testing nine ways to organize shoes in a small entryway without a closet. Vertical hidden freestanding adhesive over-the-door. Some held. One failed at 6 a.m. and dented my door.
Here’s what worked what didn’t and what I’d buy again tomorrow.
Quick Answer: The most reliable way to organize shoes in a small entryway without a closet is to go vertical and shallow. A slim wall-mounted or freestanding cabinet under 8 inches deep such as the IKEA TRONES holds roughly four pairs per unit while barely intruding on a narrow hallway. Renters who cannot drill should pair a low freestanding rack with a rubber boot tray and a rotation rule that keeps only two pairs per person at the door. Everything else goes into labeled clear shoe containers on a shelf or under the bed.
How I test: I buy everything myself. No affiliate links no paid mentions. Prices are what I paid in 2025 and will drift.
What Actually Counts as a “Small Entryway” (and Why No Closet Changes Everything)
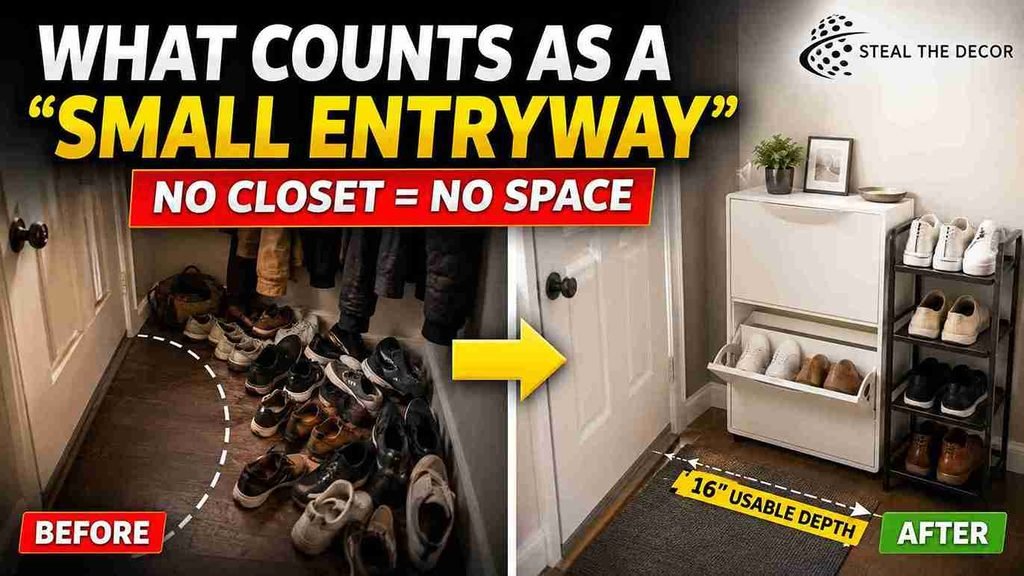
Small entryways are any entry zone under about 40 inches wide or under about 20 inches of usable depth once you subtract the door swing. That second measurement is the one nobody takes. My entryway area measured 48 inches deep on paper. The door swept a 32-inch arc across it and left a strip roughly 16 inches wide along one wall. That strip was the entire space for shoes.
A missing entryway closet costs you two things at once. Closed storage so every pair you own becomes visible clutter. And vertical storage because the real value of a built-in closet in a tiny apartment is stacked closet storage inside a 24-inch footprint. Renters with a mudroom or even a shallow coat closet get a closet floor to work with. You get bare wall.
Then there’s your lease. Most American rental agreements treat screw holes in drywall as tenant damage and a wall-mounted cabinet like the TRONES is explicitly required by IKEA to be secured to the wall. One line in a product manual and half the entryway shoe storage ideas on Pinterest quietly stop being options for you.
Bottom line: measure your usable depth after the door swings not before that number decides everything else.
Does No-Drill Shoe Storage Actually Hold Up in a Rental?
Yes but only under conditions most people never check. And shoes are heavier than they look. A pair of leather boots runs 4 to 6 pounds so three pairs on an adhesive rack means you’re asking a strip rated for a picture frame to hold a small dumbbell. That math is where almost every failure starts.
It works when: your walls are smooth painted drywall the load per mount stays under the stated limit and you clean the surface with isopropyl alcohol first. Then you wait a full hour before loading it. 3M’s Command product weight limits guide lists exact ratings per hook and strip. Those numbers are honest if you respect them.
It fails when: the wall is textured painted within the last three weeks or sitting in a humid entry that takes wet boots all winter. It also fails when someone yanks a shoe outward instead of lifting it off. Adhesive is strong in shear and weak in peel. That’s the whole story.
And if you’re in a rental with knockdown texture I feel you. Nothing sticks. Light orange peel usually holds. Anything deeper don’t bother.
Honestly? I went in more optimistic than this. Adhesive turned out to be excellent for slippers sandals flats and kids’ shoes and useless for boots. I learned the same lesson mounting hooks around the kitchen the full breakdown of what command hooks can and can’t hold applies directly here.
Bottom line: use adhesive for lightweight footwear gravity for everything else.
9 Small Entryway Shoe Storage Ideas That Need Zero Drilling
Every idea below is one I put in my own entry. Pair counts and footprints are measured not estimated and each one is built to keep your shoes tidy without a single screw.
1. A slim freestanding shoe cabinet unanchored but weighted. A cabinet under 8 inches deep is the single biggest win in a narrow hallway. The IKEA TRONES is 7⅛ inches deep and holds about four pairs per unit. IKEA wants it anchored to the wall so if you can’t drill stack two units maximum against a wall the door doesn’t hit and weight the base. Not three high not with kids or pets in the house. About $60 for a two-pack.
2. A narrow shoe rack behind the door. The most underused square footage in any apartment is the wall the open door covers. A multi-tier shoe rack in metal roughly 24 inches wide and 11 inches deep holds six to eight pairs there for $18 to $30 and gives you quick access on the way out. Mine had to stay under 12 inches deep or the door hit it. This is also the easiest DIY shoe rack spot if you’d rather build a two-board version yourself.
3. A bench with storage underneath. If your entry is 36 inches or wider a storage bench earns its footprint twice. A bench to sit on when putting on shoes and four to six pairs in shoe cubbies underneath. It’s the one piece of furniture here that fixes a comfort problem as well as a storage problem. Expect $70 to $140 for something that doesn’t wobble.
4. Clear plastic shoe containers stacked and labeled. Unglamorous and extremely effective for hidden shoe storage in apartments. Stackable shoe boxes run $1.50 to $3 each and let you see contents without unstacking the same labeling logic that keeps a tiny rental pantry organized. I keep six in a corner column 13 inches deep.
5. An over-the-door shoe organizer with a warning. A fabric pocket organizer holds 12 to 24 pairs for $15 to $25. Best capacity per dollar on this whole list. It’s also the one that failed on me which I’ll get into below. Use it on a bedroom or closet door. Never your front door.
6. A tension-mounted shelf across a narrow alcove. Got a recess or a gap under 40 inches? A spring-loaded rod plus a shallow board makes a floating shelf with zero fasteners. Same principle as tension rods under the sink scaled to footwear. Keep it to sneakers and flats around 15 pounds total.
7. A boot tray as the anchor of a drop zone. A rubber boot tray or low boot rack $20 to $35 does something psychological as much as practical. It tells everyone in the apartment where shoes are allowed to be. Mine is 15 by 30 inches and holds three pairs plus the snow that would otherwise puddle on the floor. I almost skipped this one as too obvious. Glad I didn’t.
8. Baskets under a narrow console table. A console table or small table 10 to 12 inches deep gives you a surface for keys and mail. Underneath two woven baskets hold four to six pairs of soft shoes. It’s hidden storage that guests never read as shoe storage at all.
9. Adhesive flip-down racks for lightweight pairs only. Wall mounted shoe storage ideas using adhesive plates work well for sandals slippers and flats at 1 to 2 pounds per pair. Mount at hip height load lightly. Above 3 pounds per mount? Walk away.
Bottom line: the winning entryway storage setup is almost always one shallow vertical unit one tray and a hard cap on how many pairs live at the door.
Pro Tips for Renters
- Wipe the wall with isopropyl alcohol not a household cleaner before any adhesive goes up. Multi-surface sprays leave a film that quietly halves bond strength and you won’t find out for six weeks.
- Cap the door at two pairs per person. Storage never fixes a volume problem. My eleven pairs became four at the door and seven in containers and the entry has stayed clear for a year.
- Store shoes heel-to-toe not side by side. Alternating direction shaves roughly 30 percent off the width a pair occupies the cheapest way to save space in a narrow hallway.
- Never put wet shoes on a wood or laminate shelf. Water sits under the sole and lifts the finish quiet damage that surfaces at move-out.
- Photograph the bare wall and floor before you install anything. Timestamped photos are the cheapest deposit insurance that exists.
Step-by-Step: How to Build a Damage-Free Shoe Drop Zone
This is the exact sequence I use now. About 90 minutes start to finish and the order matters more than the products.
Step 1 Measure your usable depth after the door swing. Open the door fully mark where the leading edge lands and measure from that line to the opposite wall. Then measure your wall height to the ceiling. Common mistake: measuring the empty room and buying a unit the door then hits.
Step 2 Count and cull your shoe collection. Line up every pair. Anything you haven’t worn in three months leaves the entryway. Common mistake: buying a storage system sized for the pile you have instead of the pile you need at the door.
Step 3 Claim the wall behind the open door first. This is how you maximize vertical space in an entry that has no floor to spare. Your tallest freestanding unit goes here. Common mistake: filling the visible wall and leaving the hidden one empty.
Step 4 Set the boot tray as your boundary. Against the wall on the hinge side out of the walking path. Common mistake: centering it in the walkway where it becomes a trip hazard.
Step 5 Clean any adhesive mounting surface. Isopropyl alcohol on a lint-free cloth dried fully. I stood there with a bottle of rubbing alcohol thinking this was overkill on a wall that looked spotless. Did it anyway. That mount is still up. Common mistake: skipping it because the wall “looks clean.”
Step 6 Mount adhesive hardware and wait a full hour before loading. 3M’s official application and removal instructions specify pressing firmly for 30 seconds and waiting an hour for full bond strength. Common mistake: hanging shoes immediately the number one cause of overnight failures.
Step 7 Load heaviest at the bottom. Boots on the floor tier sneakers in the middle sandals up high. Common mistake: putting boots on an upper adhesive tier because it’s easier to reach.
Step 8 Live with it for one week then adjust. Watch where shoes actually land when you’re tired and carrying things. If people keep dropping them two feet short of your rack move the rack. Don’t nag. Common mistake: designing for the habit you want instead of the one you have.
Bottom line: measure cull then install in that order or you’ll buy twice.
6 Common Mistakes Renters Make With Entryway Shoe Storage
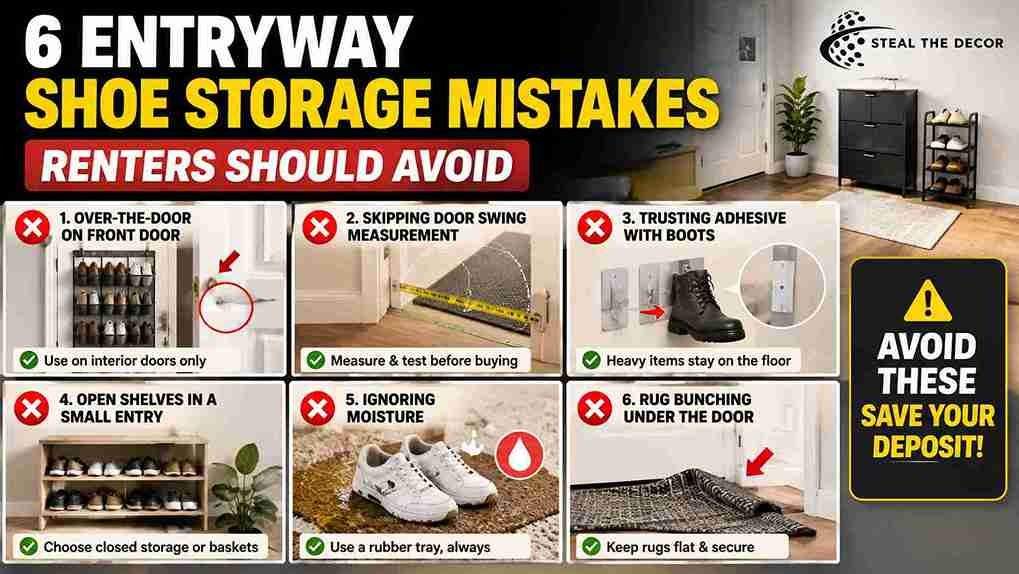
Mistake 1: Hanging an over-the-door organizer on the front door. This one’s mine. It held 16 pairs beautifully for five weeks and I was ready to call it the winner. Then the metal hooks compressed between door and frame every time the door closed left two shallow dents in the door edge and the whole thing slid off at 6 a.m. when a boot shifted. Do this instead: interior bedroom or closet doors where the clearance is forgiving and nobody slams them.
Mistake 2: Buying before measuring the door swing. A 14-inch-deep shoe cabinet is useless if the door clears 12 inches and returns cost you shipping and a weekend. Do this instead: tape the footprint on the floor and open the door 20 times before you order.
Mistake 3: Trusting adhesive with boot weight. Adhesive strips are rated for static evenly distributed load. Yanking a boot outward applies peel force instead and peel is where they give way. Do this instead: anything over 3 pounds per mounting point stays on the floor.
Mistake 4: Choosing open shelves in a small entry. Shoes on open shelves read as clutter no matter how neatly you arrange them because you see them head-on the second you walk in. Do this instead: closed storage or baskets at eye level open shelves only above shoulder height where they don’t dominate the entryway area.
Mistake 5: Ignoring moisture. Wet shoes on carpet grow mildew and mildew in a rental entry is a deposit conversation. The same rule governs every damp corner of a rental it’s why damage-free bathroom storage leans on non-porous materials too. Do this instead: rubber tray always.
Mistake 6: Letting a rug bunch under the door. A sliding entry rug catches the door and rucks up a trip hazard and a fast way to fray the carpet underneath. Do this instead: stop the rug from bunching on carpet before it costs you.
Bottom line: most entryway failures are load and moisture problems not design problems.
Renter-Safe Shoe Storage I’d Actually Buy Again
Four shoe storage solutions earned their space. Prices are what I paid treat them as ranges.
The IKEA TRONES two-pack ($60) has the best depth-to-capacity ratio I found though the plastic has no ventilation holes so damp shoes stay damp in there. The two-tier metal rack ($22) is cheap airy and moves in 10 seconds but it’s fully visible which is exactly why it belongs behind the door. A storage bench with cubbies ($95) is the only option here that solves the balancing-on-one-foot problem and the only one that demands 36 inches of wall.
And then the rubber boot tray ($28) which adds zero capacity and still took the highest rating in the table. I know how that looks. Use one for a week.
| Product / Method | Price Range | Ease of Use (1–5) | Damage Risk | Best For | My Rating |
|---|---|---|---|---|---|
| Slim shoe cabinet (IKEA TRONES) | $55–$70 | 4 | Minor anchoring recommended | Narrow entries under 20 inches deep | 4.5/5 |
| Two-tier metal shoe rack | $18–$30 | 5 | None | Wall behind the open door | 4.5/5 |
| Storage bench with cubbies | $70–$140 | 4 | None | Entries 36 inches wide or more | 4/5 |
| Clear stackable shoe containers | $1.50–$3 each | 5 | None | Off-season and rarely worn pairs | 4/5 |
| Over-the-door shoe organizer | $15–$25 | 5 | Risk of dents on the door edge | Interior doors only never the front door | 2.5/5 |
| Adhesive flip-down rack | $20–$35 | 3 | Risk of paint damage if overloaded | Sandals slippers flats under 2 pounds | 3/5 |
| Rubber boot tray | $20–$35 | 5 | None | Wet boots and defining a drop zone | 5/5 |
Bottom line: a slim cabinet plus a boot tray keeps your shoes off the floor in most small entries for under $100.
What to Check With Your Landlord Before You Start
Five minutes of checking beats a deposit deduction. Before anything goes up:
- Read your lease for language on wall anchors screws adhesives and “alterations.” Adhesive is often silent in leases which is not the same as permitted.
- Ask in writing email not a phone call whether small anchors are acceptable and whether you’re expected to patch them at move-out.
- Check whether your front door is a fire door. Hardware hung over one can interfere with its seal and self-closing function and many buildings prohibit it outright.
- Confirm that shared-corridor storage is allowed. In most buildings shoes outside your unit door violate egress rules.
- Photograph the entry walls floor door edge and baseboards before installation with timestamps.
- Keep receipts and packaging for anything freestanding so you can prove it left with you.
The U.S. Department of Housing and Urban Development maintains a tenant rights resource worth reading once though your lease and your state’s landlord-tenant statute are the documents that actually govern you.
Bottom line: get permission in writing and photograph everything before the first hook goes up.
Real Results: What Fit Into a 32-Inch Entry for $118
Final setup itemized:
- Two-tier metal shoe rack behind the door: $22
- IKEA TRONES two-pack stacked two high against the hinge-side wall: $60
- Rubber boot tray: $28
- Six clear stackable shoe containers for off-season pairs stored in the bedroom: $8
Total: $118 and multiple pairs of shoes finally have somewhere to go eleven pairs four at the door and seven stored elsewhere. Floor space reclaimed in the walking path: the entire 32-inch width where a pile used to eat about 18 inches. Extra space I didn’t expect: the top of the cabinet became the key drop.
What failed: the $19 over-the-door organizer which dented the door edge and came down at 6 a.m. It lives inside a bedroom closet now and it’s excellent there. What surprised me: the boot tray mattered more than any storage unit in the entry. Once there was an obvious place for wet shoes everyone used it without being asked once.
Actually let me walk one thing back. I said earlier that the slim cabinet was the biggest win and by capacity it is. By behavior change the $28 tray beat it.
What I’d change: buy the TRONES first skip the organizer entirely and accept that two units is the ceiling without anchoring. I tried a third. The stack swayed enough that it came down the same evening.
Bottom line: $118 and one honest failure bought me a permanently clear entry.
FAQ: organize shoes in a small entryway without a closet
How do you organize shoes when you have no closet?
Go vertical and shallow. Put one slim cabinet under 8 inches deep on the wall behind your door then add a rubber boot tray as a defined drop zone. Everything you don’t wear weekly moves into labeled clear containers stored under a bed.
Where should shoes go in a small entryway?
Against the hinge-side wall behind the arc of the open door the only floor area in most apartments that isn’t part of the walking path. Measure the swing first then keep any unit shallower than that clearance so the door opens fully.
Is no-drill shoe storage safe for a rental?
Freestanding racks benches trays and containers carry no damage risk. Adhesive mounts are safe on smooth painted drywall within their stated weight limits but they can pull paint if overloaded and perform poorly on textured walls or in humid entries.
Does adhesive shoe storage leave residue?
Properly removed Command-style strips come off cleanly by stretching them straight down along the wall rather than pulling outward. Residue and paint damage almost always come from pulling toward you removing too fast or exceeding the weight rating. Follow the manufacturer’s removal method exactly.
How much does it cost to organize a small entryway?
A functional setup runs $40 to $120. An entryway shoe rack at $18 to $30 plus a boot tray at $20 to $35 covers a very tight entry. Adding a slim cabinet at $55 to $70 or a storage bench at $70 to $140 buys enough space to keep footwear organized out of sight.
What’s the best shoe storage for a narrow hallway?
A slim wall-style cabinet is the strongest pick because depth not width is the binding constraint. The IKEA TRONES is 7⅛ inches deep and holds about four pairs per unit so two units give you real storage space against one wall. If you can’t anchor it stack no more than two and weight the base.
What do I do if my shoe rack fails or falls?
Don’t re-hang it in the same spot a failed adhesive mount rarely holds a second time on the same patch of paint. Inspect the wall for lifted paint photograph it and move that load to a freestanding unit on the floor.
Key Takeaways
- The IKEA TRONES shoe cabinet measures 7⅛ inches deep and holds approximately four pairs of shoes per unit making it one of the shallowest closed-storage options available for narrow rental entryways.
- IKEA specifies that TRONES cabinets must be secured to the wall which means renters who cannot drill should limit themselves to a maximum of two stacked units placed against a wall and weighted at the base.
- 3M Command adhesive strips reach full bond strength one hour after application and must be removed by stretching straight down the wall not pulled outward to avoid paint damage in rental apartments.
- Adhesive wall mounted shoe storage is reliable for footwear under roughly 2 pounds per pair such as sandals and flats but unsuitable for leather boots weighing 4 to 6 pounds per pair.
- The wall behind an inward-swinging front door is the most underused vertical space in a small apartment entryway and fits a multi-tier metal shoe rack roughly 24 inches wide and 11 inches deep which is the cheapest way to maximize entryway storage without a closet.
- A complete damage-free entryway shoe storage system slim cabinet metal rack rubber boot tray and clear plastic shoe containers costs approximately $118 and keeps eleven pairs tidy in a 32-inch-wide entry.
- Over-the-door shoe organizers hung on a front door can dent the door edge where the hooks compress against the frame making interior bedroom doors the safer placement in rental housing.
Before You Buy Anything
If you take one thing from three weekends of this: measure your door swing then cull your collection before you spend a dollar. Almost every entryway that looks like a storage problem is a volume problem wearing a disguise and that fix costs nothing at all.
The rest is unglamorous. A shallow cabinet a rack the door hides a rubber tray that tells everyone where wet shoes go. That’s the whole smart entryway setup and it survived a winter.
Have you tried organizing a closet-less entry in your own rental? Tell me what worked and what fell off the wall I read every comment and the failures are usually more useful than the wins.
If you’re tackling the rest of your place next start with decorating a rental without damage it covers the same deposit-safe logic applied to walls floors and lighting.