
That metal grille sitting in the middle of your living room wall isn’t going anywhere on its own. If you’ve ever tried to plan a gallery wall, hang a TV, or just enjoy a clean-looking room, you know how a vent can throw the whole design off. Learning how to hide ugly wall vents doesn’t mean ripping out drywall or calling an HVAC contractor — most fixes take an afternoon and a few dollars. The trick is balancing looks with airflow, since blocking a vent completely can strain your heating and cooling system. Below are the methods homeowners actually use, what they cost, and which ones hold up over time.

Why Wall Vents Stand Out So Much
Builders place HVAC vents wherever the ductwork lands, not wherever they’ll look good. That’s why so many homes end up with a stark white or beige grille smack in the center of an otherwise nice wall. The contrast in color, the slatted shape, and the slight shadow it casts all pull the eye toward it before anything else in the room.
Older homes have it worse. Vents installed decades ago often sit at odd heights, clash with updated trim, or show rust and chipped paint. New construction isn’t immune either — builder-grade plastic registers rarely match higher-end finishes once you start decorating.
Position matters just as much as finish. A vent tucked low near the baseboard is easy to ignore, but one positioned at eye level on a feature wall competes directly with artwork, mirrors, or a TV mount. Open floor plans make this worse, since a single vent can be visible from three or four different sightlines at once—the kitchen, the hallway, and the living room all looking at the same grille.
There’s also a psychological side to it. Once you notice a vent, you can’t un-notice it. Designers call this the “ugly duckling effect” — a single mismatched detail pulls focus away from everything you actually spent time decorating. That’s exactly why even small fixes, like a matched paint job, can make a room feel finished without changing anything else.
What to Check Before You Hide Ugly Wall Vents
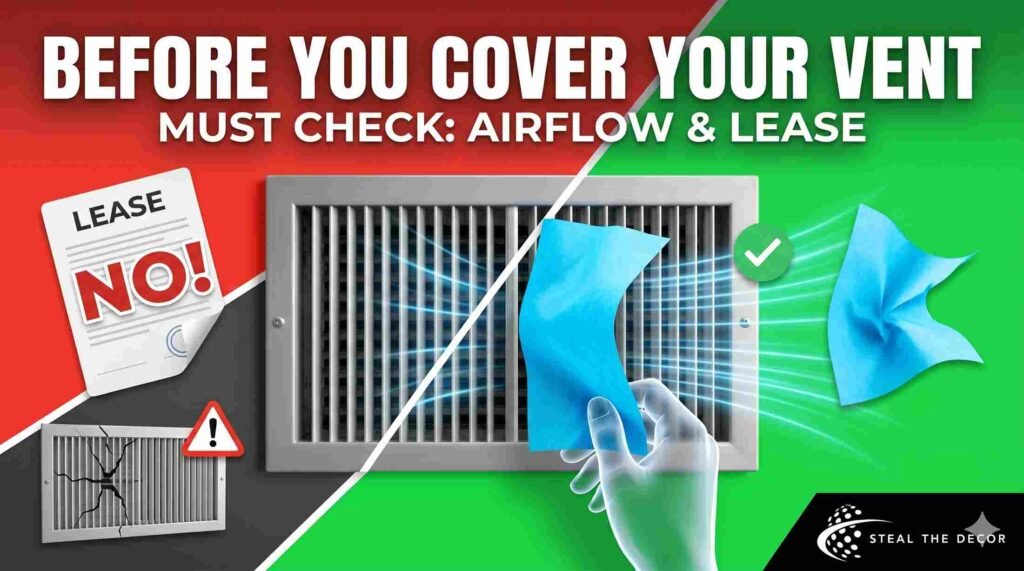
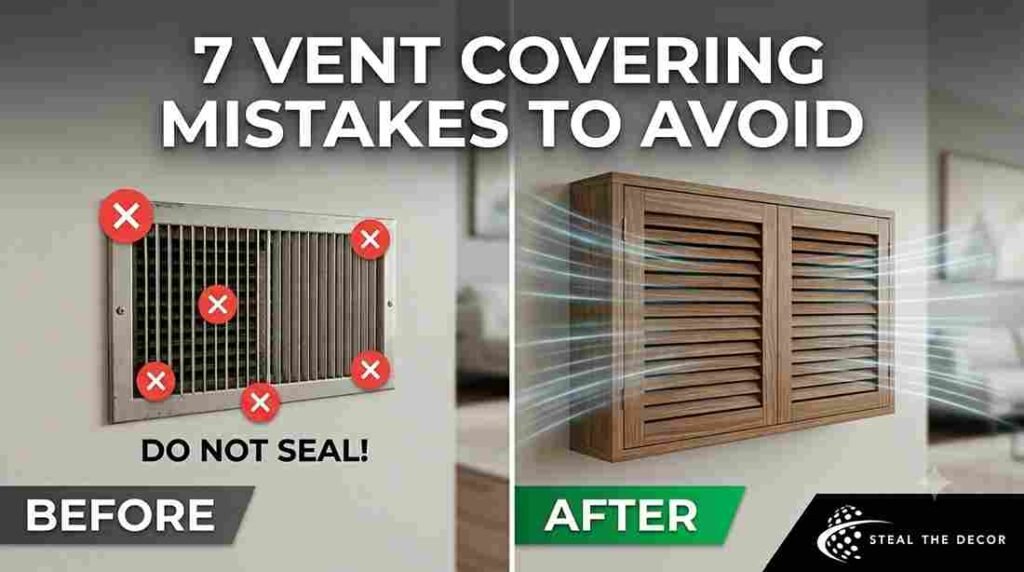
A wall vent is a return-air or supply-air opening connected to your home’s HVAC ductwork, and it needs unobstructed airflow to work correctly. Covering it with a solid, sealed object can strain the system, cause uneven heating or cooling, and, in some cases, trip safety shutoffs on the furnace.
Before picking a method, figure out which type of vent you have. A supply vent pushes conditioned air into the room, so it needs an opening that lets air pass through freely. A return vent pulls air back toward the system, and it’s a little more forgiving since it doesn’t need to project air outward—but it still can’t be sealed shut. If you’re not sure which one you’ve got, hold a tissue near it with the HVAC running. Air blowing out means supply; air pulling in means return.
Renters should also check their lease. Some rental restrictions specifically prohibit painting permanent fixtures or drilling into walls near ductwork, so a removable solution is the safer bet if you don’t own the place.
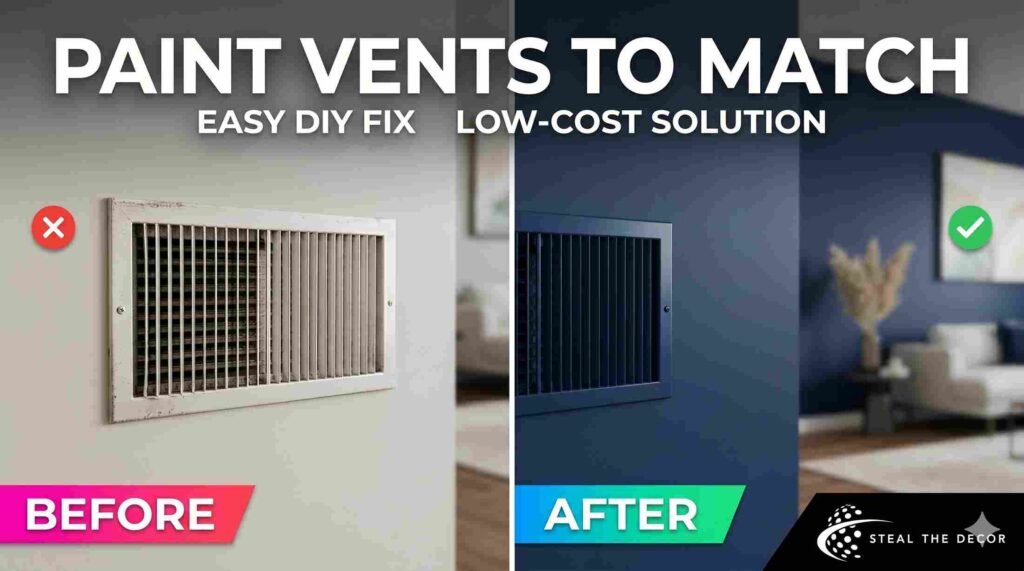
Paint the Vent to Match Your Wall
This is the cheapest and fastest fix, and it works on almost any vent style. Unscrew the cover, take it outside or into a garage, and use a metal-safe spray paint in a color matched to your wall. A small can typically runs $6 to $10 at a hardware store like Home Depot or Lowe’s.
Let the cover dry completely—usually 24 hours—before reinstalling it. Painting it the exact wall color makes it recede into the background instead of standing out as a separate object. If your walls have a pattern or wallpaper, match the darkest tone in the design rather than going stark white, since white draws more attention than a muted shade.
This won’t make the vent invisible up close. You’ll still see the slats and the shadow line around the edges. But from normal viewing distance, most people stop noticing it within a few days of the change.
A few things make the paint job hold up better. Lightly sand the cover first with fine-grit sandpaper so the new coat has something to grip — skipping this step is the main reason painted vent covers chip within a month. Apply two thin coats instead of one thick one, since heavy coats tend to pool inside the slats and clog the openings. And avoid glossy finishes; a satin or matte sheen blends with most wall paints far better than anything shiny.
If you’re renting and worried about painting a fixture that technically belongs to the landlord, ask first. Most property managers don’t mind a vent cover being painted, since it’s a cheap swap back to original if needed—just keep the original color can or a sample chip in case you move out.
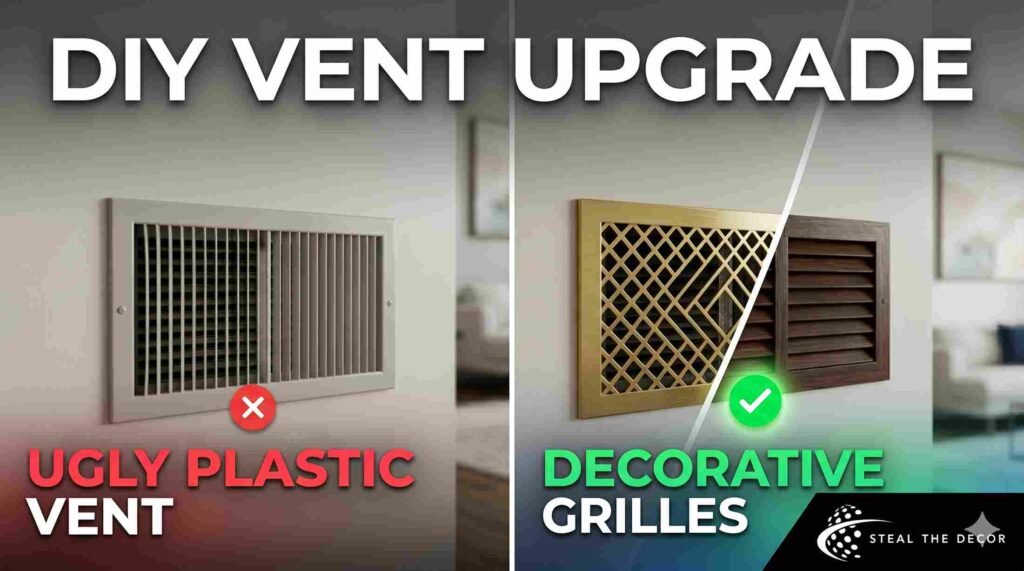
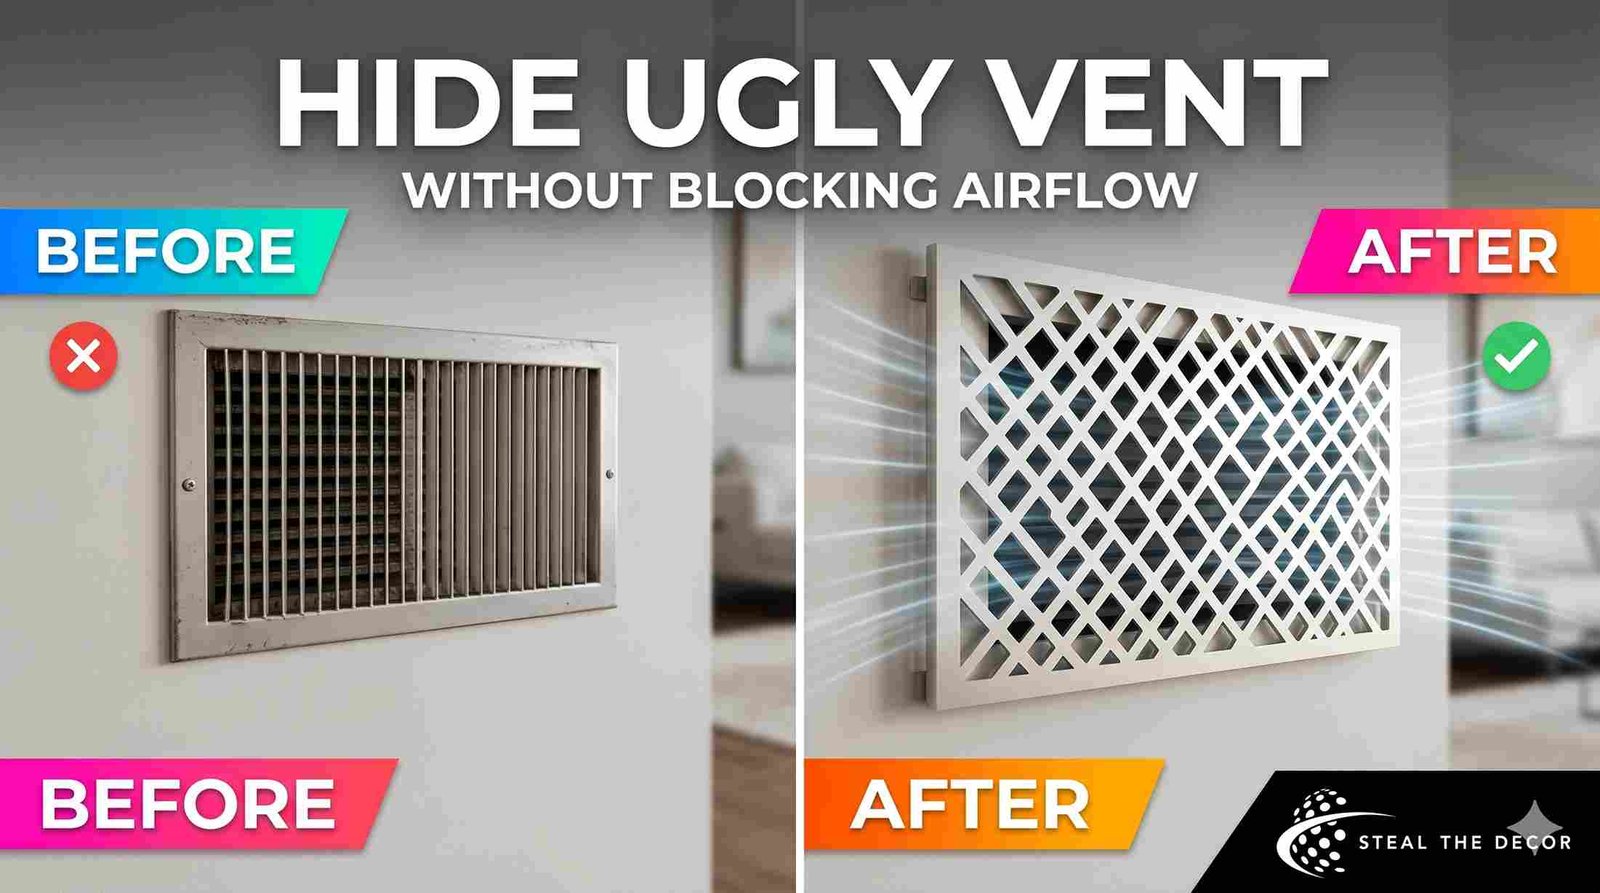
Use a decorative vent cover or grille.
Swapping the builder-grade plastic register for a decorative metal or wood grille is a bigger upgrade, but it’s still a DIY-friendly project. These covers come in scrollwork, geometric, and minimalist patterns, and they install the same way as the original — usually with two screws or a simple clip mechanism.
Decorative covers run anywhere from $15 for basic styles to $60 or more for solid brass or hand-finished wood. Measure your existing vent opening carefully before ordering, since sizing varies between brands, and a half inch off can mean a return trip to the store.
Magnetic covers are worth a separate mention. These sit flush over the existing register using a thin magnetic frame, which means no screws, no painting, and no risk of damaging the wall. They’re popular with renters for exactly that reason, though they only work on metal-framed vents, not plastic ones. Measure twice here, too, since magnetic covers need to overlap the vent edges by at least half an inch to stay in place.
When shopping, look for reviews mentioning airflow specifically. A beautifully designed cover that restricts air movement too much defeats the purpose, and some lower-cost imports have noticeably tighter slats than the original builder-grade register.
| Cover Type | Average Price | Best For |
| Painted plastic (DIY) | $6–$10 (paint only) | Renters, quick fixes |
| Decorative metal grille | $20–$45 | Traditional or vintage homes |
| Solid wood louvered cover | $30–$60 | Farmhouse or craftsman style |
| Custom-cut magnetic cover | $25–$50 | Modern, minimalist rooms |
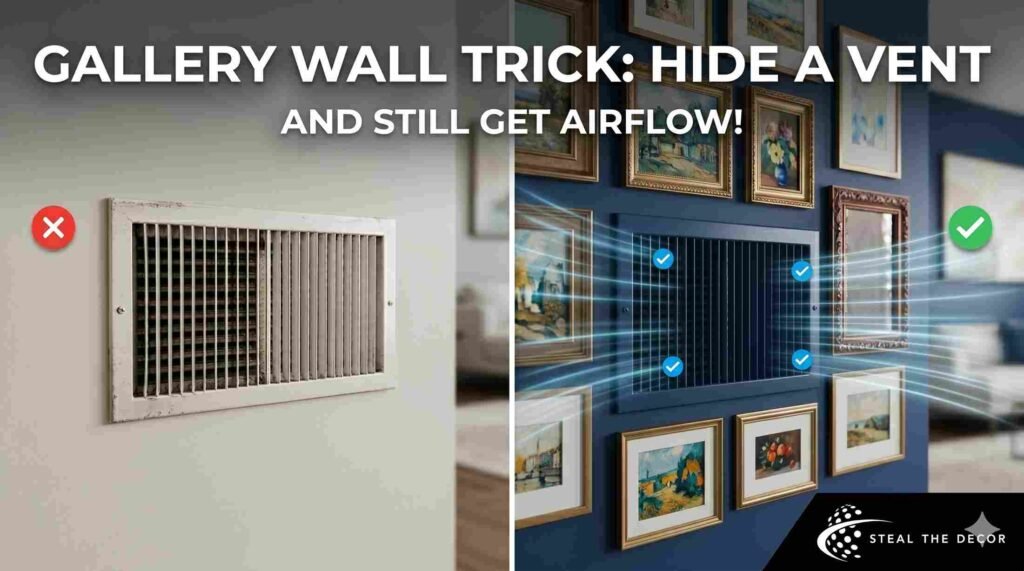
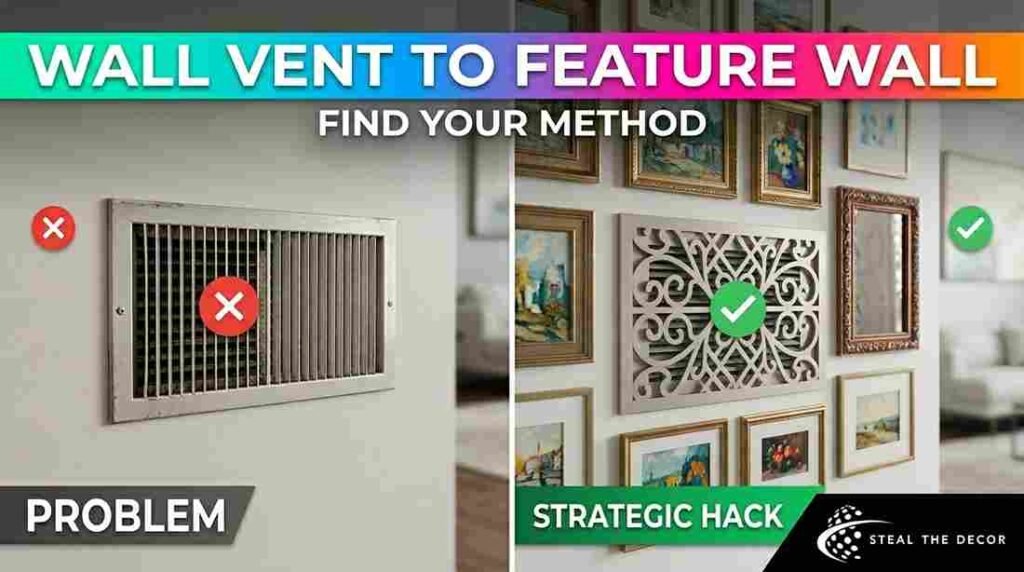
Hide It Behind a Gallery Wall or Art
Building a gallery wall around the vent is one of the more popular tricks among interior designers, and it works because it gives the eye somewhere else to land. Instead of one obvious grille, the wall becomes a collection of frames, with the vent treated as just another shape in the layout.
Start by painting the vent cover to match the wall or the frame finish, then arrange art, mirrors, or photos around it in a balanced grid. Leave enough clearance directly in front of the vent opening so airflow isn’t blocked by frame edges or mats.
This method takes more planning than the others, but it doubles as a real design feature instead of a patch job. It works especially well in entryways, staircases, and dining rooms where a vent often lands at an awkward eye-level spot.
To plan the layout, lay the frames out on the floor first, using painter’s tape to mark the wall boundaries. Treat the vent as one “slot” in the grid rather than something to work around—center a frame above or beside it rather than leaving an empty gap, which only draws more attention to the spot you’re trying to disguise. Mixing frame sizes and a couple of mirrors also helps, since reflective surfaces break up the wall visually and pull focus away from any single point.
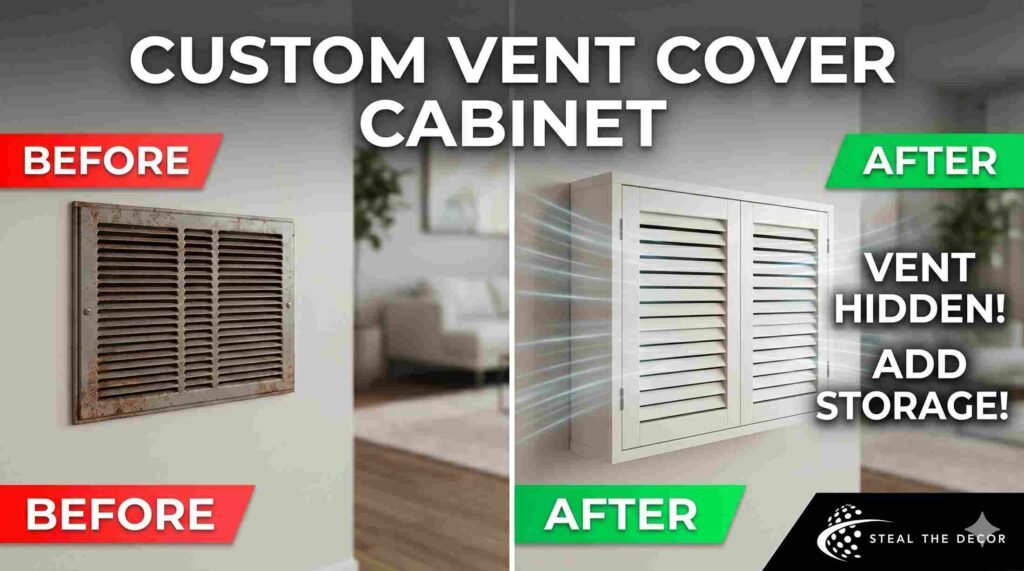
Build a vent-cover cabinet or shelf.
For vents near the floor, a low cabinet or open shelving unit can hide the opening completely while adding storage. Remove the back panel of the cabinet, or cut an opening in it, so air can still pass through into the room. A jigsaw and about an hour of work are usually enough for a basic cabinet retrofit.
Taller vents, closer to ceiling height, are trickier to box in, but a floating shelf with a slatted or louvered front panel can achieve a similar effect. Air circulation has to stay the priority here — any enclosure needs a vented front, back, or side, not a solid box.
This is the most labor-intensive option on this list, and it may require basic carpentry skills or a handyman. But it’s also the most permanent and the most functional, since you gain usable surface space in the process.
Cabinet depth matters more than people expect. Anything deeper than about 10 inches starts to choke airflow, even with a vented back panel, so shallow consoles and media stands work better than deep storage cabinets. If you’re building from scratch, a louvered or caned door front lets air pass through the whole face of the cabinet instead of relying on a single cutout, which keeps the HVAC system running closer to normal.
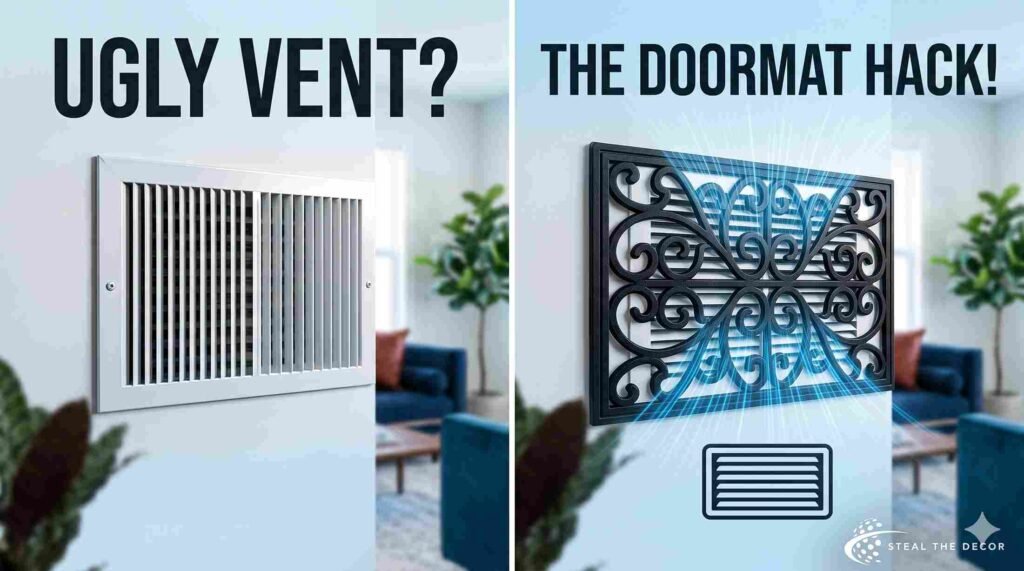
Try the Doormat Trick
This one sounds strange the first time you hear it, but it’s become a go-to hack in home design circles. A grate-style rubber doormat, the kind with an open scrollwork pattern, can be hung directly over a wall vent using two small nails or hooks.
Doormats with open designs let air pass through just fine, and the decorative pattern reads as wall art rather than HVAC hardware. Prices typically land between $10 and $20 at stores like Target or Home Depot. If the black rubber doesn’t match your decor, a coat of spray paint in gold, bronze, or matte white can change the whole look.
Make sure the mat actually has gaps in the pattern before buying — solid rubber mats will block airflow and aren’t a safe substitute.
Hanging it correctly takes a little care. Use light-duty picture hooks rather than heavy-duty nails, since rubber doormats are lighter than they look, and oversized hardware can leave bigger holes than necessary. Center the mat over the vent opening rather than the wall space around it, and double-check that the open pattern lines up with the slats underneath instead of crossing them at an angle, which can visually look messy from across the room.

Use Furniture Placement Strategically
A console table, narrow bookshelf, or accent chair placed in front of a low wall vent can hide it without touching the vent itself. The key is leaving enough gap underneath or behind the furniture for air to move freely—most HVAC guidelines recommend at least a few inches of clearance.
A tall plant works the same way for vents at awkward mid-wall heights, and it’s an easy option for renters since nothing gets painted, drilled, or modified. Just check that the plant won’t dry out or get knocked over by direct airflow.
This approach is the least committal on the list. If you move or change your mind, there’s nothing to undo. It also pairs well with the gallery wall idea, since furniture below and frames above can fully redirect attention away from the vent.
Furniture height matters as much as placement. A piece that’s too tall can trap warm or cool air against the wall instead of letting it circulate into the room, which sometimes shows up as a cold spot on the floor nearby. Stick to furniture that sits at or just below the bottom edge of the vent opening, and leave a couple of inches of breathing room behind it rather than pushing it flush against the wall.
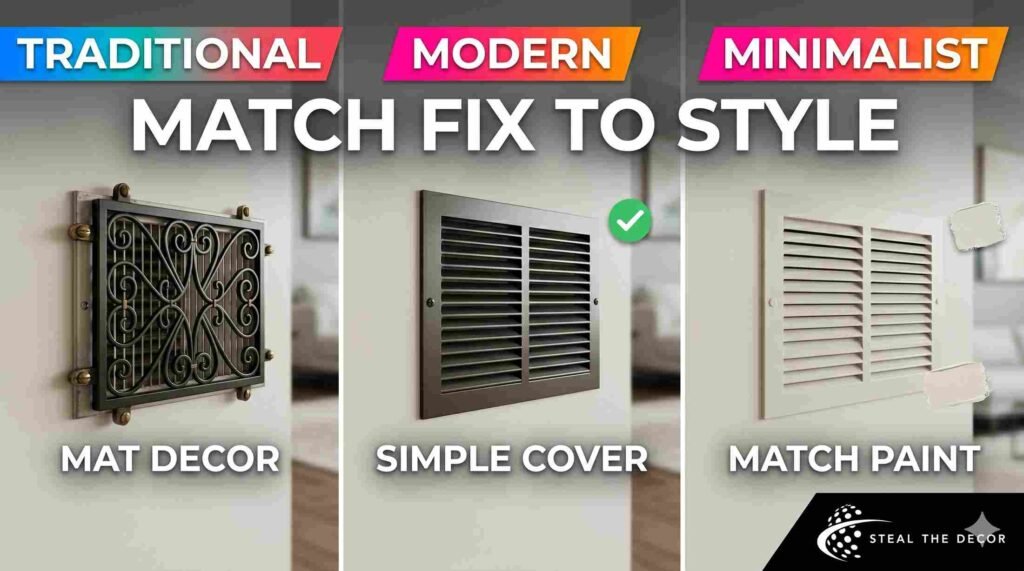
How to Hide Ugly Wall Vents Based on Your Home’s Style
Not every method suits every room. A scrollwork doormat looks right at home in a farmhouse or traditional space, but it can feel out of place in a sleek, modern apartment where a magnetic flush cover or a simple matched-paint finish reads more intentional. Mid-century and minimalist interiors tend to favor covers with clean geometric lines rather than ornate patterns.
Seasonal swaps are worth considering, too, especially in regions with big temperature swings. Some homeowners keep a lightweight decorative cover for spring and summer, then switch to a heavier, more insulated register cover in winter to cut down on drafts near the floor. It’s a small habit, but it can shave a little off heating costs in older homes with leaky ductwork.
Color undertones are another detail that’s easy to miss. Matching a vent cover to the exact wall paint sounds simple, but lighting changes how a color reads throughout the day. Bring a paint sample or the actual cover to the wall at different times—morning light and evening lamp light can make the same shade look slightly mismatched if you only check once.
Common Mistakes to Avoid When Covering a Wall Vent
- Sealing the vent completely with a solid object strains the HVAC system over time.
- Skipping the supply-versus-return check before choosing a cover style.
- Using regular interior wall paint instead of a metal-safe spray paint, which can chip or peel quickly.
- Forgetting to measure the vent opening before ordering a decorative grille.
- Blocking the airflow path with thick rugs, baskets, or solid-backed furniture.
- Ignoring lease restrictions before painting or drilling near a rental’s ductwork.
- Choosing a finish that’s too close to pure white, which tends to stand out more than a muted or matched tone.
Quick Comparison: Which Method Fits Your Situation
| Situation | Best Method |
| Renting an apartment | Doormat trick or furniture placement |
| Vent in the middle of a feature wall | Gallery wall |
| Vent near the floor | Cabinet or shelf build |
| Old, rusted, or chipped vent cover | Spray paint |
| Want a design upgrade, not just a cover-up | Decorative grille |
FAQs: How to Hide Ugly Wall Vents Effectively
Can you cover an air vent on the wall?
Yes, but it has to stay open enough for air to pass through. A decorative grille, an open-pattern doormat, or vented furniture all work, while a sealed, solid cover does not. The general rule is to avoid blocking more than a small percentage of the opening and to check the cover periodically for dust buildup, since that can reduce airflow almost as much as a solid object.
How do you hide a wall vent without blocking it?
The most reliable methods are painting the vent to match the wall, swapping in a decorative cover with open slats, or arranging a gallery wall around it. Each of these keeps the airflow path clear while changing how noticeable the vent looks from across the room. Combining two methods, like a matched paint job plus a nearby gallery wall, tends to work better than relying on just one trick alone.
Is it safe to paint over a vent cover?
It’s safe as long as you use a metal-safe spray paint and apply it to the vent cover itself, not the wall fabric around moving parts. Avoid painting the inside of the duct or any mechanical components, and let the cover dry fully before reinstalling it.
Can you replace a wall vent cover with a decorative one?
Most standard vent covers can be swapped for a decorative version, since they typically use the same screw pattern or clip system. Measure the opening first, because sizing isn’t universal across brands, and a mismatched cover won’t sit flush against the wall.
Does covering a vent affect your HVAC system?
Partially restricting airflow with an open-pattern cover usually has little to no effect on system performance. Fully sealing a vent, however, can cause pressure imbalances, uneven temperatures, and added strain on the furnace or air handler over time.
What is the cheapest way to hide a wall vent?
Spray-painting the existing vent cover to match the wall color is the lowest-cost option, usually under $10. It won’t hide the shape entirely, but it removes the harsh color contrast that makes vents so noticeable in the first place. For renters on a tight budget, this is also the easiest fix to reverse before moving out, since the original cover can be reinstalled or repainted back to its starting color in a single afternoon.
Final Thoughts
There’s no single best way to hide ugly wall vents—it depends on whether you’re renting, how much time you want to spend, and how much the vent’s location is actually bothering you. A coat of matching paint solves the problem for a lot of people. Others need a full design workaround, like a gallery wall or a built-in cabinet. Either way, the airflow has to stay open, so steer clear of anything sealed or solid.
Start with the cheapest fix first, see how it looks for a week, and go bigger only if it’s still bothering you. Most of these projects can be undone or upgraded later, so there’s no real downside to testing a simple option before committing to carpentry or custom covers. The goal isn’t to make the vent disappear completely — it’s to stop it from being the first thing anyone notices when they walk into the room.