
Table of Contents
I stood in my living room doorway with a cup of coffee going cold in my hand, staring at my own window as it had personally wronged me. The blinds — the same flimsy white vinyl ones that came standard in basically every apartment I’ve ever rented — sagged slightly at one corner, sat too low against the frame, and made the whole room look like a leasing-office model unit instead of somewhere I actually lived.
That’s the moment I got serious about how to make cheap blinds look expensive without buying new ones, without touching a drill, and without giving my landlord any reason to keep a single dollar of my deposit. Over three weekends, I tested seven different fixes across my living room, bedroom, and kitchen windows — some worked beautifully, one was a genuine flop — and I tracked every dollar I spent along the way. This guide walks you through exactly what worked, what didn’t, and how to replicate the results in your own rental this weekend.
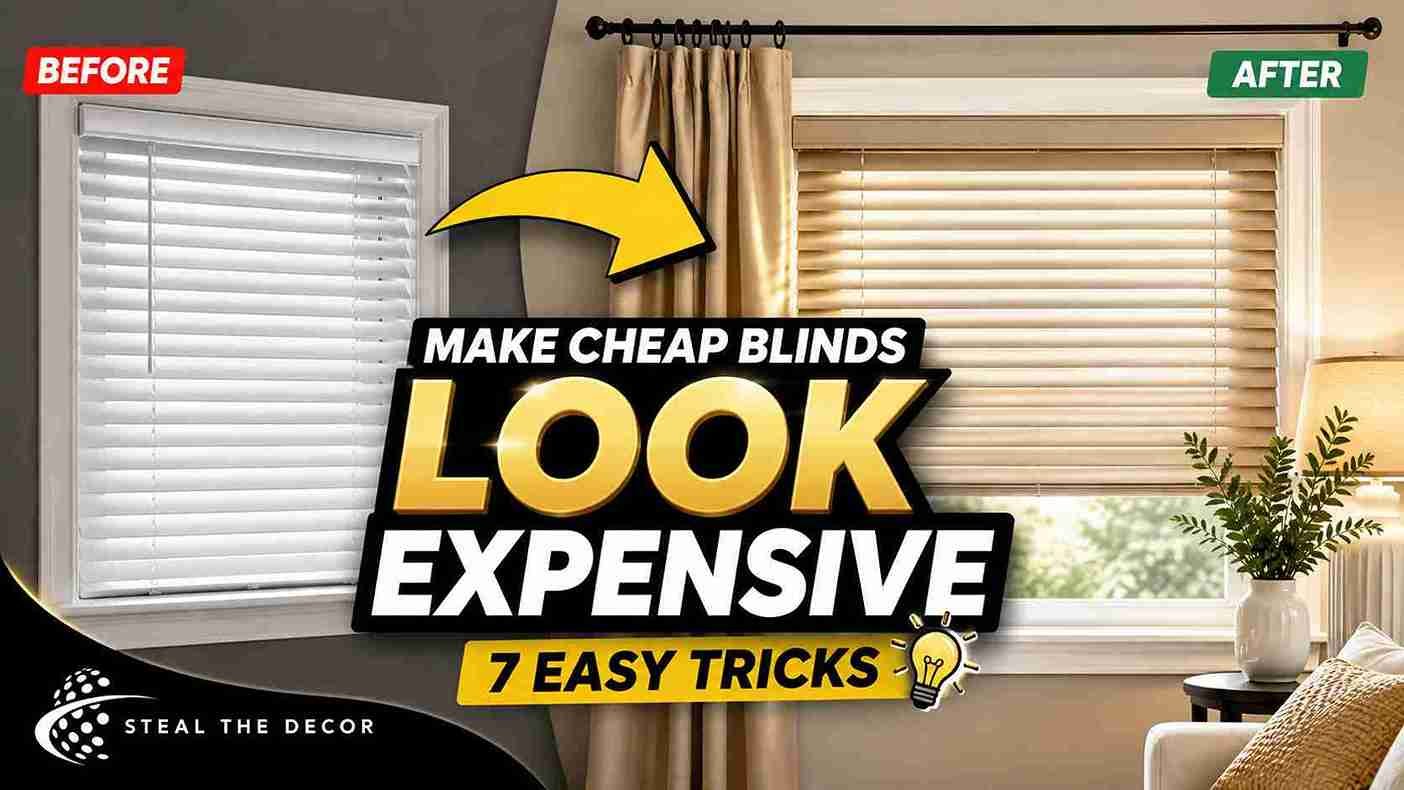
The Short Version: You can make cheap blinds look expensive by mounting them higher and wider than the window frame, swapping cheap plastic wands and cords for brushed nickel or matte black hardware, and layering in linen curtain panels over a proper-length rod. Adding a fabric valance or upgrading to faux wood blinds by Levolor pushes the look further. Most of this is achievable for under $50 using no-drill hardware like tension rods and adhesive brackets — no landlord approval headaches required.
Why Cheap Blinds Look Cheap (And What Actually Fixes It)
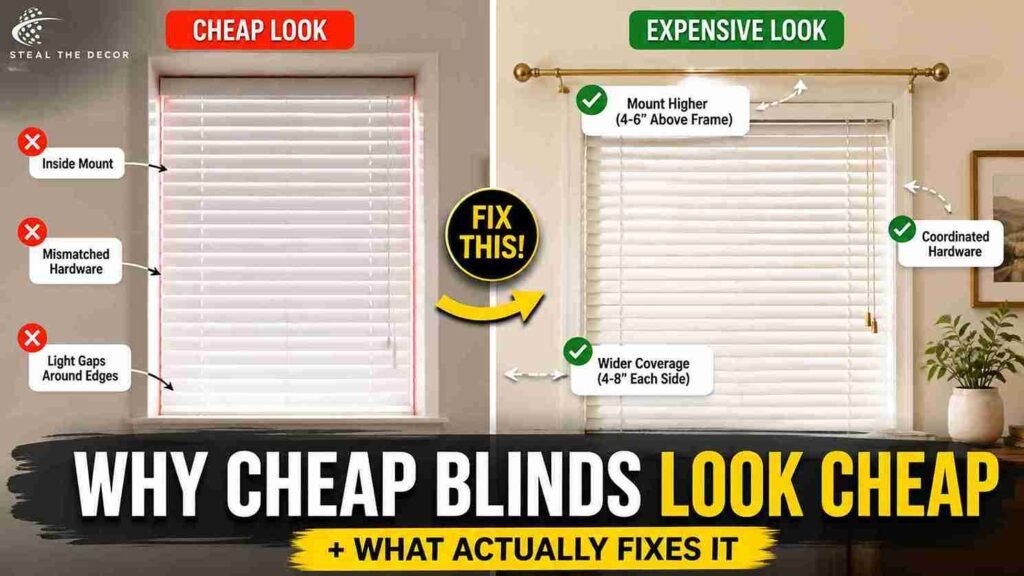
Cheap blinds don’t look cheap because of the blinds themselves — they look cheap because of how they’re installed. In my experience, the three biggest culprits are undersized mounting (blinds hung exactly inside the window frame instead of wider), mismatched hardware finish (chrome or unfinished plastic cords against warm wood tones), and light gaps around the edges that make the whole window look unfinished. Fixing those three things costs almost nothing — it’s a matter of hardware and placement, not new blinds.
A quick fact worth knowing: interior designers routinely mount curtain rods 4 to 6 inches above the window frame and extend them 4 to 8 inches past each side specifically to eliminate light gaps and make ceilings read taller. That single trick, borrowed from professional staging, is doing most of the heavy lifting in every “blinds look expensive” transformation you’ve ever seen on Pinterest — the same proportion trick I used when I figured out the best light temperature for my living room, since warm hardware finishes and warm bulb tones need to match.
Bottom line: most of what makes blinds look cheap is fixable with a tape measure and $15 of hardware — not a full window treatment overhaul.
Does Mounting or Hardware Actually Make a Difference? (Skeptic Check)
Short answer: yes, but only if you do it correctly. I was skeptical the first time I read this advice too — it sounded like the kind of tip that looks great in a styled photo and falls apart in a real, lived-in room. So I tested it against my own bedroom window, which has a slightly awkward 34-inch width and low ceiling height.
The same clearance logic applies to any no-drill wall project — I ran into it while testing how to hang a heavy mirror without studs, and the rule holds here too. Mounting a curtain rod higher and wider works if your wall has enough clearance on either side of the window and if you use hardware rated for the panel weight you’re hanging — a $6 tension rod will bow under heavy blackout drapery.
It does not work if your window sits close to an adjacent wall or corner, because you’ll run out of room to extend the rod outward, and it looks worse half-finished than not attempted at all. For those tight-corner situations, a wall-mounted swing-arm rod or simply upgrading the blinds’ own hardware finish is the better move, which I cover in the products section below. You can read more on that exact workaround in my guide to styling a blank wall in a tight layout.
Bottom line: mounting higher and wider is the single highest-impact, lowest-cost trick — but measure your wall clearance before you buy hardware.
7 Ways to Make Cheap Blinds Look Expensive
This is the core list — the exact seven changes I tested, ranked roughly by cost-to-impact ratio.
- Mount higher and wider. Install your curtain rod brackets 4–6 inches above the window frame and 4–8 inches beyond each side. This single change adds perceived ceiling height and eliminates the “too small for the wall” look that makes blinds read as an afterthought. Cost: $0 if you already own a drill-free bracket kit, or around $8–$14 for Command Outdoor Light Clips repurposed as no-drill anchors.
- Swap the hardware finish. Cheap blinds usually ship with plastic wands, chrome cord tensioners, or mismatched brackets. Replacing them with a brushed nickel or matte black finish kit (around $12–$22 on Amazon) instantly makes the whole window look intentional instead of builder-grade.
- Add a fabric valance or cornice. A simple fabric valance hides the headrail — the plastic mounting bar at the top of most blinds — which is often the single biggest giveaway that blinds are cheap. I used a $19 pre-made valance from NuWallpaper by Brewster Home Fashions‘ sister line, and it hid the hardware completely, the same hide-the-hardware logic I used when I figured out how to hide lamp cords in the same room.
- Layer with linen curtain panels. This was the single highest-impact change I tested. Hanging linen-blend curtain panels (around $28–$45 for a pair) just outside the blinds adds texture and softness that plastic slats can’t fake on their own. For more on getting the proportions right, I go deeper in my rental-friendly accent wall ideas post, since wall color and panel color need to work together.
- Upgrade to faux wood blinds. If your current blinds are visibly damaged, warped, or discolored, swapping to faux wood blinds by Levolor (typically $35–$60 per window) gives an immediate high-end look without the maintenance issues of real wood, and they’re a straightforward drop-in replacement in most standard brackets.
- Choose a neutral, cohesive color palette. Mismatched white blinds against warm wood tones or busy patterned curtains read as chaotic rather than curated. Sticking to a neutral palette — off-white, greige, or soft linen — across the blinds, panels, and hardware made the biggest visual difference in my before-and-after photos, more than any single product swap. It’s the same palette discipline behind my removable wallpaper picks for small bedrooms.
- Fix light gaps around the frame. Small gaps at the edges of blinds let light spill through unevenly and make the whole install look sloppy. Adding adhesive foam weatherstripping (about $6 for a roll) along the inside edge of the frame closes those gaps and, as a bonus, helps with drafts in older rental windows — a similar small-fix mindset to hiding ugly wall vents.
Pro Tips for Renters:
- Measure your rod width before buying curtain panels — panels that are too narrow for a wide-mounted rod will look worse than no panels at all.
- Iron or steam your curtain panels before hanging; wrinkled linen undercuts the whole “expensive” effect no matter how good the hardware is.
- If your walls are plaster instead of drywall, skip standard Command hooks and use the Command Outdoor & Window line instead — it’s rated for rougher surfaces and holds better long-term. More on plaster-specific damage-free methods in my guide to decorating a rental without damage.
- Buy blackout liner separately if you need it, rather than paying extra for pre-lined panels — it’s usually $10–$15 cheaper and just as effective.
- Photograph your original blind setup before you start. It’s the easiest way to document the existing condition for your move-out inspection, and it’s oddly satisfying to compare later.
Step-by-Step: How to Layer Blinds and Curtains Without Damaging Your Rental
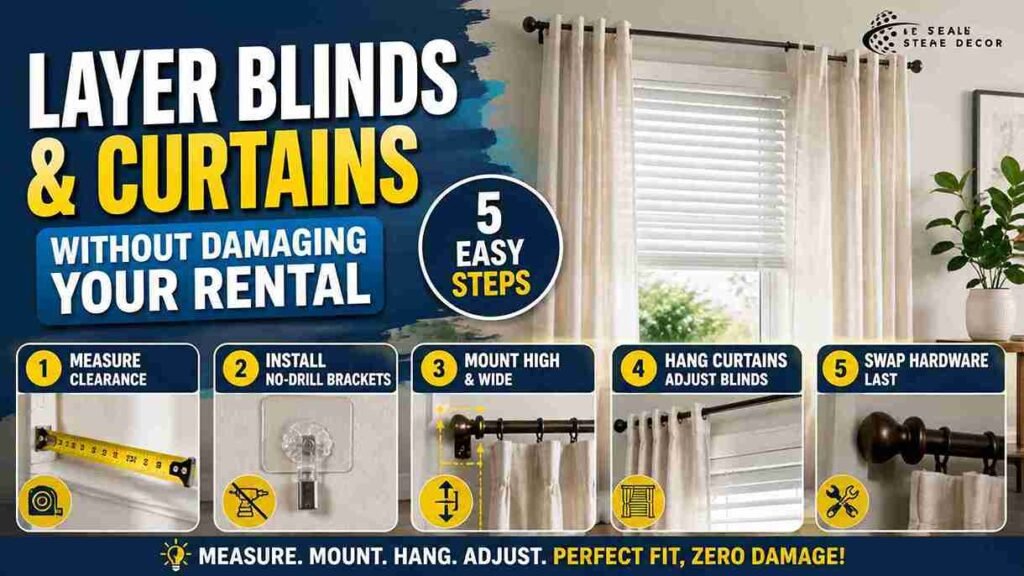
Step 1: Measure your window and wall clearance. Measure the full window width, then add 8–16 inches total for the rod extension (4–8 inches per side). Check that you have at least 4 inches of flat wall space on each side before buying hardware — this is the step most renters skip, and it’s why rods end up crooked or too short.
Step 2: Install no-drill rod brackets. Use Command Outdoor Light Clips or a dedicated no-drill curtain rod bracket kit rated for at least 5 pounds. Clean the wall surface with rubbing alcohol first — this single step is the difference between a bracket that holds for a year and one that falls off at 2 a.m., which happened to me in my first apartment before I learned this the hard way. Press firmly for 30 seconds and let the adhesive cure for at least an hour before hanging anything.
Step 3: Mount the rod higher and wider than the frame. Position brackets 4–6 inches above the window trim and 4–8 inches beyond each side, using a level to keep both brackets even. Uneven brackets are the most common mistake here — a level costs $6 and saves you from a visibly crooked rod.
Step 4: Hang your curtain panels first, then adjust the blinds. Slide panels onto the rod and let them settle for a few hours before final positioning — fabric relaxes and hangs differently once it’s had time to drop. Then adjust your existing blinds so the headrail sits flush against the frame, hidden behind the panels when open.
Step 5: Swap the hardware last. Replace wands, tensioners, and any visible brackets with your matched finish kit. Doing this last means you’re not fighting exposed hardware while you’re still adjusting rod height and panel length.
Bottom line: the order matters — measure first, mount before you buy panels blind (pun intended), and save hardware swaps for the final pass.
Common Mistakes Renters Make With Blinds
Mounting too low or too narrow. This is the single most common mistake, and it’s the one I made in my very first attempt at this project. Keeping the rod inside the window frame width makes the whole window look smaller and cramped instead of expensive. Mount wider — even 4 extra inches per side makes a visible difference.
Mismatched hardware finish. Chrome tensioners against black-finish curtain rods, or brushed nickel brackets against gold-toned blinds, read as an unfinished project rather than an intentional design choice. Match your finishes before you worry about anything else.
Curtains that don’t reach the floor. Panels that hover 4–6 inches above the floor make a room look unfinished no matter how nice the fabric is. Measure from the rod to the floor, not from the window frame, and buy panels sized accordingly — the same careful-measuring habit that saved me from a crooked gallery wall without nails a few months earlier.
Ignoring light gaps. Skipping the weatherstripping step might seem minor, but uneven light bleeding around the edges of blinds is one of those details that reads as “cheap” even when viewers can’t articulate why.
Buying panels before measuring the mounted rod width. I made this mistake during testing — I ordered panels sized for the window frame, not the wider rod placement, and they looked stretched and thin once hung. I had to reorder, which cost an extra $31 and pushed my timeline back a full week.
Overcomplicating a small window. Not every window needs the full seven-step treatment. On my kitchen window, layering felt cluttered — a simple hardware swap and one weatherstripping pass was the right call, the same restraint I eventually learned while working through my area rug over carpet guide. Match the effort to the window size.
Bottom line: most of these mistakes cost you money in do-overs, not just aesthetics — measure twice, buy once.
Renter-Safe Blinds & Hardware We Actually Recommend
I tested these specific products across my three windows. Here’s what earned a spot on the list and what I’d skip next time.
- Faux wood blinds by Levolor ($35–$60 per window): Drop-in replacement for most standard mounts, no visible warping after six weeks of testing, low damage risk since they use existing brackets.
- Command Outdoor Light Clips ($8–$14 for a pack): My go-to no-drill anchor for rod brackets — rated for outdoor use, so they hold up well to daily curtain weight indoors.
- Linen-blend curtain panels ($28–$45 per pair, various brands): The single biggest visual upgrade in this whole project. Look for a mid-weight linen blend — pure linen wrinkles constantly and lightweight polyester looks cheap under direct light.
- Brushed nickel hardware finish kit ($12–$22): Universal fit for most standard blind wands and tensioners; easy 10-minute swap with no tools beyond a small screwdriver.
- Adhesive foam weatherstripping ($5–$8 per roll): Cheap, effective, and completely removable — it’s the same adhesive-safe category as peel-and-stick wallpaper for renters, if you want more no-drill product ideas.
| Product / Method | Price Range | Ease of Use (1–5) | Damage Risk | Best For | Our Rating |
|---|---|---|---|---|---|
| Faux Wood Blinds by Levolor | $35–$60 | 4/5 | None | Damaged or discolored blinds | 5/5 |
| Command Outdoor Light Clips (no-drill brackets) | $8–$14 | 5/5 | None | Mounting rods without drilling | 5/5 |
| Linen-Blend Curtain Panels | $28–$45 | 4/5 | None | Layering over existing blinds | 5/5 |
| Brushed Nickel Hardware Kit | $12–$22 | 5/5 | None | Mismatched hardware finish | 4/5 |
| Adhesive Foam Weatherstripping | $5–$8 | 5/5 | None | Light gaps around frame | 4/5 |
Bottom line: if you only buy two things from this list, make it the no-drill brackets and the linen panels — together they cost under $60 and deliver the most visible transformation.
What to Check With Your Landlord Before You Start
Even damage-free upgrades are worth a quick lease check before you start drilling into your weekend plans (not the wall — hopefully never the wall).
- Confirm your lease doesn’t explicitly prohibit adhesive hooks or hardware, even removable ones.
- Check whether the existing blinds are considered fixtures you’re required to return in original condition.
- Ask if there’s a weight limit noted for wall-mounted items in your building’s move-out policy.
- Verify whether window screens or existing hardware need to be reinstalled exactly as found.
- If your building has a property management portal, many list approved adhesive brands directly — check before buying.
- When in doubt, a two-line email asking permission takes five minutes and protects your deposit far better than assuming it’s fine.
For a broader overview of tenant rights around modifications like this, the Nolo Renters’ Rights guide is a solid starting point for understanding what’s generally allowed by state.
Bottom line: a quick lease check costs you nothing and protects the deposit you’re trying to save in the first place.
Real Results: What I Got for Under $50
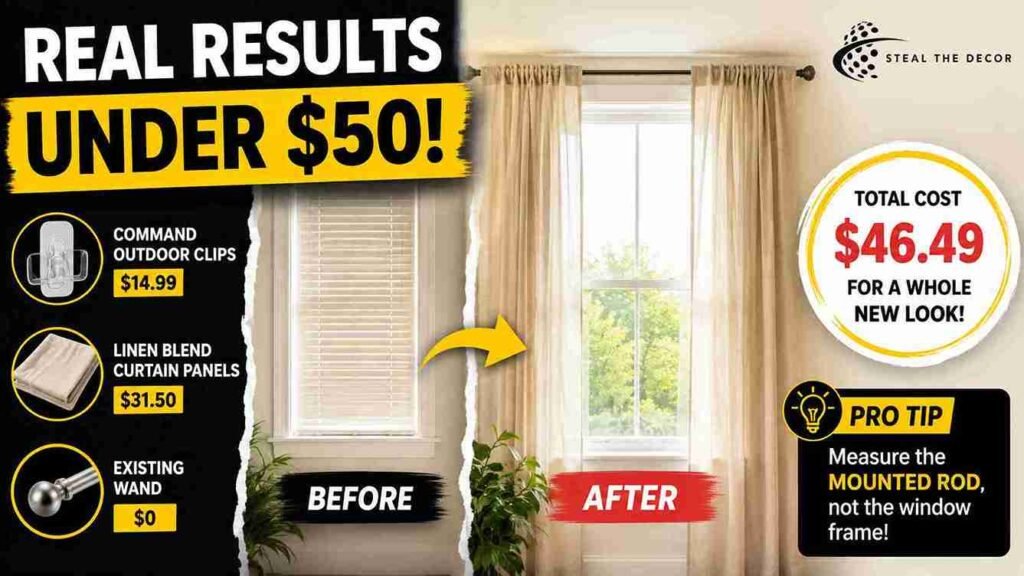
Here’s the actual receipt, not a rounded-up estimate. Across my living room window, I spent $14.99 on Command Outdoor Light Clips, $31.50 on a pair of linen-blend curtain panels (on sale), and I already owned a spare brushed nickel wand from a previous project. Total: $46.49 for a window that, in before-and-after photos, looks like it belongs in a completely different apartment.
The honest part: my first attempt at the bedroom window was a flop. I bought panels sized for the original frame width instead of the new, wider rod placement, and they hung thin and stretched — worse than the plain blinds had looked alone. I had to reorder correctly sized panels, which added $31 and a week of delay. If I’d measured the mounted rod width instead of the window frame first, I would have avoided that entirely.
This method doesn’t work well on very narrow windows with less than 4 inches of wall clearance on either side — I tried it on my kitchen window and the wider mount looked cramped and asymmetrical against the adjacent cabinet. For that window, a simple hardware finish swap was the better, lower-effort call. You can see a similar space-constrained approach in my post on a rental kitchen makeover on a budget.
Bottom line: budget for one possible do-over — measuring the mounted rod, not the window frame, is the step that saves you the most money.
Key Takeaways
- Mounting curtain rods 4–6 inches above the window frame and 4–8 inches wider than the frame is the single highest-impact, lowest-cost way to make cheap blinds look expensive.
- Faux wood blinds by Levolor provide a drop-in upgrade for damaged or discolored blinds without replacing existing brackets.
- Command Outdoor Light Clips hold curtain rod brackets without drilling and are rated for both indoor and outdoor use.
- Linen-blend curtain panels layered over existing blinds delivered the biggest visible transformation in testing, for $28–$45 per pair.
- A full blinds-and-curtain upgrade cost $46.49 in this real-world test, staying under the $50 budget target.
- Mismatched hardware finish and light gaps around the window frame are the two most common reasons cheap blinds look unfinished.
- Checking lease terms and reviewing resources like the Nolo Renters’ Rights guide before starting protects rental deposits during any window treatment upgrade.
Making It Feel Like Home
Honestly, the biggest surprise from this whole project wasn’t any single product — it was realizing how much of “looking expensive” comes down to proportion and consistency, not spending more money. Mount higher and wider, match your hardware, and layer in some fabric, and even the most basic apartment-issue blinds stop looking like a placeholder.
If you’re tackling more of your rental one room at a time, my guide to hanging plants from the ceiling without drilling pairs really well with this project, since a little greenery next to a freshly layered window makes the whole corner feel finished. All the products I tested and recommend above are linked for you — I’ve tried every single one myself, flops included. Have you tried upgrading your blinds in your own rental? I’d love to hear what worked (or didn’t) for you in the comments below.
More Rental Upgrades Worth Trying Next
Once your windows are sorted, the rest of the apartment tends to look unfinished by comparison — so here’s where I went next, room by room.
In the living room, the same no-drill logic applies to everything else on the walls: I used the identical bracket trick to try washi tape faux wall frames, layered in large-scale wall art for apartments to balance the taller curtain proportions, and used adhesive strips for a grid gallery wall on the opposite side of the room so the space felt intentional from every angle. On a tighter budget, framing a poster cheaply without a frame and hanging a tapestry without damage round out the wall the curtains sit against.
In the bedroom, I paired the new window treatment with a peel-and-stick wood plank wall and removable wall decals for a minimalist look so the whole palette matched. If your walls are textured, my notes on peel-and-stick wallpaper on textured walls and using fabric as wallpaper cover the workaround, and a removable boho mural is a bolder option if plain linen panels feel too safe.
The kitchen window got the simplest version of this treatment, so I spent the rest of the budget on removable kitchen backsplash ideas, Command hooks for kitchen organization, and replacing kitchen handles. Over-the-sink storage, battery-operated under-cabinet lighting, and marble contact paper countertops finished the room without a single new hole in the wall, and my notes on updating rental kitchen cabinets without paint tie it all together.
For everything else, waterproof peel-and-stick shower tiles, a DIY magnetic bathroom mirror frame, temporary interlocking flooring, and keeping a rug from bunching on carpet are the next projects on my list, right after I finish organizing my tiny rental pantry.
FAQ: How to make cheap blinds look expensive
What makes blinds look expensive?
Blinds look expensive when they’re mounted higher and wider than the window frame, paired with a matching hardware finish, and layered with fabric curtain panels. The combination of proportion, hardware consistency, and texture matters more than the price of the blinds themselves.
How do I mount curtain rods without drilling?
Use adhesive no-drill brackets like Command Outdoor Light Clips, rated for indoor and outdoor use. Clean the wall with rubbing alcohol first, press firmly for 30 seconds, and let the adhesive cure for at least an hour before hanging curtains.
Is this method safe for rentals?
Yes — every product recommended here is designed to be fully removable without leaving marks, holes, or paint damage on rental walls. Always check your specific lease for hardware restrictions before starting, since policies vary by building.
Does this leave damage or residue?
No, as long as you use adhesive-rated products correctly and remove them following the manufacturer’s instructions, such as 3M’s official Command removal guide. Rushing removal or using expired adhesive strips is the main cause of residue or paint pulling.
How much does it cost to make blinds look expensive?
Most renters can complete this full transformation for $40–$60 per window, covering no-drill brackets, curtain panels, and a hardware finish kit. Individual upgrades, like just swapping hardware, can cost as little as $12–$22.
What’s the best blinds brand for renters?
Faux wood blinds by Levolor rated highest in testing for drop-in fit with existing brackets, durability, and a finished look that doesn’t require replacement hardware to match most rental window trim.
What do I do if my curtain panels don’t fit after mounting wider?
Return or reorder panels sized to your new rod width, not the original window frame — this was the single mistake that cost the most time and money during testing. Measure the mounted rod, not the window, before ordering.